Power Up the Machine
| Model | [•] AON M2+ (CE) | [•] AON M2+ (R-NZ) | [•] AON M2+ | [•] AON-M2 2020 | [•] AON-M2 |
| Category | [•] Installation | [ ] Operation | [ ] Maintenance |
Summary
The procedure that follows gives instructions on how to power ON the AON3D machine.
Estimated time: 15 minutes
Tools
None required.
Parts Information
None required.
Personal Protective Equipment
| Qty | Description | Minimum Specification |
|---|---|---|
| 1 | Safety Eyewear | ANSI/ISEA Z87.1 |
Install Power Cords and Power-Up the Machine
AON M2+ (CE) Model
- Connect power to the machine from the local supply disconnecting device. Refer to the Power Requirements page.
- Turn the machine main power ON at the ON/OFF switch (4) found on the rear panel.
- Release the E-stop button.
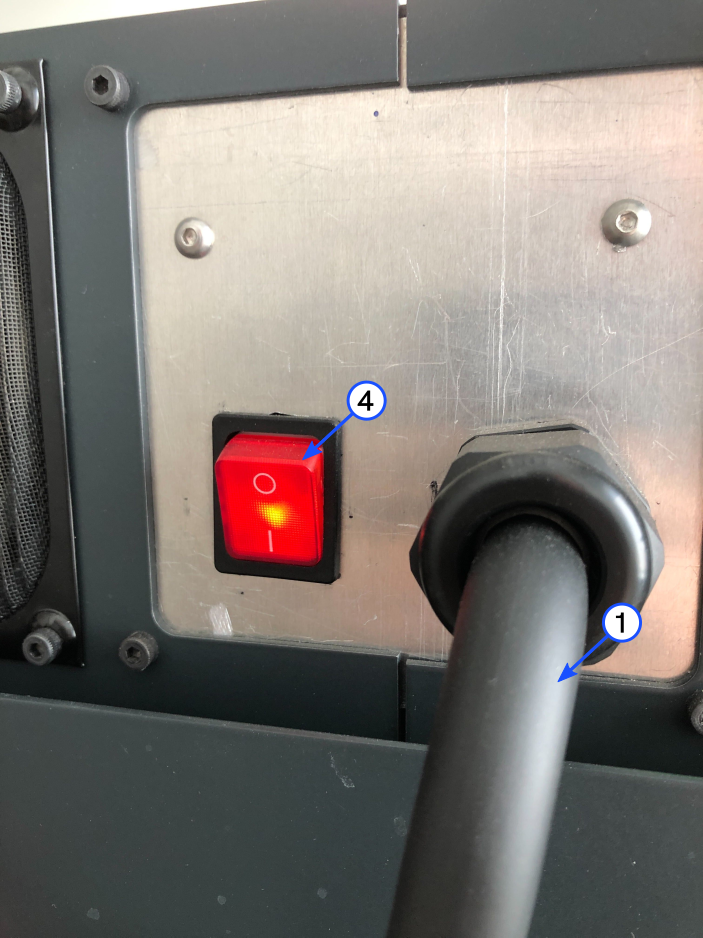
AON M2+ (R-NZ) Model
- Install the 220V AC power cord (1) into a L6-30R receptacle.
- Turn the machine main power ON at the ON/OFF switch (4) found on the rear panel.
- Release the E-stop button.
AON M2+ Model

- Install the 220V AC power cord into the electrical power inlet (1) found at the rear panel of the main electrical enclosure (1), and the other end of the power cord into a L6-20R receptacle.
An IEC-320-C19 to IEC 332P6 Power Cord is supplied with machines shipped to Europe.
- Install the 120V AC power cord into the electrical power inlet (2) found at the rear panel of the vacuum circuit electrical enclosure (2), and the other end of the power cord into a 120V AC wall receptacle.
- Turn the machine main power ON at the ON/OFF switch (4) found on the rear panel.
When the switch is set to the ON position, the right-hand side of the switch in pressed in.
- Turn the vacuum circuit power ON at the ON/OFF switch (5) found on the rear panel of the machine.
- Release the E-stop button.
AON-M2 2020 and AON-M2 Models
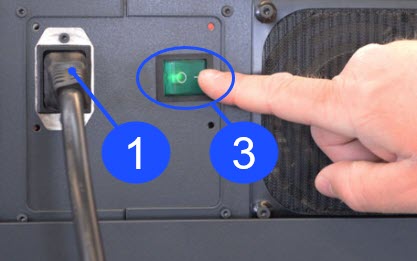
- Install the 220V AC power cord into the electrical power inlet (1) found at the rear panel of the main electrical enclosure (1), and the other end of the power cord into a L6-20R receptacle.
An IEC-320-C19 to IEC 332P6 Power Cord is supplied with machines shipped to Europe.
- Turn the machine main power ON at the ON/OFF switch (3) found on the rear panel of the machine.
- Release the E-stop button.
Checklist
- Is the machine powered ON?
- Is the vacuum circuit powered ON (AON M2+)?
- Do the three radiator fans run?
- Do the four electrical enclosure fans run?
- Are the build chamber lights powered ON?
- Is the Graphical User Interface (GUI) powered ON and loaded with the AON3D logo?
- Put a piece of 1.75 mm filament into the two filament detectors:
- Does the LED light illuminate green when the filament is installed?
- Does the LED light shut OFF when the filament is removed?
Reach out to our Customer Success team at help@aon3d.com if there are any questions in regards to the installation procedure.