Network Connection
| Model | [•] AON M2+ (CE) | [•] AON M2+ (R-NZ) | [•] AON M2+ | [•] AON-M2 2020 | [•] AON-M2 |
| Category | [•] Installation | [ ] Operation | [ ] Maintenance |
- AON3D machines requires a network connection with a computer/workstation to operate the machine (transfer files and print).
- An internet network connection is not mandatory.
The AON3D machine receives automatic updates when connected to an internet network. Updates are released regularly, with goals to improve print quality, machine usability, and overall stability of the machine. If the machine does not have access to the internet, AON3D offers a service to receive offline updates. This service is free of charge for all Success Plan customers. Reach out to our Customer Success team at help@aon3d.com for details.
There are three methods to connect the AON3D machine to a network:
- Wired: A cable that is installed into the Ethernet port found on the rear panel of the machine. When a wired connection is in use, the network should have a DHCP server to assign an IP address to the machine. An IP address can also be set manually for a wired connection. Refer to Wired Connection.
- Wireless: Built-in WiFi capability. When a wireless connection is in use, the network must have a DHCP server to assign an IP address to the machine. Refer to Wireless Connection.
- Local wired: A cable that is installed into the Ethernet port found on the rear panel of the machine and a computer. When a local wired connection is used, it is necessary to set an IP address manually on the computer and the machine. Refer to Local Wired Connection.
AON3D recommends the AON3D machine be connected to a network through a wired connection:
- A wired connection is more reliable than a wireless connection.
- A wired connection lets the AON3D technicians remote troubleshoot without the risk of a weak wireless internet connection.
All locations have different network configurations. The instructions that follow can not be specified to all installation procedures. Speak with your network administrator for additional clarification, if necessary.
The AON3D machine has no exposed ports outside of your Local Area Network (LAN) and all updates and troubleshooting support is conducted through a secured VPN. For more information in regards to the technical security details, reach out to AON3D’s Customer Success team at help@aon3d.com.
On initial power-up of the AON3D machine:
- Rename the machine.
- The control software is in the default factory state. As the software versions are released, the AON3D machine would benefit from these updates. To update the software, connect the machine to internet network. Once connected, the AON3D machine downloads any available updates. Refer to Software Update.
The sections that follow provide details on how to set-up the network for the AON3D machine:
- Wired Connection
- Wireless Connection
- Local Wired Connection
- Machine Name and Control Interface
- Client Authorization
- Advanced Networking Information
Wired Connection
To connect the machine to a wired connection, install a Ethernet cable into the Ethernet port found at the rear panel of the machine.
The Graphical User Interface (GUI) displays question-mark icons. These icons can be selected to get additional information about the associated setting.

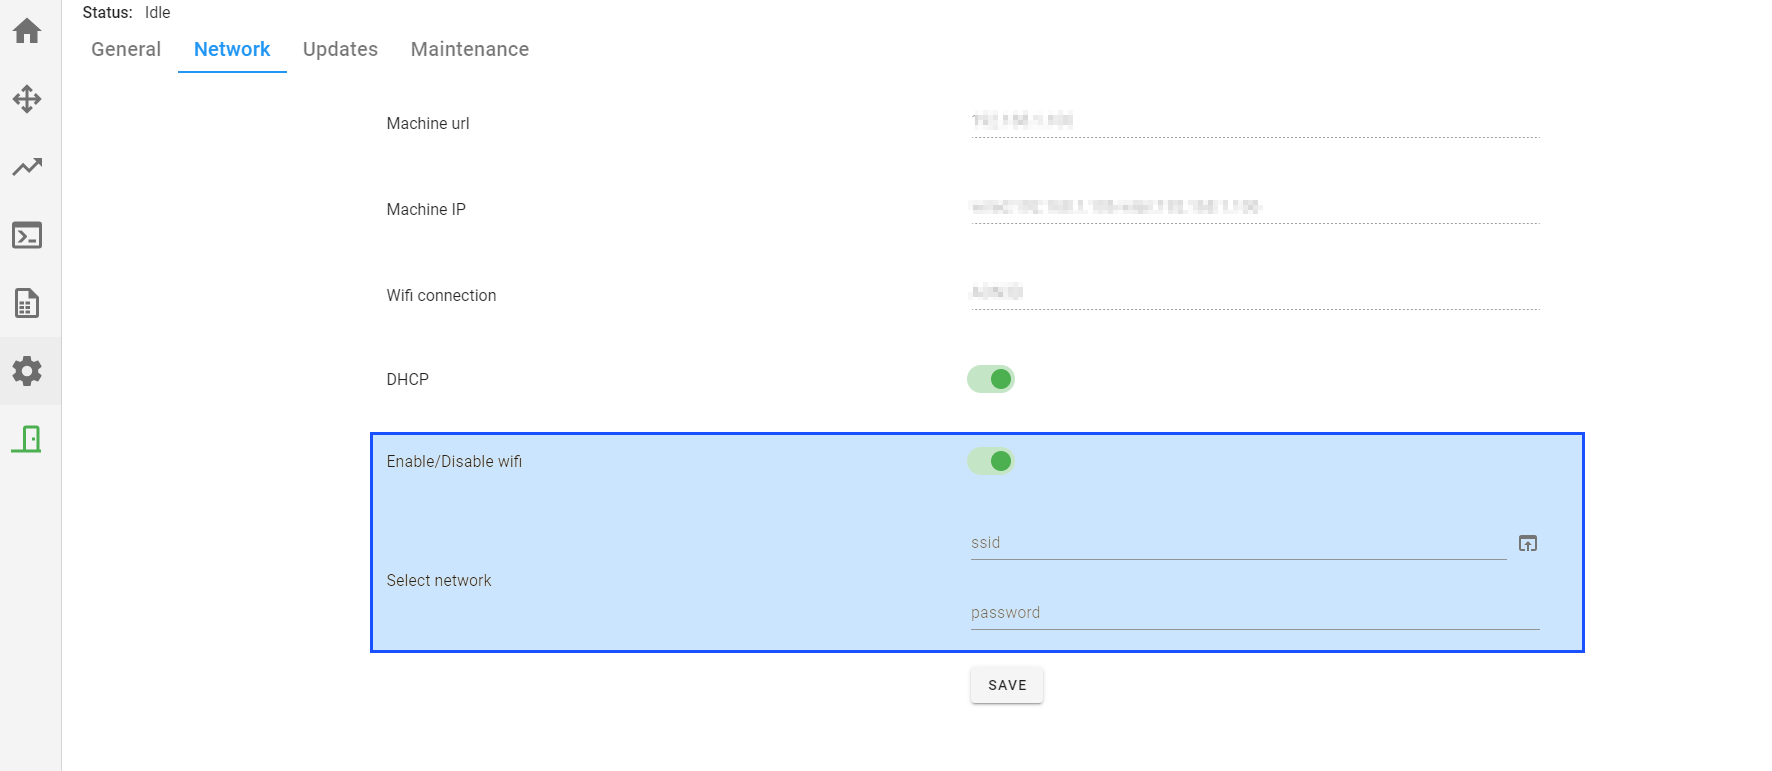
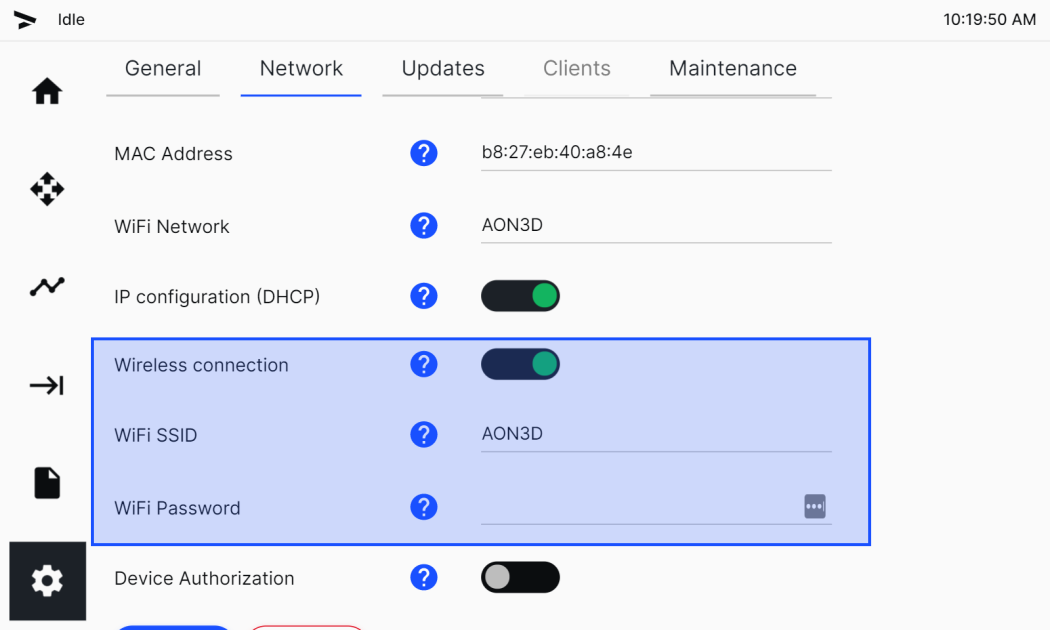
Wireless Connection
The AON3D machine only connects to 2.4 GHz WiFi networks that use WPA or WPA2 security and require a password. At this point in time, the AON3D machine does not support 5 GHz WiFi networks.
To connect using a wireless connection:
- Select Settings > Network.
- Select the Wireless connection to enable.
- When the feature is ON, the toggle is green.
- When the feature is OFF, the toggle is gray.
- Select the input box for WiFi SSID. Input in the correct name of the wireless network, then select Enter submit.
- Select the WiFi Password. Input the correct WiFi password, then select then select Enter to submit.
- Once the SSID and password have been correctly entered, select Save at bottom of the GUI.
To protect private data to connected clients, all future visits to the network settings page will not display the WiFi password.

Local Wired Connection
To connect a computer to the machine and get access to the GUI, do the steps that follow:
- Connect the Ethernet cable to the port on the rear panel of the machine.
- Connect the other end of the Ethernet cable to the computer.
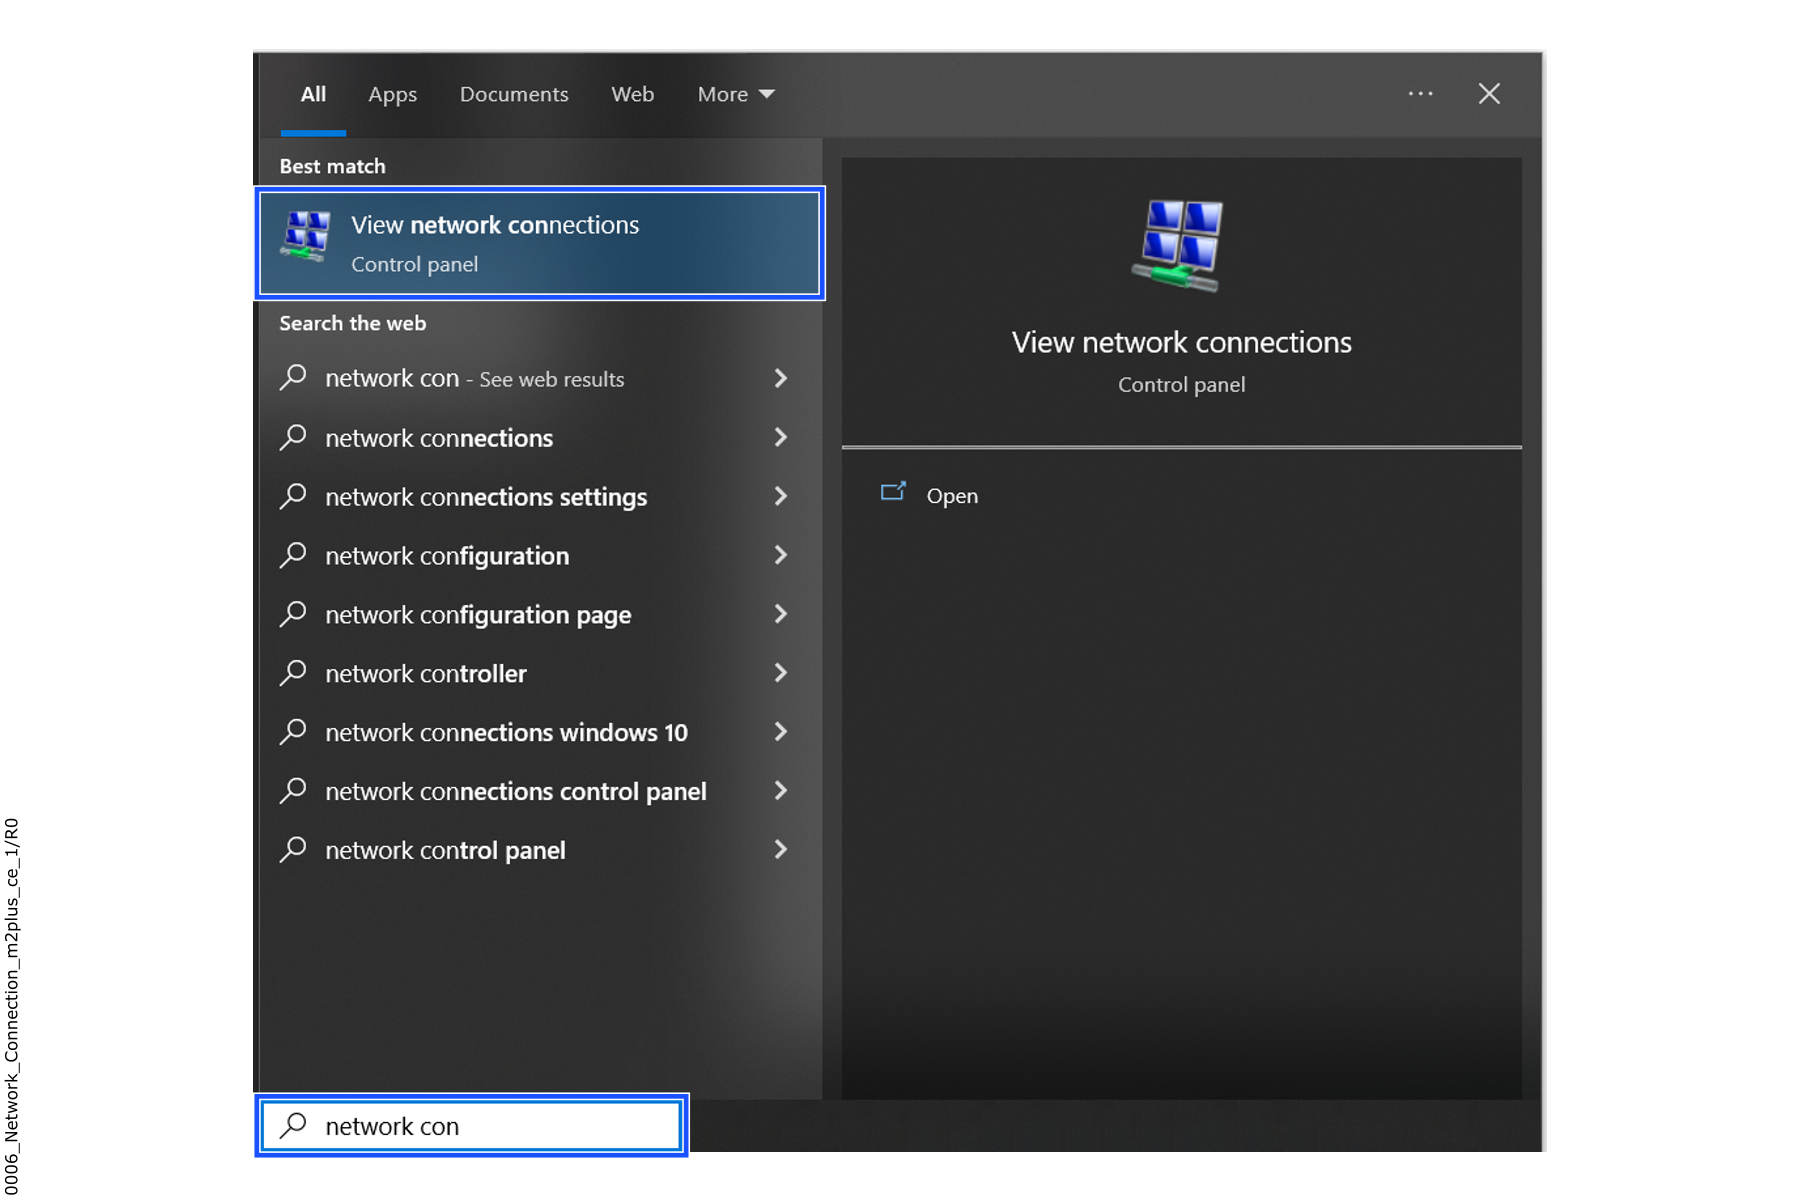
- In the search bar of the computer, type Network connections and click on
View network connections.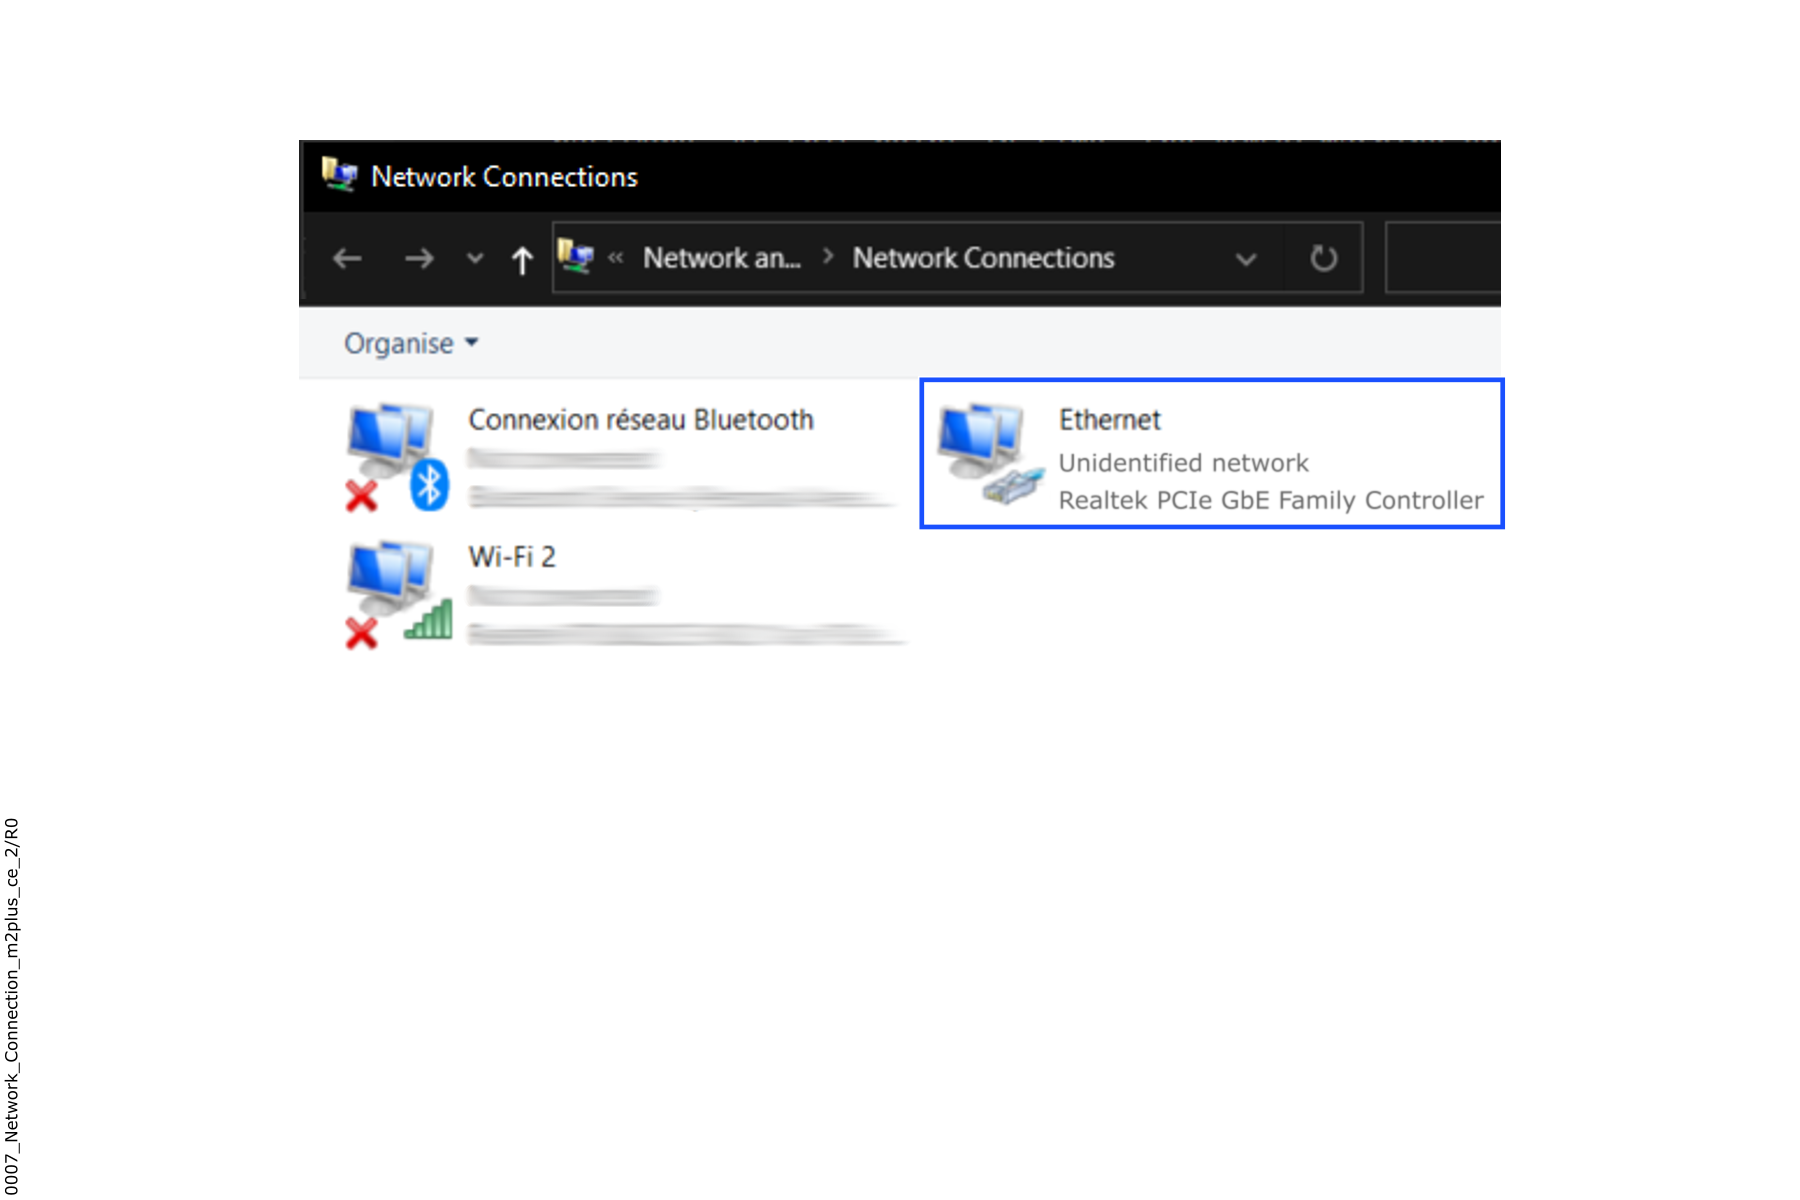
- Right click on the
Ethernetconnection.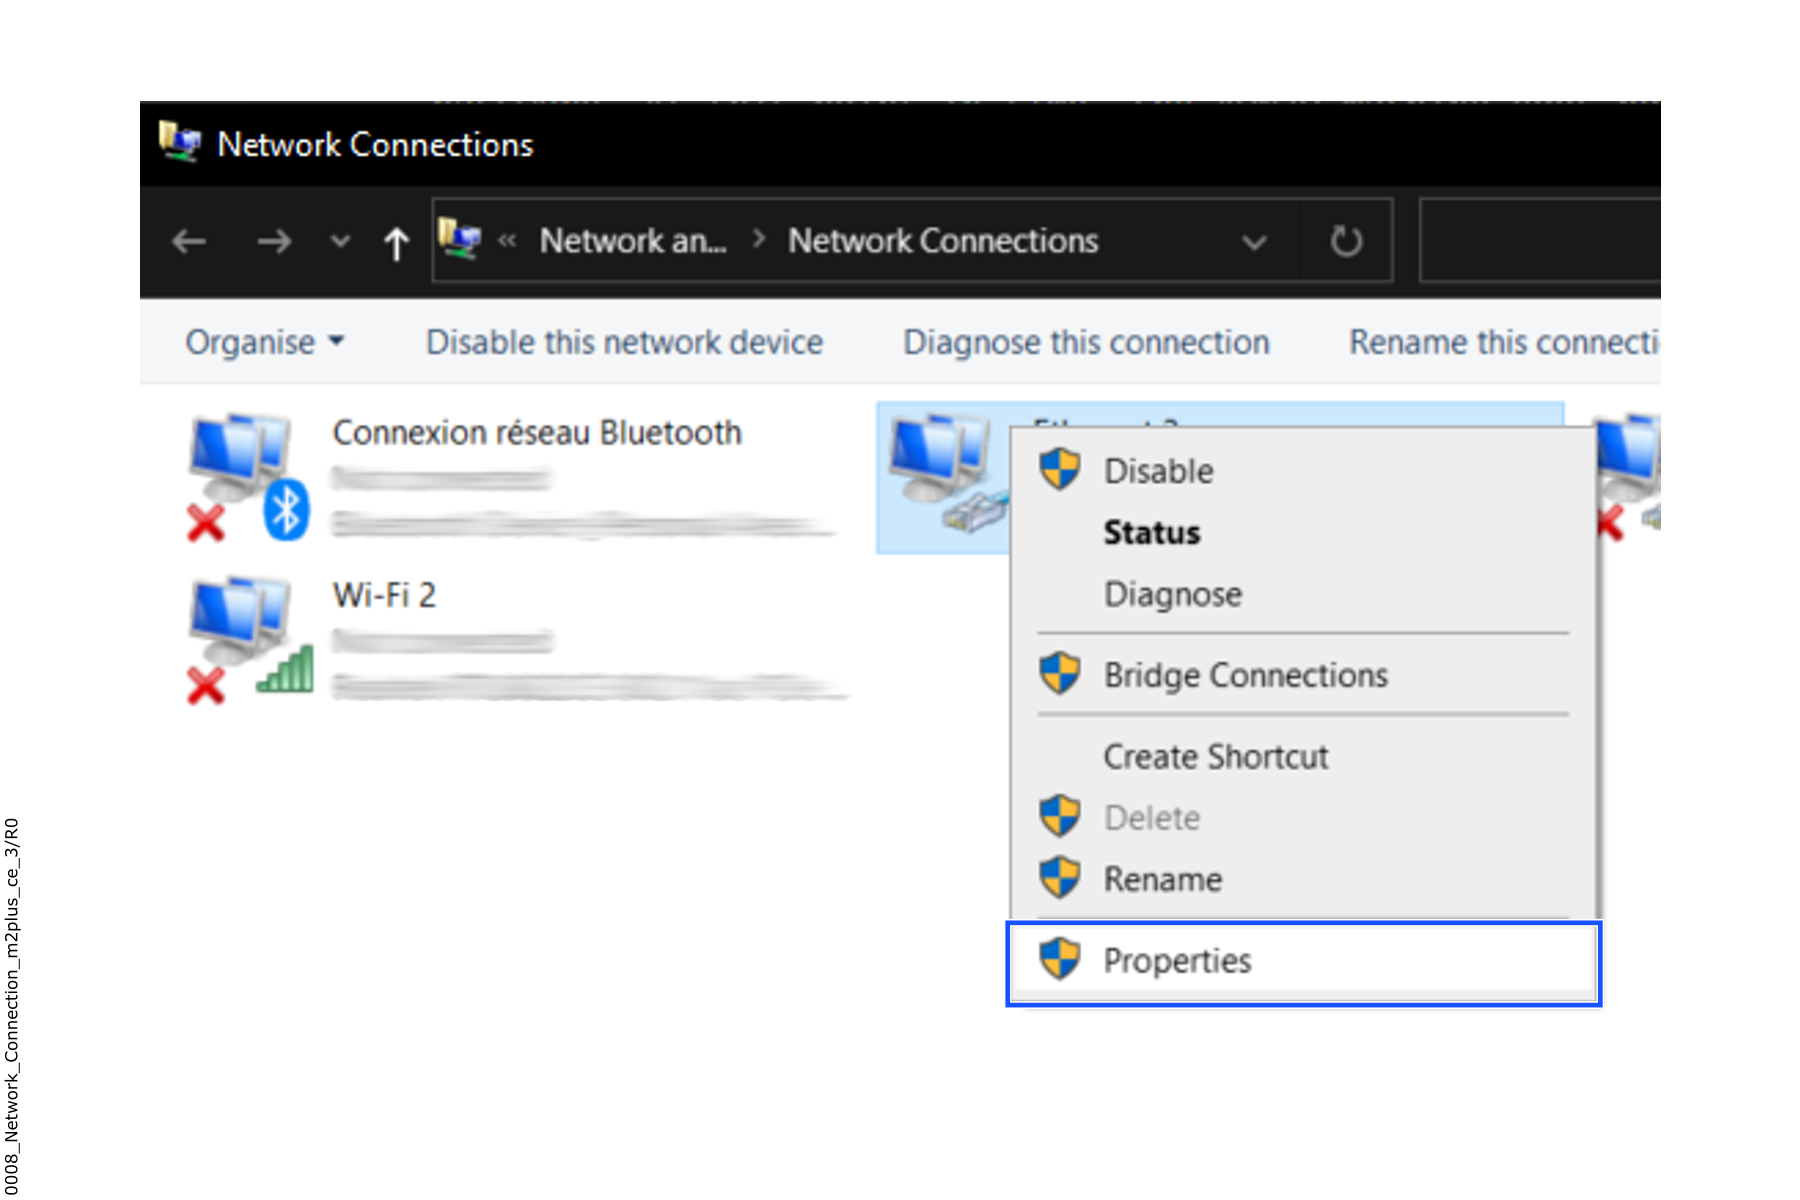
- Click on
Properties.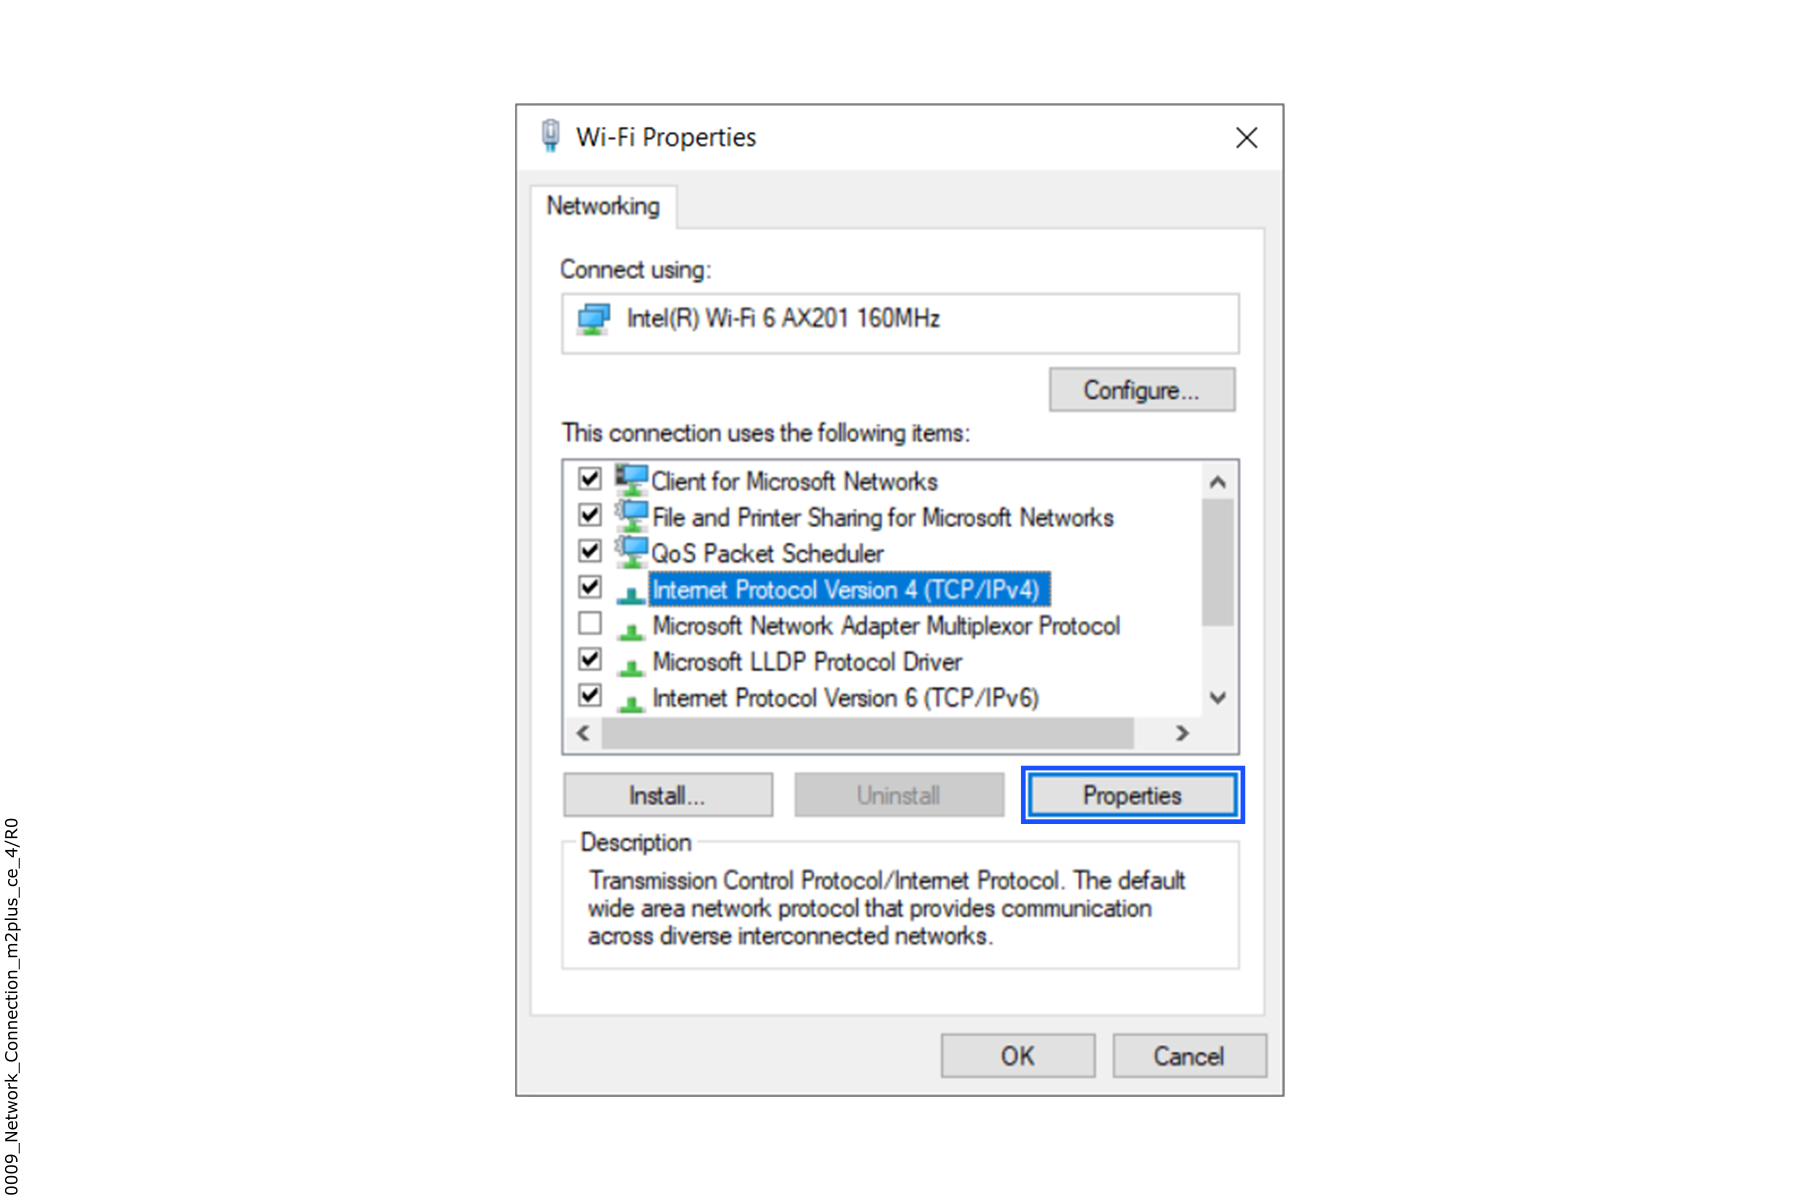
- Find and click on
Internet Protocol Version 4 (TCP/IPv4). - Click on
Properties.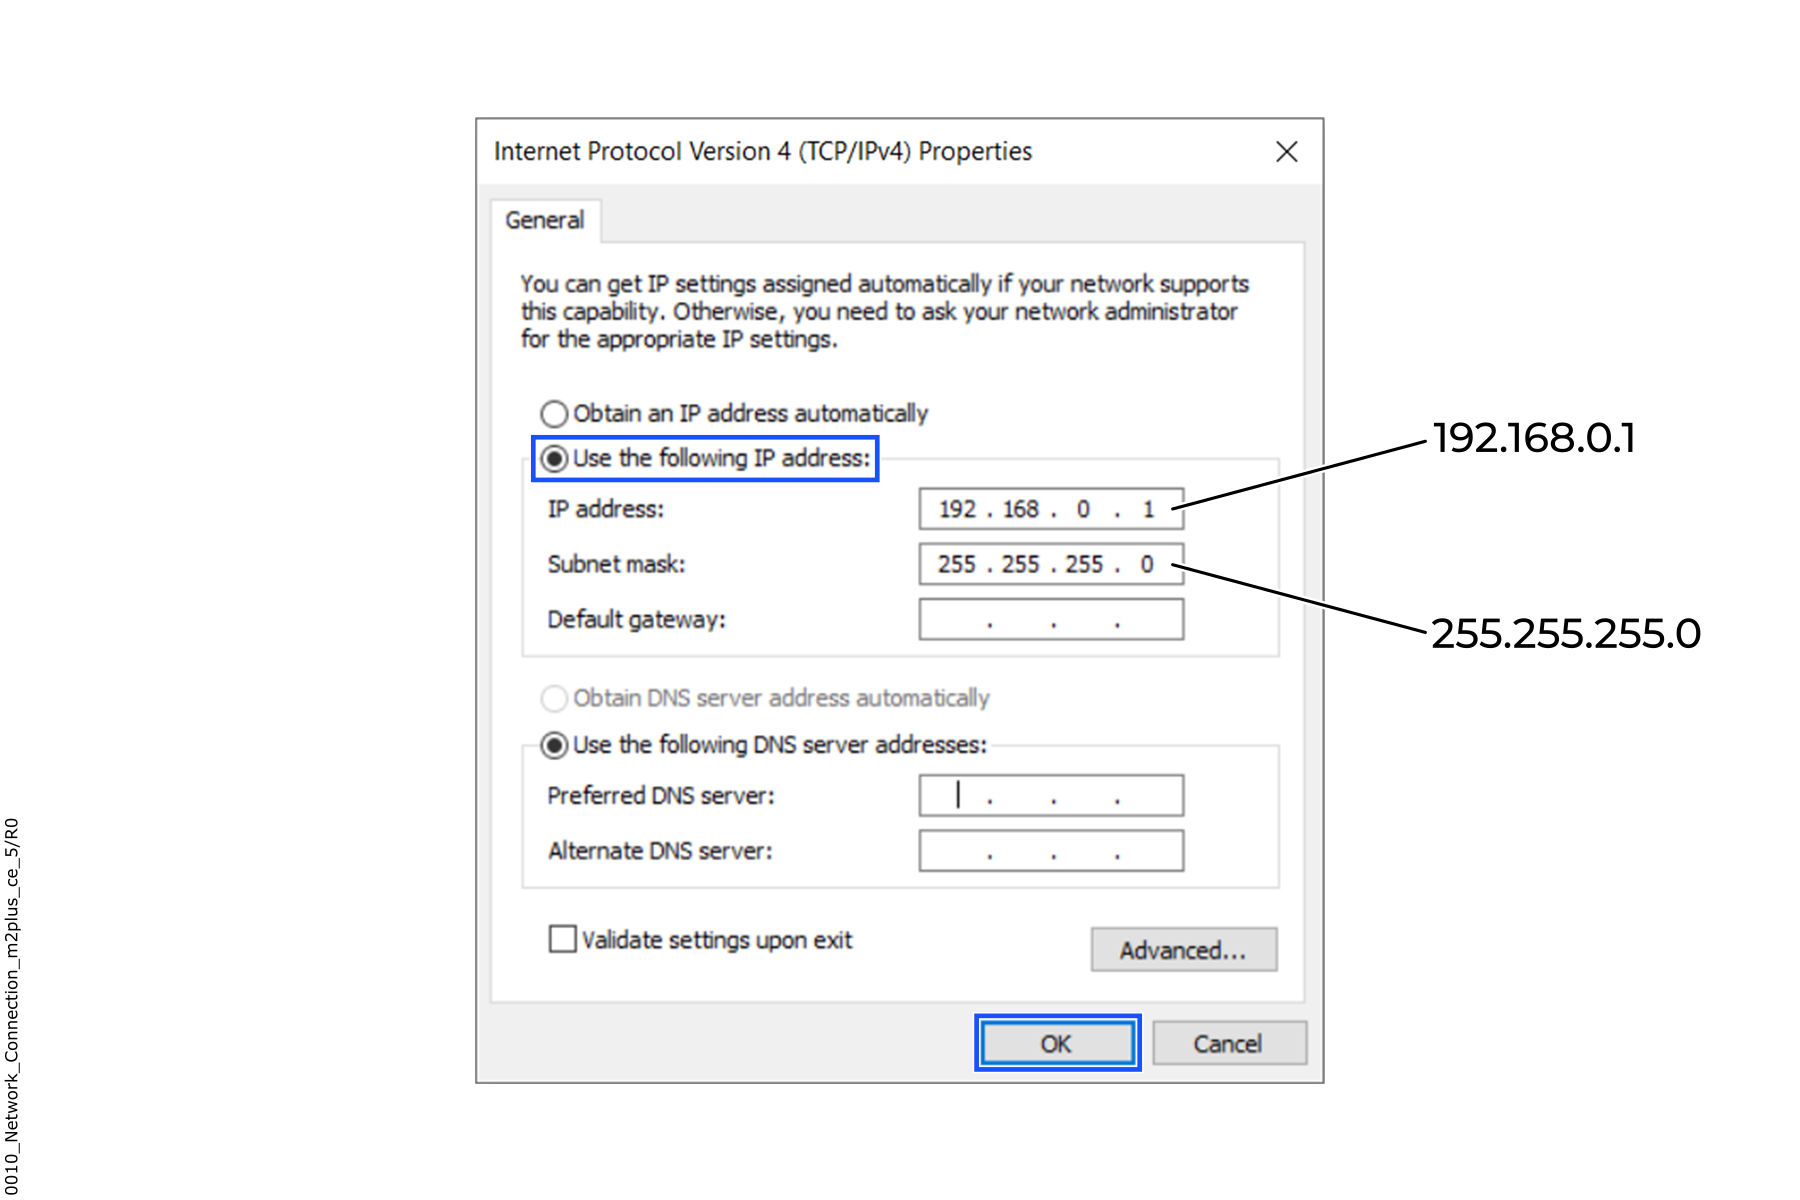
- Select
Use the following IP address:. - Enter 192.168.0.1 in the
IP address:field. - Enter 255.255.255.0 in the
Subnet mask:field. - Click on
OK.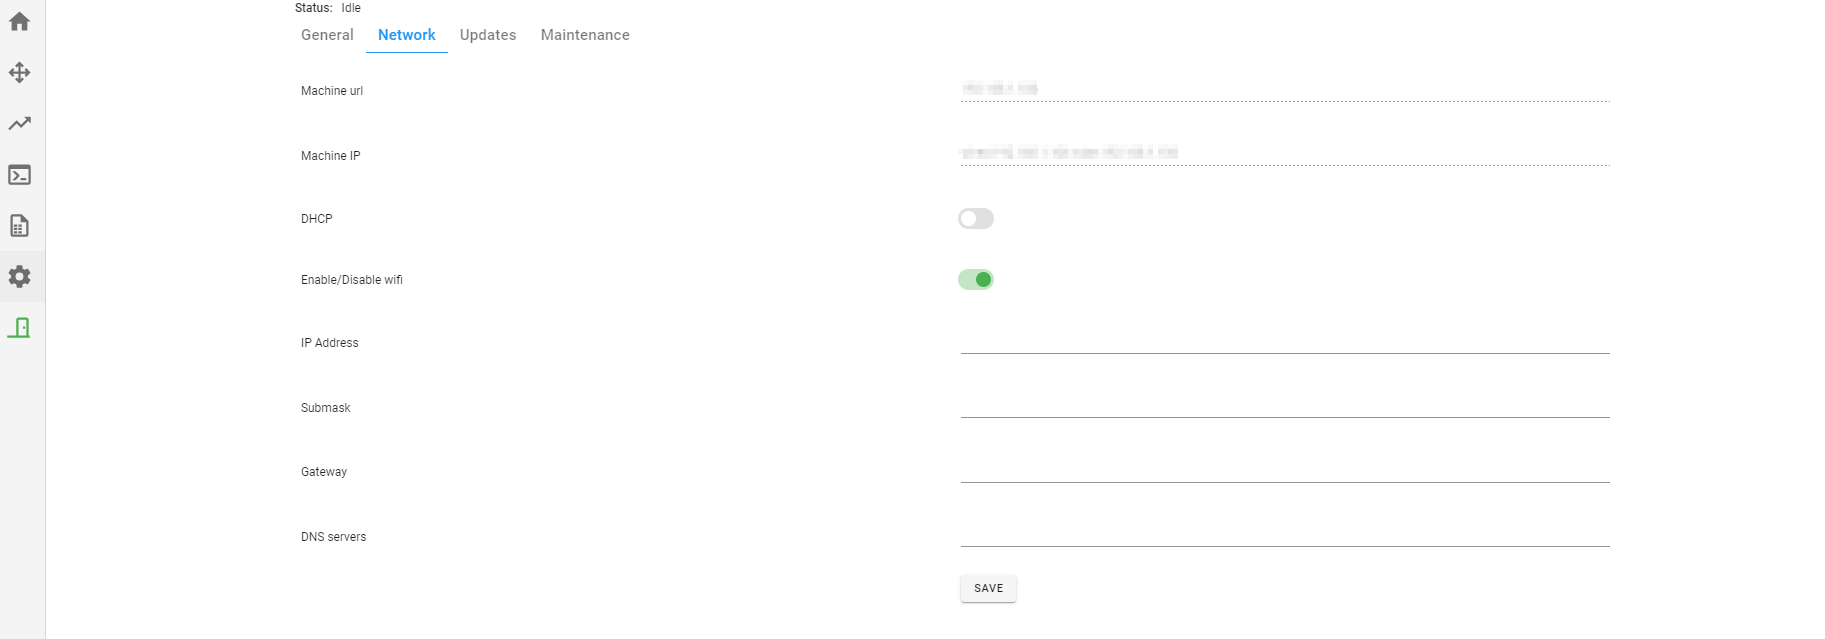
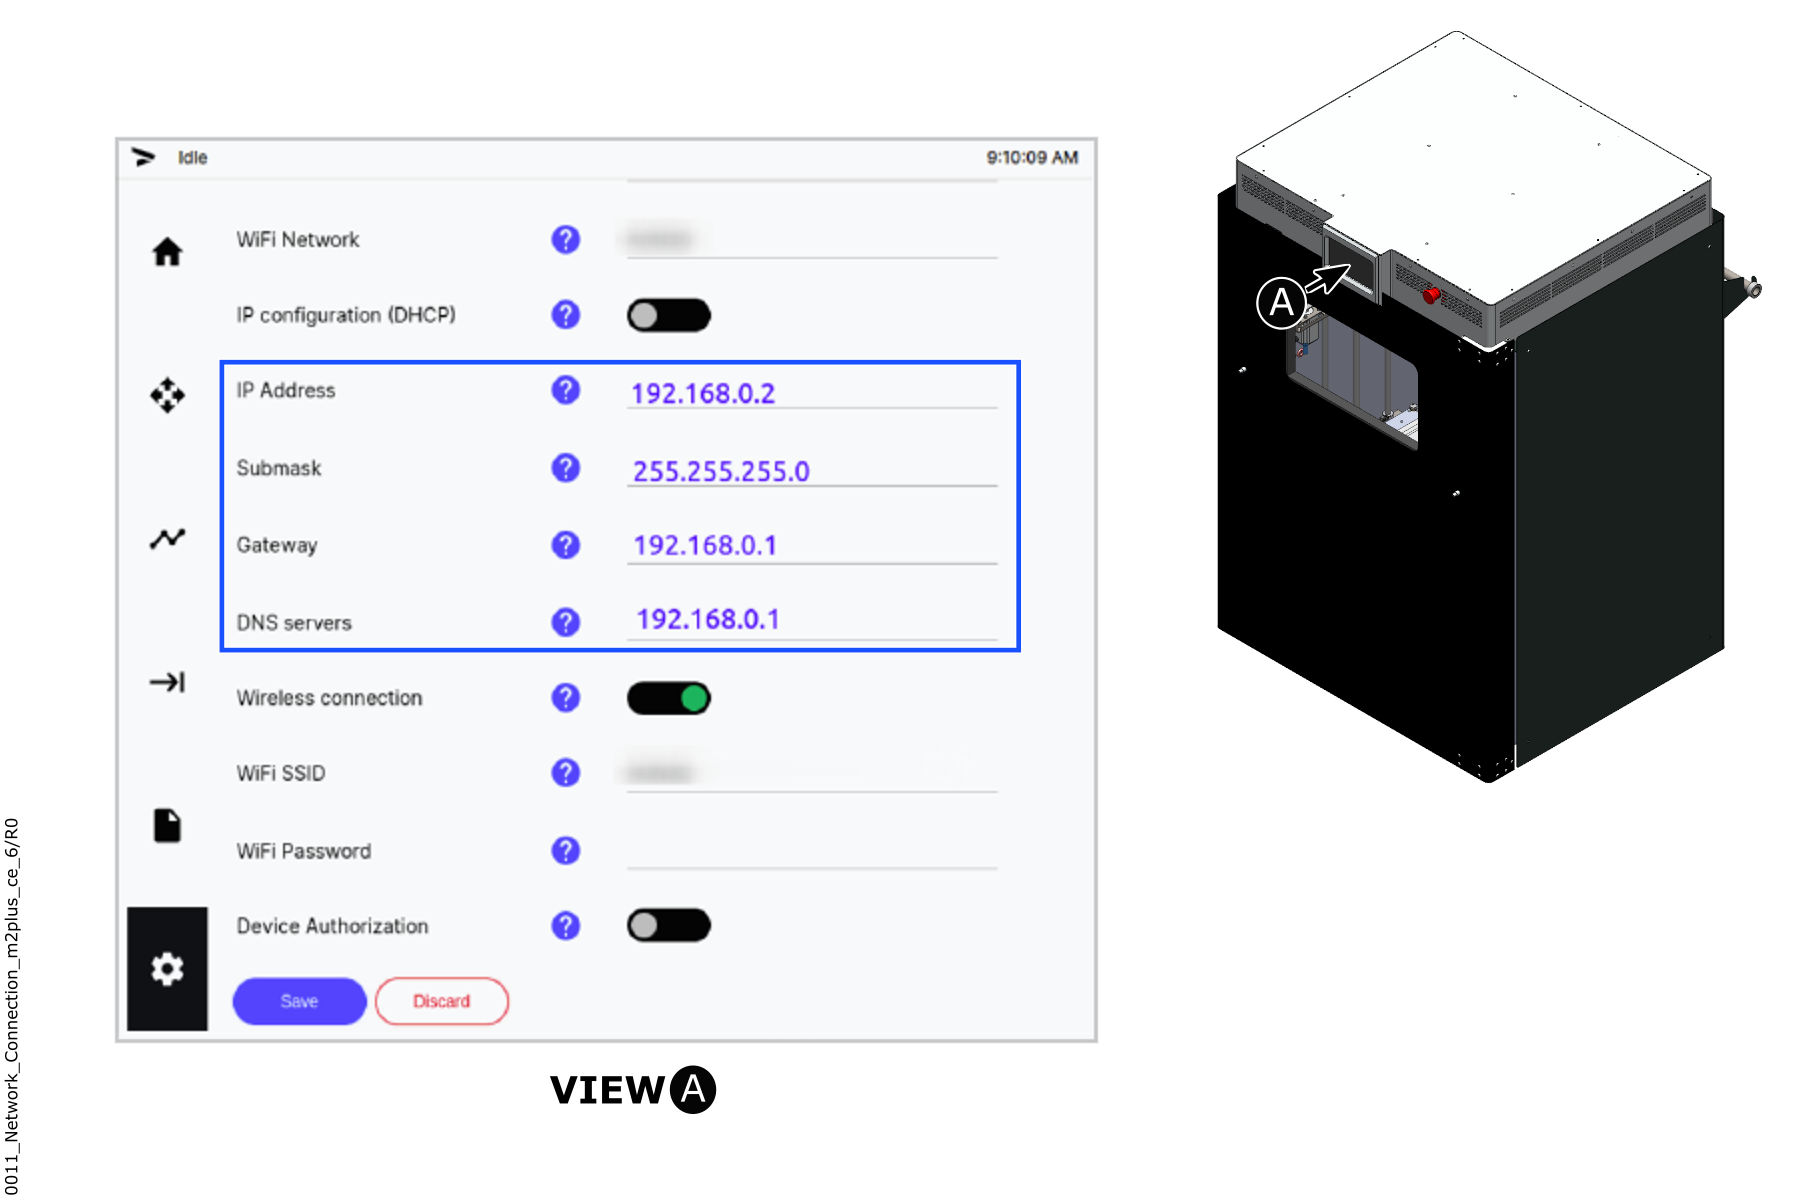
- On the machine GUI, go to Settings > Network.
- Set the
IP configuration (DHCP)button to the off position. - Enter 192.168.0.2 in the
IP Addressfield. - Enter 255.255.255.0 in the
Submaskfield. - Enter 192.168.0.1 in the
Gatewayfield. - Enter 192.168.0.1 in the
DNS serversfield. - Open a web browser (AON3D recommends Google Chrome).
- Enter http://192.168.0.2 in the address bar to get access to the GUI of the printer.
Machine Name and Control Interface
The machine GUI can be accessed from a computer on the same network by visiting either the mDNS URL constructed using the machine name or the device IP address. On a computer with Windows® OS, install Bonjour Print Services to enable mDNS service discovery. The machine IP address can be entered in a web browser should Bonjour Print Services not be available/installed on the user computer.
mDNS and Bonjour service discovery sometimes do not work well on computers running Windows®. This appears to be an unresolved bug in Windows®. If Bonjour services do not work correctly, use of the machine IP address in a web browser.
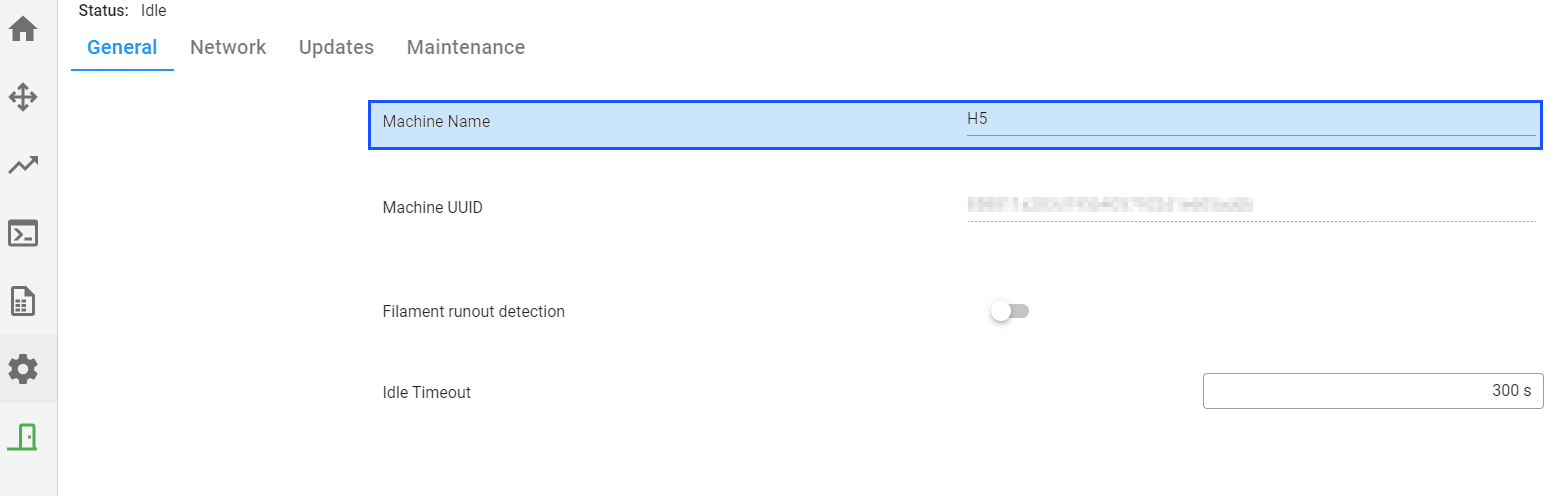
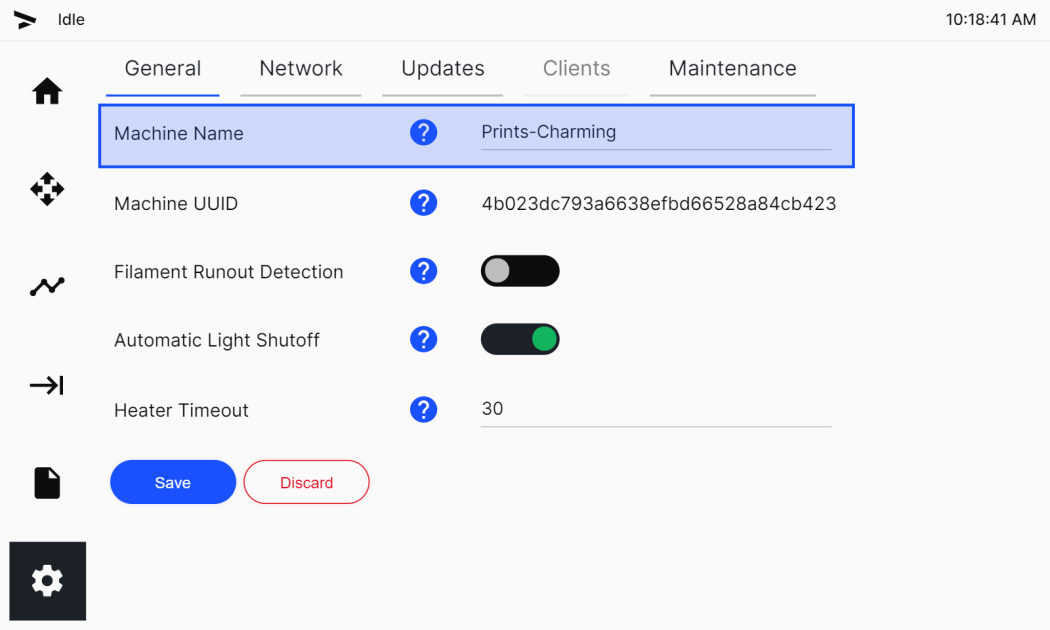
The steps that follow gives instructions on how to rename the machine:
- Select Settings > General.
- Select the input box for Machine Name.
- Input the new machine name. Only letters, numbers, underscores (
_), and dashes (-) are permitted. - Select Enter to submit.
- Select Save at the bottom of the screen.
- Once these steps have been correctly completed, and both the machine and computer are on the same network, visit either the Machine URL or Machine IP in a web browser to use the AON3D machine remotely.
The Machine URL is shown on the Network tab update to reflect the URL. The machine control interface may now be controlled from a computer connected to the same network.
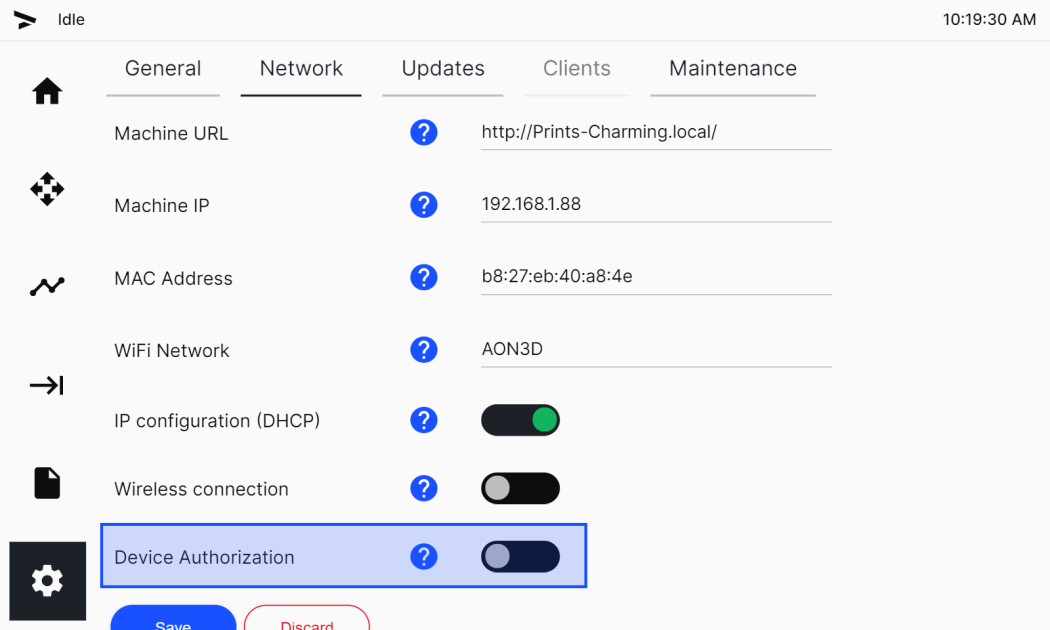
Client Authorization
The client authorization feature is only available on Marlin-based firmware.
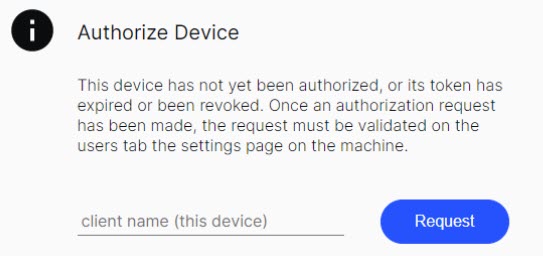
A simple client-based authorization scheme can be configured that requires clients (i.e., browsers on a workstation) to be authorize access to the machine GUI.
On initial start-up of the control page of the machine, user is prompted to input a Client Name. As common practice, this should be the name of either the user or workstation which will attempt to connect. Once request has been submitted, go to Settings > Clients and select the Authorize button next to the correct client name.
While the client authorization scheme used is cryptographically secure, it does not replace physical and network security for the machine. In a large enterprise with employees who should not have access to the machine, AON3D recommends the use of a dedicated network or subnet, and install the machine in a secure location.
To authorize a workstation, on the same LAN, access the machine UI, do the steps that follow:
- Select Settings > Network.
- Select the toggle to enable the Device Authorization.
- When the feature is ON, the toggle turns green.
- When the feature is OFF, the toggle turns gray.
- Select Save at the bottom of the UI to save the feature selection.
Advanced Networking Information
The sections that follow gives information for your network administrator.
Networks Without Internet Access
To isolate the AON3D machine from the internet, a local area network (LAN) connection between the AON3D machine and a workstation is still required for uploading print files and controlling the machine. This network should have an active DHCP server in order to provide an IP address to the machine. The DHCP server can be on a router or the workstation. An IP address can also be set manually for a wired connection.
The AON3D machine requires an internet connection to make outgoing software update requests to our AON3D servers. If internet access is not an option, AON3D offers a service to receive offline updates, free of charge, for all Success Plan customers. Reach out to our Customer Success team at help@aon3d.com for details.
The AON3D machine can connect to a mobile phone WiFi hotspot to update the software on a machine that is normally air-gapped. Refer to the user manual of a mobile phone for instructions on how to setup a WiFi hotspot. Alternatively, instructions for most popular mobile phones can be found here.

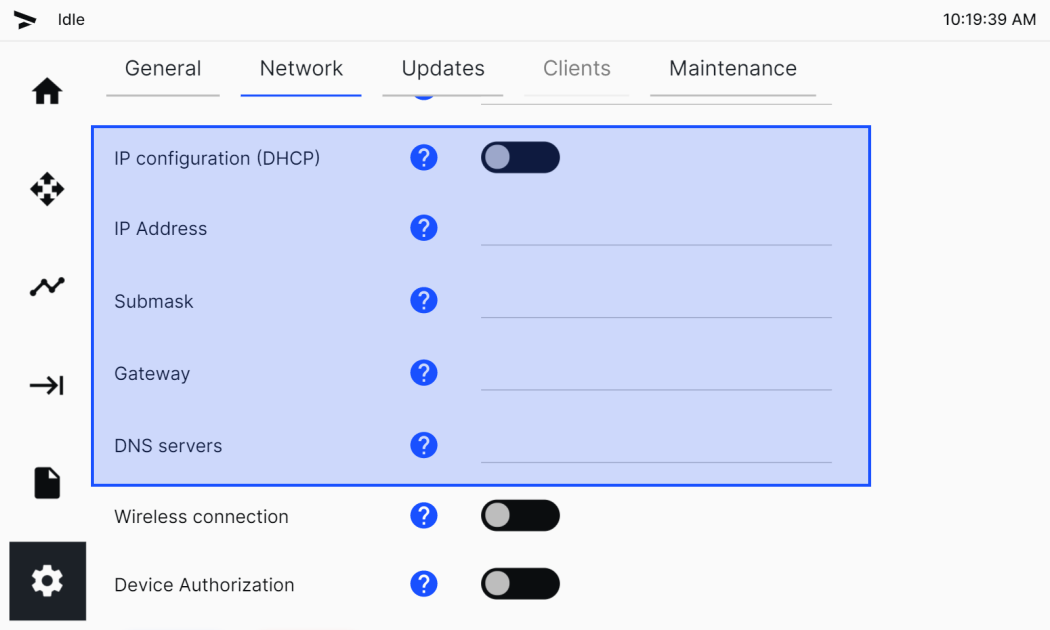
Set Static IP Address
To set a static IP address for the machine:
- Select Settings > Network.
- Select the toggle to disable DHCP. When the feature is OFF, the toggle turns gray and the manual settings are displayed.
- Input the correct values for IP Address, Submask, Gateway, and DNS servers.
- Select Save at the bottom of the GUI to save the new values.
Firewall Information
The ports that follow must be opened in the firewall for the machine to be updated, and/or, for remote troubleshooting:
- 53 (DNS)
- 123 (NTP)
- 443 (VPN to update server)
The domains that follow must be allowed in the firewall so that the machine can be updated:
- *.balena-cloud.com
- *.docker.com
- *.docker.io
- *.resinio.pool.ntp.org
The domains that follow are optional in the firewall:
- ip-api.com
- freegeoip.app
- ipapi.co

The domains that follow must be allowed in the firewall for Simplify3D® to be updated:
- HTTPS traffic to *.simplify3d.com (for example, api.simplify3d.com or cloud.simplify3d.com)
- HTTP and HTTPS traffic to wyday.com