Replace Vacuum Pump Vibration Dampeners
| Model | [ ] AON M2+ (CE) | [ ] AON M2+ (R-NZ) | [•] AON M2+ | [ ] AON-M2 2020 | [ ] AON-M2 |
| Category | [ ] Preventive | [•] Corrective |
Summary
The procedure that follows gives the instructions on how to replace the four vacuum pump vibration dampeners.
The four vacuum pump vibration dampeners may become brittle and crack for the reasons that follow:
- Loads of the vacuum motor.
- Exposure to direct sunlight.
- Accidental coolant spills.
Estimated time: 60 minutes
Tools
| Qty | Description | Specification |
|---|---|---|
| 1 | Wrench | 10 mm |
| 1 | Hex Key | 4 mm |
| 1 | Work Light | Portable |
| 1 | Pliers, Locking | Vise-Grips®, small |
Parts Information
| Qty | Part Number | Description |
|---|---|---|
| 4 | C73275BB | Vibration Dampeners |
| 8 | HW-NUT-DIS-M6 | M6 Crush Nut |
| 4 | HW-WASH-M6-001 | Washer, Regular, M6, SS18-8 |
Reach out to our Customer Success team at help@aon3d.com for genuine AON3D replacement part(s).
Personal Protective Equipment
| Qty | Description | Minimum Specification |
|---|---|---|
| 1 | Safety Eyewear | ANSI/ISEA Z87.1 |
| 1 | Safety Footwear | EN ISO 20345 or ASTM F2413 |
| A/R | Nitrile Gloves | ISO 2859-1 or ASTM D6319 |
Prepare the Machine
Make sure that there are no prints on the build surface. Remove print(s) before the procedure that follows is started. Failure to do so can cause a collision and cause damage to the machine component(s).
- Home XYZ.
- Push the E-stop button.
- Turn the power OFF with the ON/OFF switch found behind the machine.
- Disconnect the main power cord from the receptacle.
- Turn the vacuum circuit power OFF with the ON/OFF switch found on vacuum control box.
- Disconnect the power cord from the the vacuum circuit electrical enclosure.
- Wait until the build chamber, build platform, and hot ends are at room temperature.
Remove the Vacuum Pump Assembly
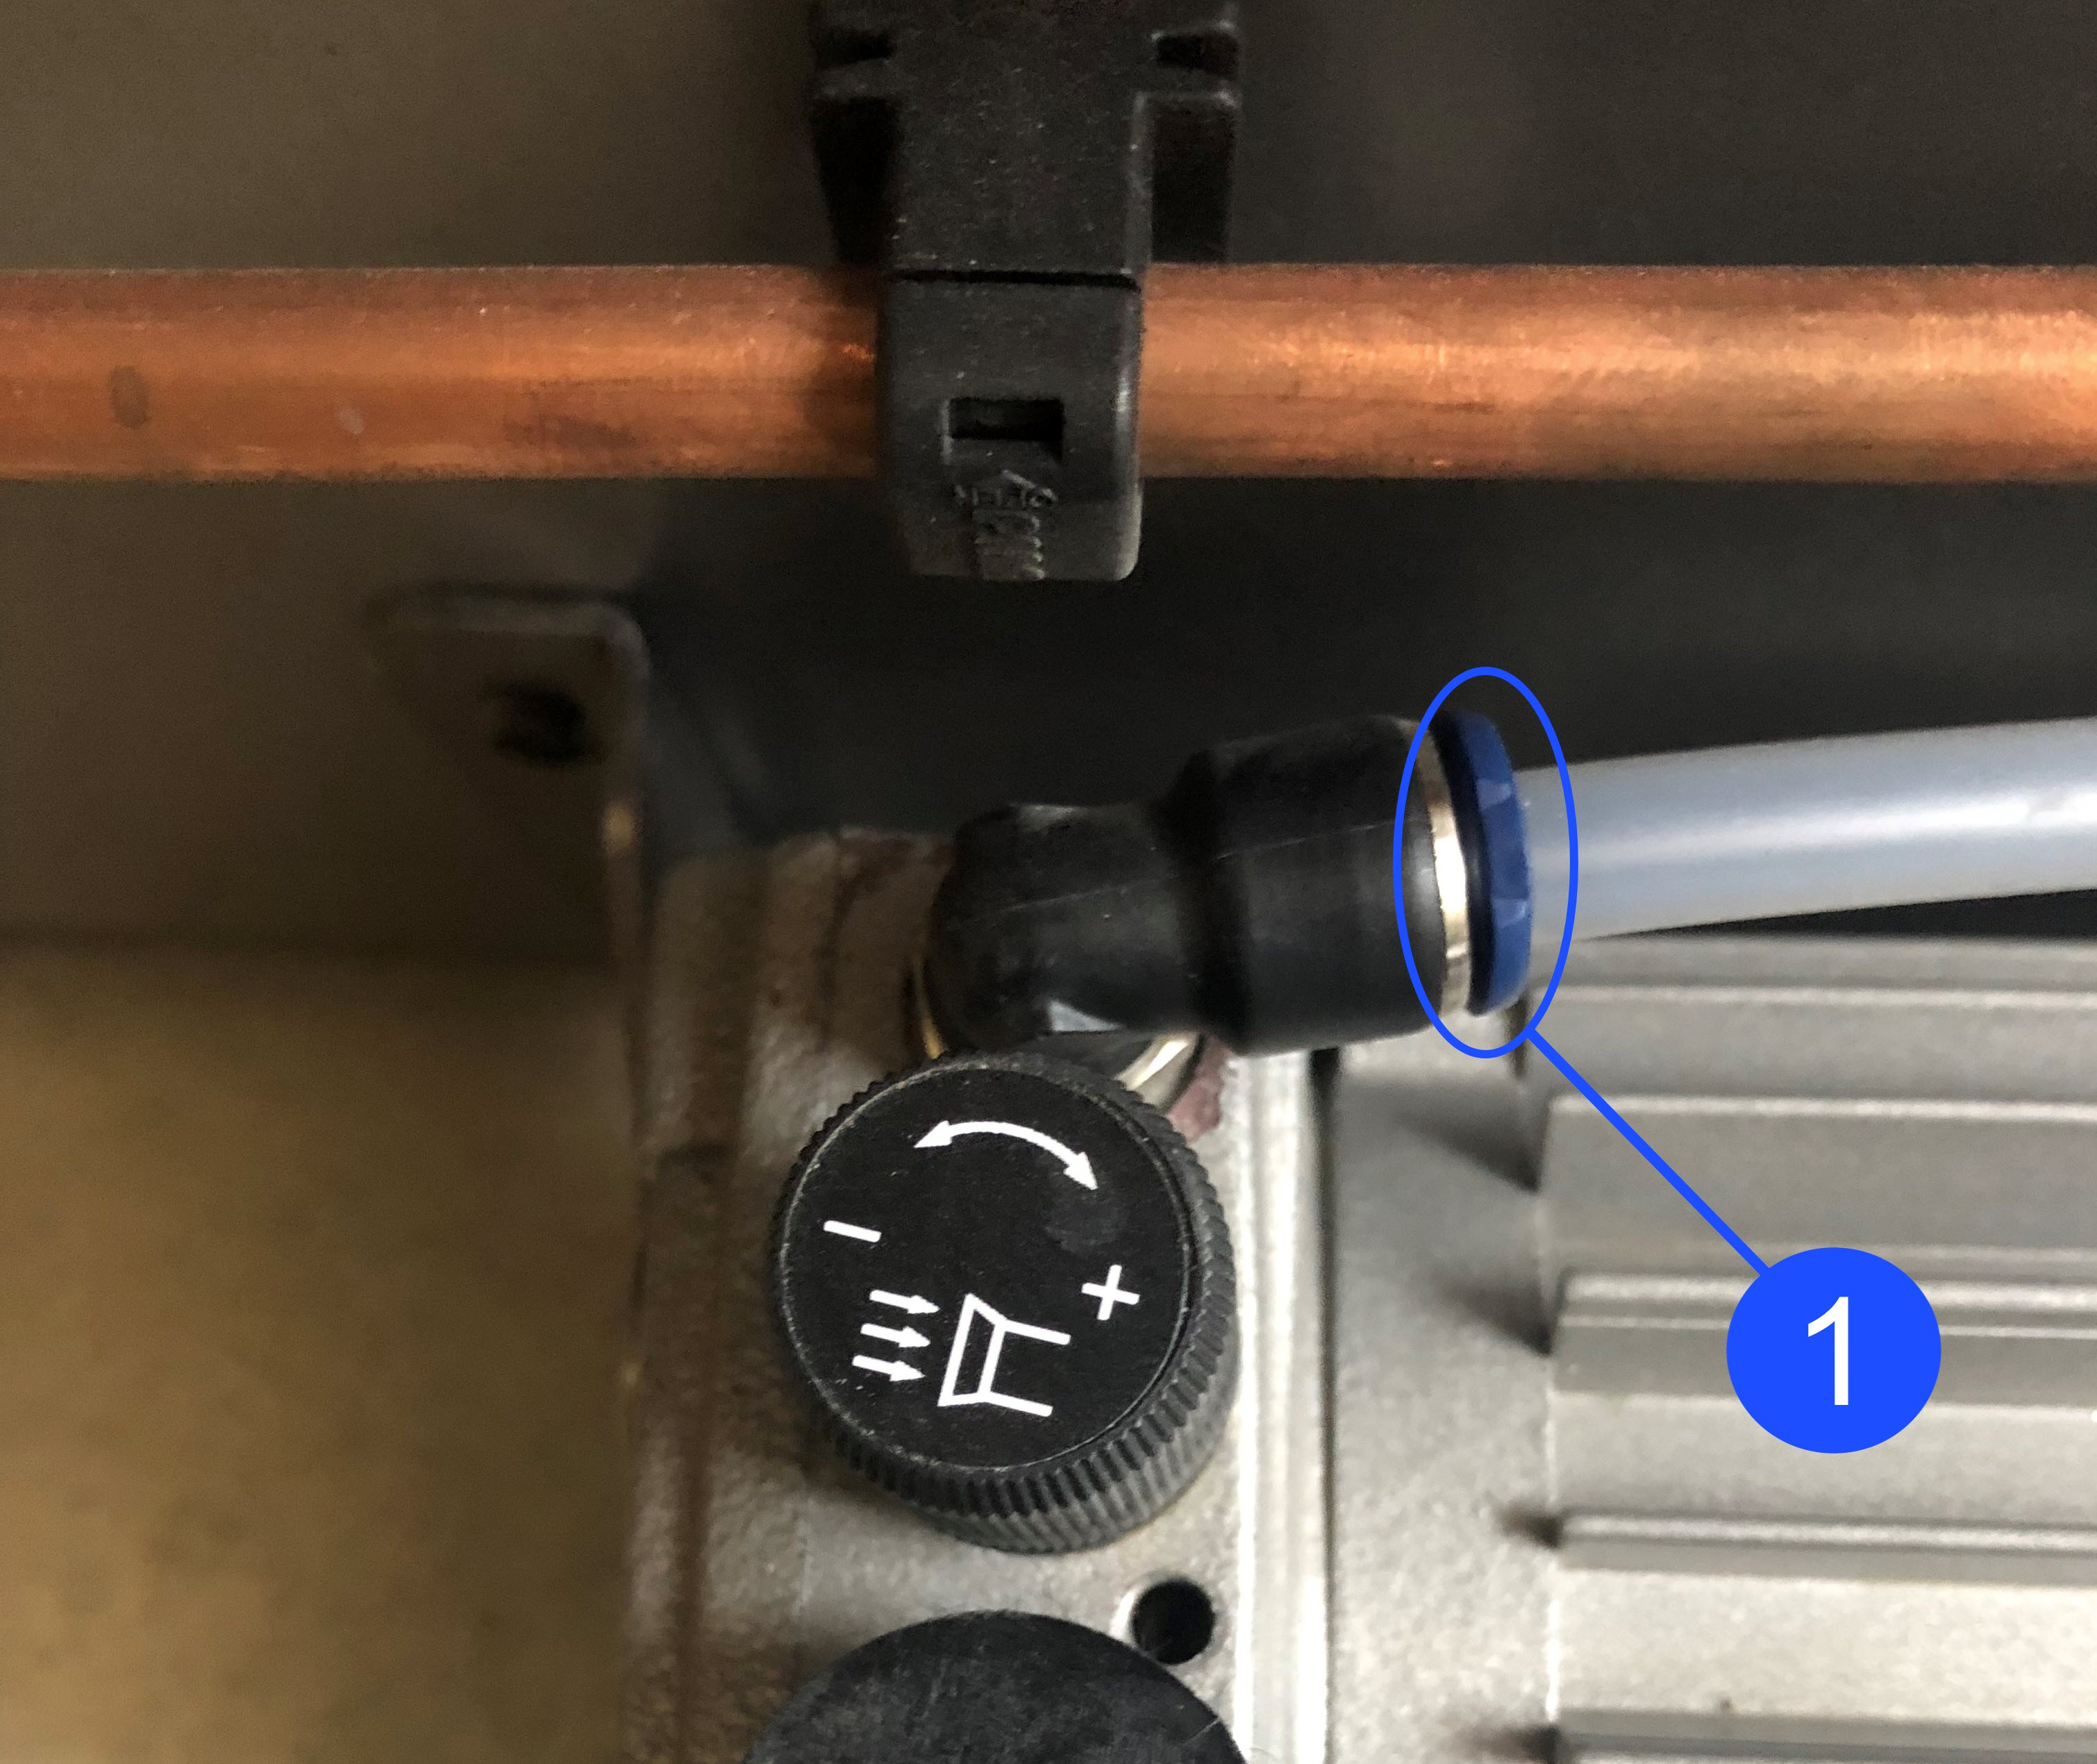
- Disconnect the flexible vacuum tube from the vacuum pump fitting (1):
- Compress the vacuum pump fitting collar.
- With the vacuum pump fitting (1) collar compressed, pull out the flexible vacuum tube.
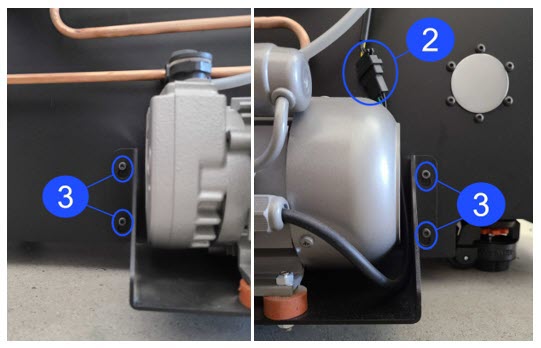
- Disconnect the vacuum pump wire harness (2).
- Use the 4 mm hex key to remove the four screws (3) that hold the vacuum pump assembly onto the rear panel of the machine. Do not remove the four screws (3).
- Carefully lift and pull out the vacuum pump assembly.
- Put the vacuum pump assembly on a clean workbench.
Disassemble the Vacuum Pump from the Vacuum Pump Mount
Take note of the orientation of the vacuum pump assembly on the vacuum pump mount.
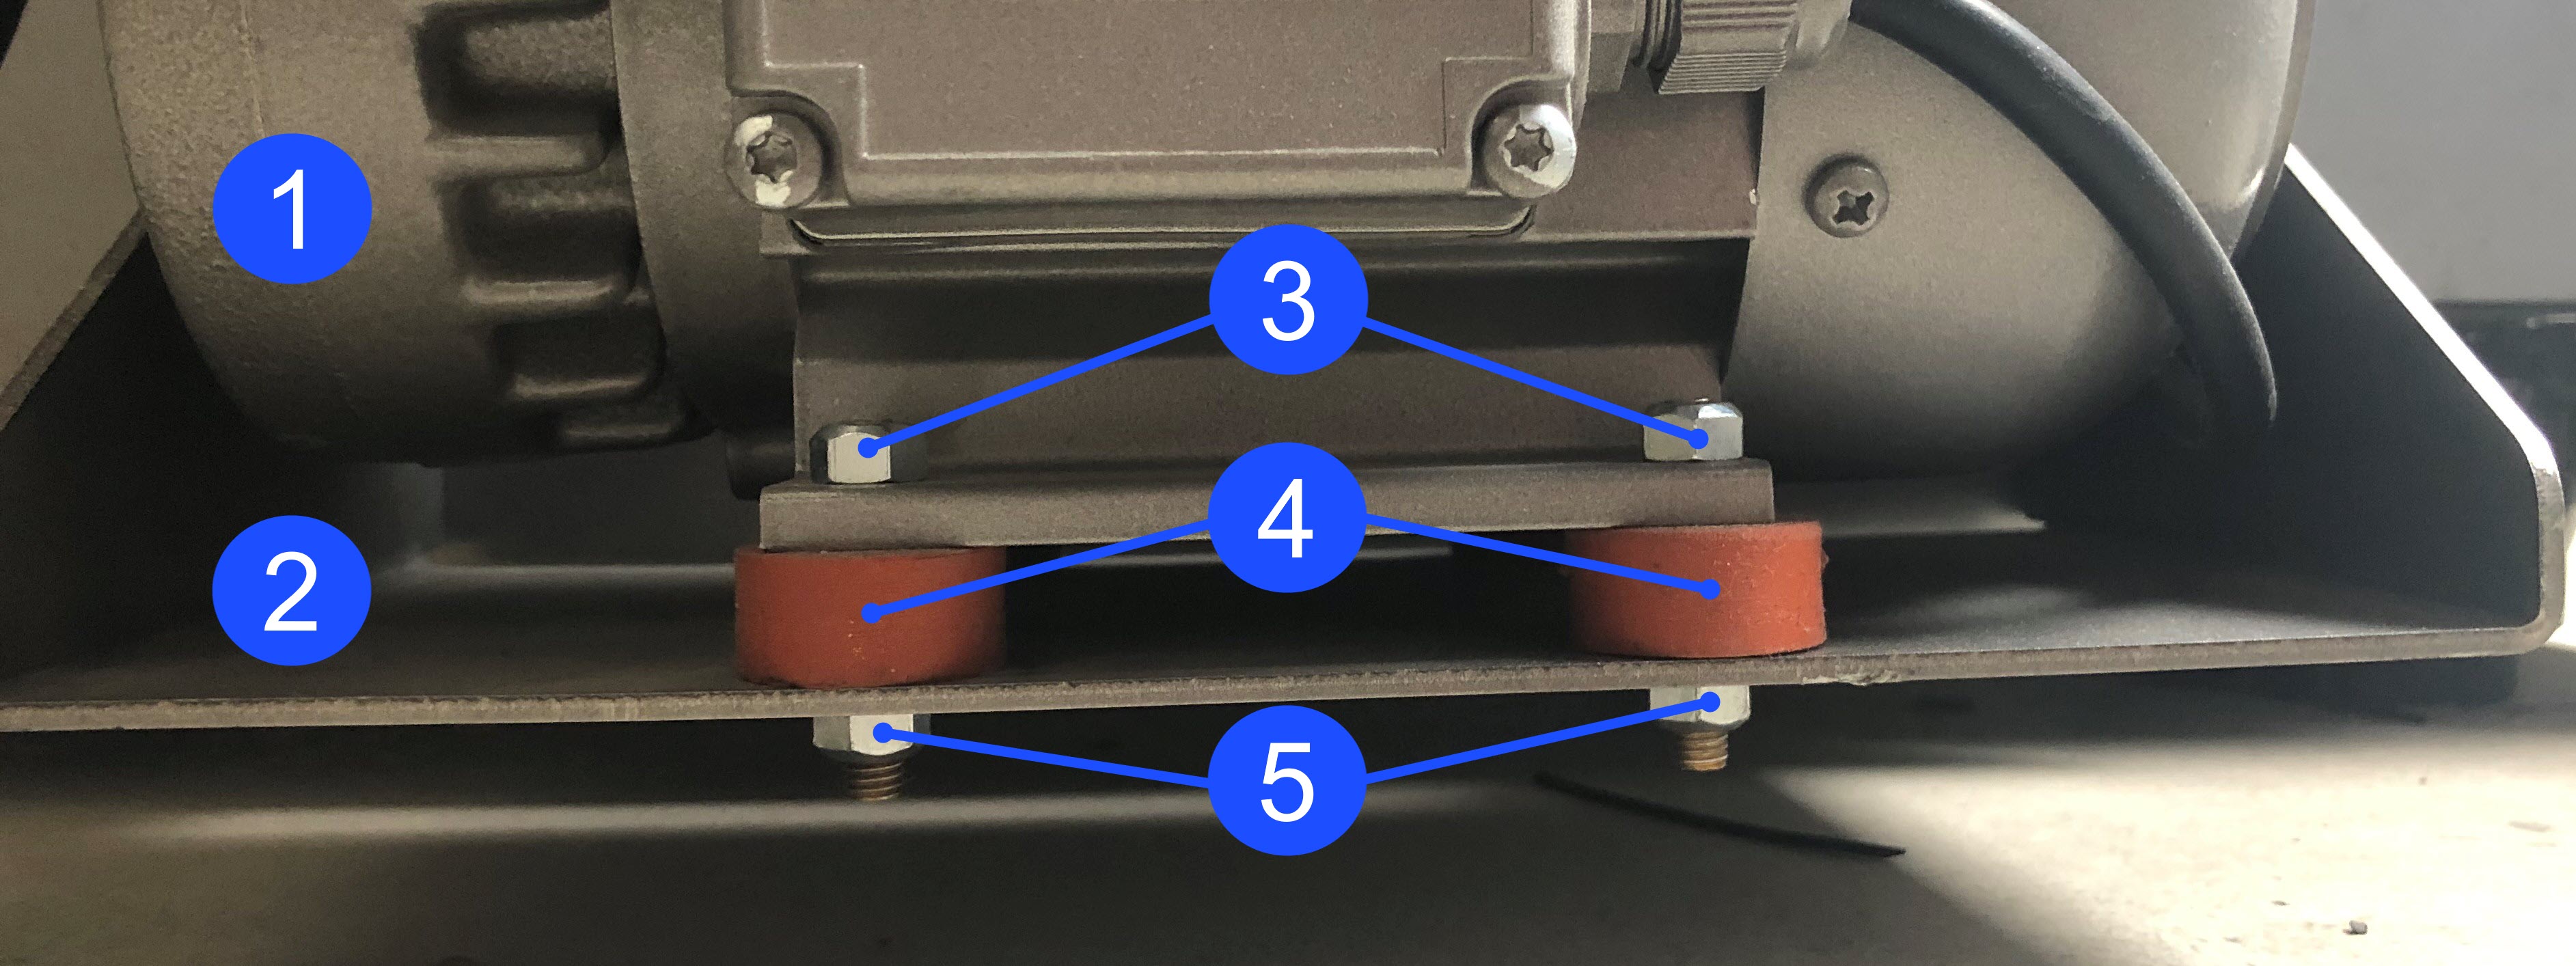
- Use the 10 mm wrench to remove the four crush nuts (5) and four metal washers found at the bottom of the vacuum pump mount (2).
- Discard the four crush nuts (5) and the metal washers.
- Carefully separate the vacuum pump (1) from the vacuum pump mount (2). Set the vacuum pump mount (2) aside.
- Do the steps that follow to remove the vacuum pump vibration dampeners (4):
- Use the pliers to hold one vacuum pump vibration dampener (4) outside diameter.
- Use 10 mm wrench to remove the crush nut (3) that holds the vacuum pump vibration dampener (4) that is held in the pliers.
- Discard the crush nut (3) and the vacuum pump vibration dampener (4).
- Do step 4 for the other three vacuum pump vibration dampeners (4).
Install the New Vacuum Pump Vibration Dampeners
Because the vacuum pump is removed from the machine, AON3D recommends the procedures that follow:
• Replace the vacuum pump vanes and clean the vacuum pump filter cartridge, if necessary. To clean or replace the vacuum pump filter cartridge, refer to the Replace Vacuum Pump Vanes procedure.
- Do the steps that follow to install the new vacuum pump vibration dampeners (4) onto the vacuum pump (1):
- Install one vacuum pump vibration dampener (4) into the vacuum pump (1) mount pad.
- Install one new crush nut (3) on the vacuum pump vibration dampener (4) stud.
- Use the pliers to lightly hold the vacuum pump vibration dampener (4) outside diameter.
- Use 10 mm wrench to tighten the crush nut (3). Make sure that the crush nut (3) is tight.
- Remove the pliers from the vacuum pump vibration dampener (4) outside diameter.
- Do step 1 for the three vacuum pump vibration dampeners.
Make sure that the vacuum pump is correctly oriented onto the vacuum pump mount.
- Do the steps that follow to install the vacuum pump (1) assembly onto the vacuum pump mount (2):
- Carefully install the vacuum pump (1) assembly onto the vacuum pump mount (2).
- Install one new washer and one new crush nut (5) onto the vibration dampener (4) stud.
- Do step 3b for the other three vacuum pump vibration dampener (4) studs.
- Use the pliers to lightly hold the vacuum pump vibration dampener (4) outside diameter.
- Use the 10 mm wrench to tighten the crush nut (5). Make sure that the crush nut is tight.
- Remove the pliers from the vacuum pump vibration dampener (4) outside diameter.
- Do steps 3d to 3f for the other three vacuum pump vibration dampeners (4).
Install the Vacuum Pump Assembly
- Carefully install the vacuum pump assembly onto the four screws found at the rear panel of the machine.
- Use the 4 mm hex key to tighten the four screws that hold the vacuum pump assembly onto the rear panel of the machine. Make sure that the four screws are tight.
- Connect the vacuum pump wire harness.
- Connect the flexible vacuum tube into the vacuum pump fitting. Lightly pull on the flexible vacuum tube to make sure that it is correctly installed in the vacuum pump fitting.
Test and Return to Service
-
- For AON M2+ (CE) machines: Connect power to the machine from the local supply disconnecting device.
- For AON M2+ machines: Connect the main power cord to the receptacle.
- Connect the power cord to the the vacuum circuit electrical enclosure.
- Turn the power ON with the ON/OFF switch found on the rear panel of the machine.
- Turn the vacuum circuit power ON with the ON/OFF switch found on vacuum control box.
- Release the E-stop button.
- Home XYZ.
- Use the Graphical User Interface (GUI) to power ON the vacuum pump.
- Make sure that the build sheet seals correctly onto the vacuum chuck. Refer to Install Build Sheet.