Clean and Lubricate X/Y-Axes
| Model | [•] AON M2+ (CE) | [•] AON M2+ (R-NZ) | [•] AON M2+ | [•] AON-M2 2020 | [•] AON-M2 |
| Category | [•] Preventive | [ ] Corrective | |||
| Frequency | [ ] Daily | [ ] Weekly | [•] Monthly | [ ] Yearly | [ ] As Needed |
Summary
The procedure that follows gives instructions on how to clean and lubricate the X/Y-axes on the AON3D machine.
Correctly lubricated X/Y-axes will prevent:
- Binds and/or squeaks when in motion.
- Vibrations at high speeds.
- Unsatisfactory print layers.
Estimated time: 60 minutes
Tools
| Qty | Description | Specification |
|---|---|---|
| 1 | High-Temp Grease Gun and Empty Cartridge Kit | K-0999-002 |
| 1 | Screwdriver | Phillips, No.0 |
| A/R | Rags | Lint-free |
| A/R | Isopropyl Alcohol | 99% |
The High-Temp Grease Gun and Empty Cartridge Kit available is needed to correctly lubricate the X/Y-axes. Reach out to our Customer Success team at help@aon3d.com to purchase the High-Temp Grease Gun and Empty Cartridge Kit
Parts Information
| Qty | Part Number | Description |
|---|---|---|
| 1 | ME-LUBE-HT-204C-001 | High-Temperature Grease, Krytox GPL 225 8oz |
Reach out to our Customer Success team at help@aon3d.com to purchase the Krytox GPL High-Temperature Grease.
Personal Protective Equipment
| Qty | Description | Minimum Specification |
|---|---|---|
| 1 | Safety Eyewear | ANSI/ISEA Z87.1 |
| A/R | Nitrile Gloves | ISO 2859-1 or ASTM D6319 |
Prepare the Machine
Make sure that there are no prints on the build surface. Remove print(s) before the procedure that follows is started. Failure to do so can cause a collision and cause damage to the machine component(s).
- Home XYZ.
- Lower the Z-axis by 300 mm.
- Open the build chamber door.
- Push the E-stop button.
- Wait until the build chamber, build platform and hot ends are at room temperature.
Clean the Linear Guides and Rails
Wait until all machine components are at room temperature before you continue. Some machine components can be hot if the machine was recently used. Failure to do so can cause injuries.
Always use personal protective equipment when dealing with chemicals, solvents and/or lubricants. Make sure to follow the manufacturer safety precautions found on the Krytox GPL 225 label.
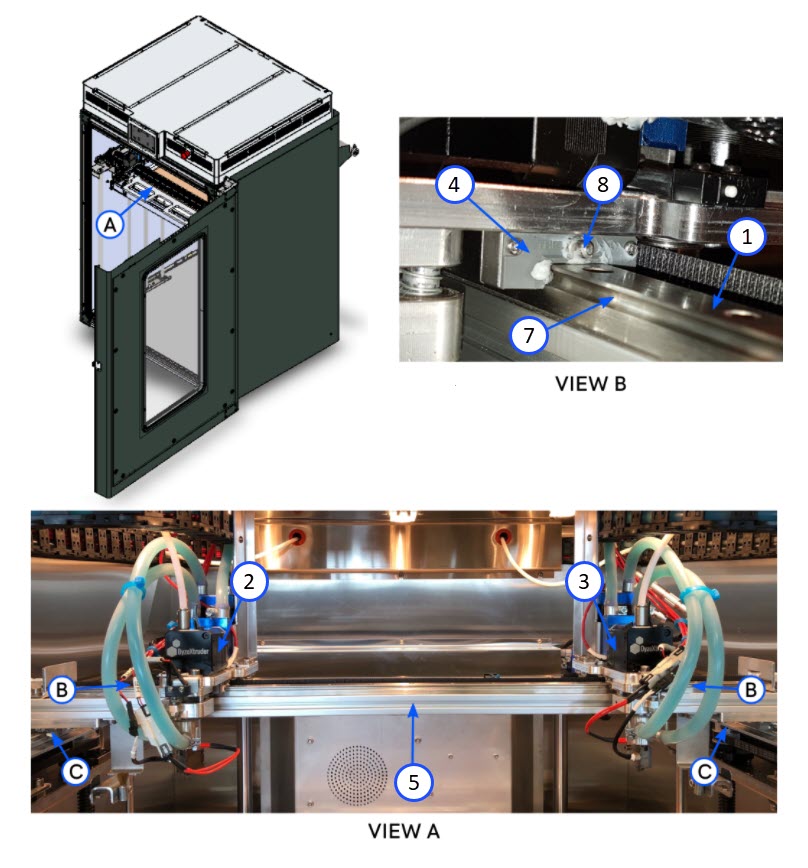
- Do the steps that follow for the X-axis linear rail (1):
- Clean the X-axis linear rail (1) with isopropyl alcohol and clean lint-free rag(s) as necessary.
- Let the clean surfaces dry for two minutes.
- Manually move T0 (2) and T1 (3) to the center of the x-axis linear rail (1).
- Clean the exposed X-axis linear rail (1) with isopropyl alcohol and clean lint-free rag(s) as necessary.
- Let the clean surfaces dry for two minutes.
- Clean the two linear guides (4) with isopropyl alcohol and clean lint-free rag(s) as necessary.
- Let the clean surfaces dry for two minutes.
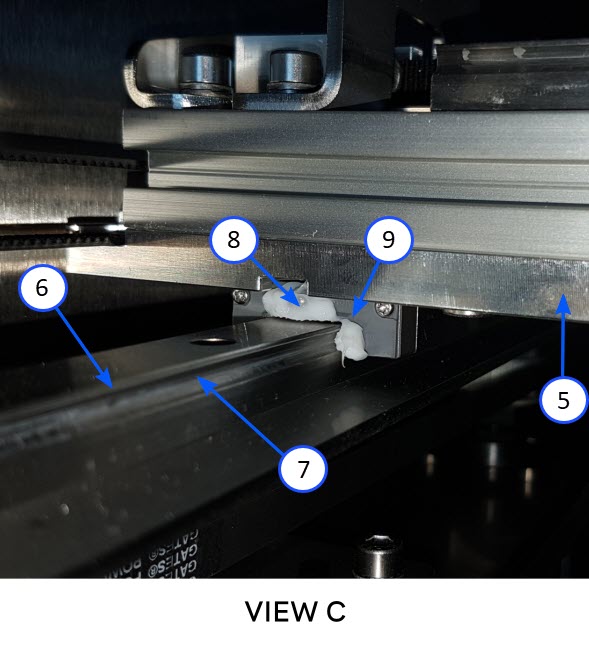
- Do the steps that follow for the two Y-axis linear rails (6):
- Clean the exposed two linear rails (6) with isopropyl alcohol and clean lint-free rag(s).
- Let the clean surfaces dry for two minutes.
- Manually move the X-axis gantry (5) to the rear of the Y-axis. Make sure to push at the center of the X-axis gantry (5).
- Clean the exposed two Y-axis linear rails (6) with isopropyl alcohol and clean lint-free rag(s) as necessary.
- Let the clean surfaces dry for two minutes.
- Clean the two linear guides (9) with isopropyl alcohol and clean lint-free rag(s) as necessary.
- Let the clean surfaces dry for two minutes.
Lubricate the Linear Guides and Rails
Only use Krytox GPL 225 grease to lubricate the X/Y-axes linear components. The Krytox GPL 225 grease has been specifically selected for its chemical compatibility with the motion components and its resistance to high temperature environments. Failure to use Krytox GPL 225 can cause the X/Y-axes to bind and/or squeak, cause incorrect print layers, and vibrations at high speeds. The use of alternative products will void the AON3D warranty. Make sure to follow the manufacturer safety instructions on the Krytox GPL 225 label.
- Do the steps that follow for all X/Y-axes linear guides (4)(9):
- Fill the grease gun cartridge with Krytox GPL 225 High-Temperature Grease.
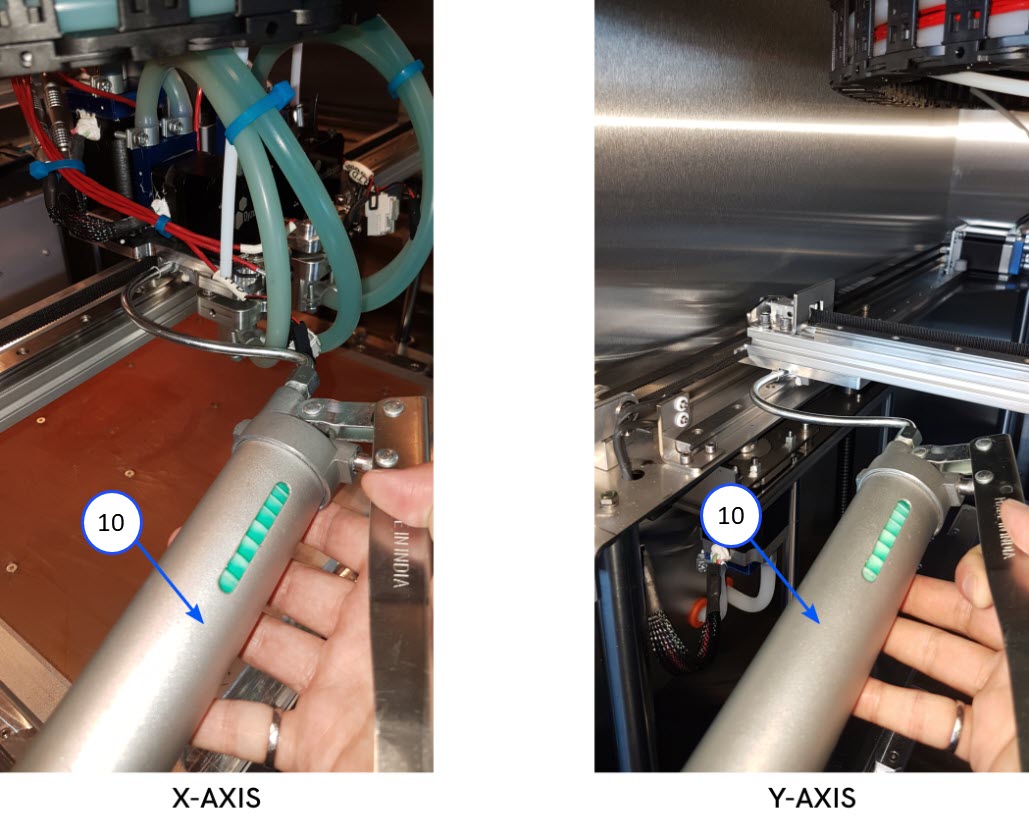
- Put the grease gun (10) square against the linear guide grease fitting (8).
- Push the grease gun (10) fitting tightly against the grease fitting (8) found on the linear guides (4)(9).
- Carefully fill the linear guides (4)(9) with grease with use of the grease gun (10).
The linear guides (4)(9) are at full capacity when a small amount of grease exits from underneath the linear guides.
- Remove the grease gun (10) from the linear guide grease fitting (8).
- Remove the excess grease from the linear guide (4)(9) with a clean lint-free rag. Do not use isopropyl alcohol.
- Do steps 1a to 1f for all four linear guides (4)(9).

- If the linear guides do not have a grease fitting (8), do the steps that follow for each of the linear guides (4)(9):
- Use the Phillips No.0 screwdriver to remove the two screws (11).
- Carefully remove the front linear guide wiper (12).
- Put a small amount of grease against the bearing retainer (13) on both sides of the linear rails (1)(6).
- Manually move T0 (2) and T1 (3) along the X-axis linear rail (1) three times to make sure that all components are lubricated correctly.
- Manually move the X-axis gantry (5) to the front and to the rear along the Y-axis linear rails (6) to make sure that all components are lubricated correctly.
- Install the linear guide wiper (12) and two screws (11).
- Do steps 2a to 2f for the four linear guides (4)(9).
- Close the build chamber door.
- Release the E-stop button.
- Home XYZ.
- Lower the Z-axis by 300 mm.
- Do the steps that follow to make sure that the X-axis linear rails (1)(6) and the linear guides (4)(9) are lubricated correctly:
- For the Klipper-based firmware:
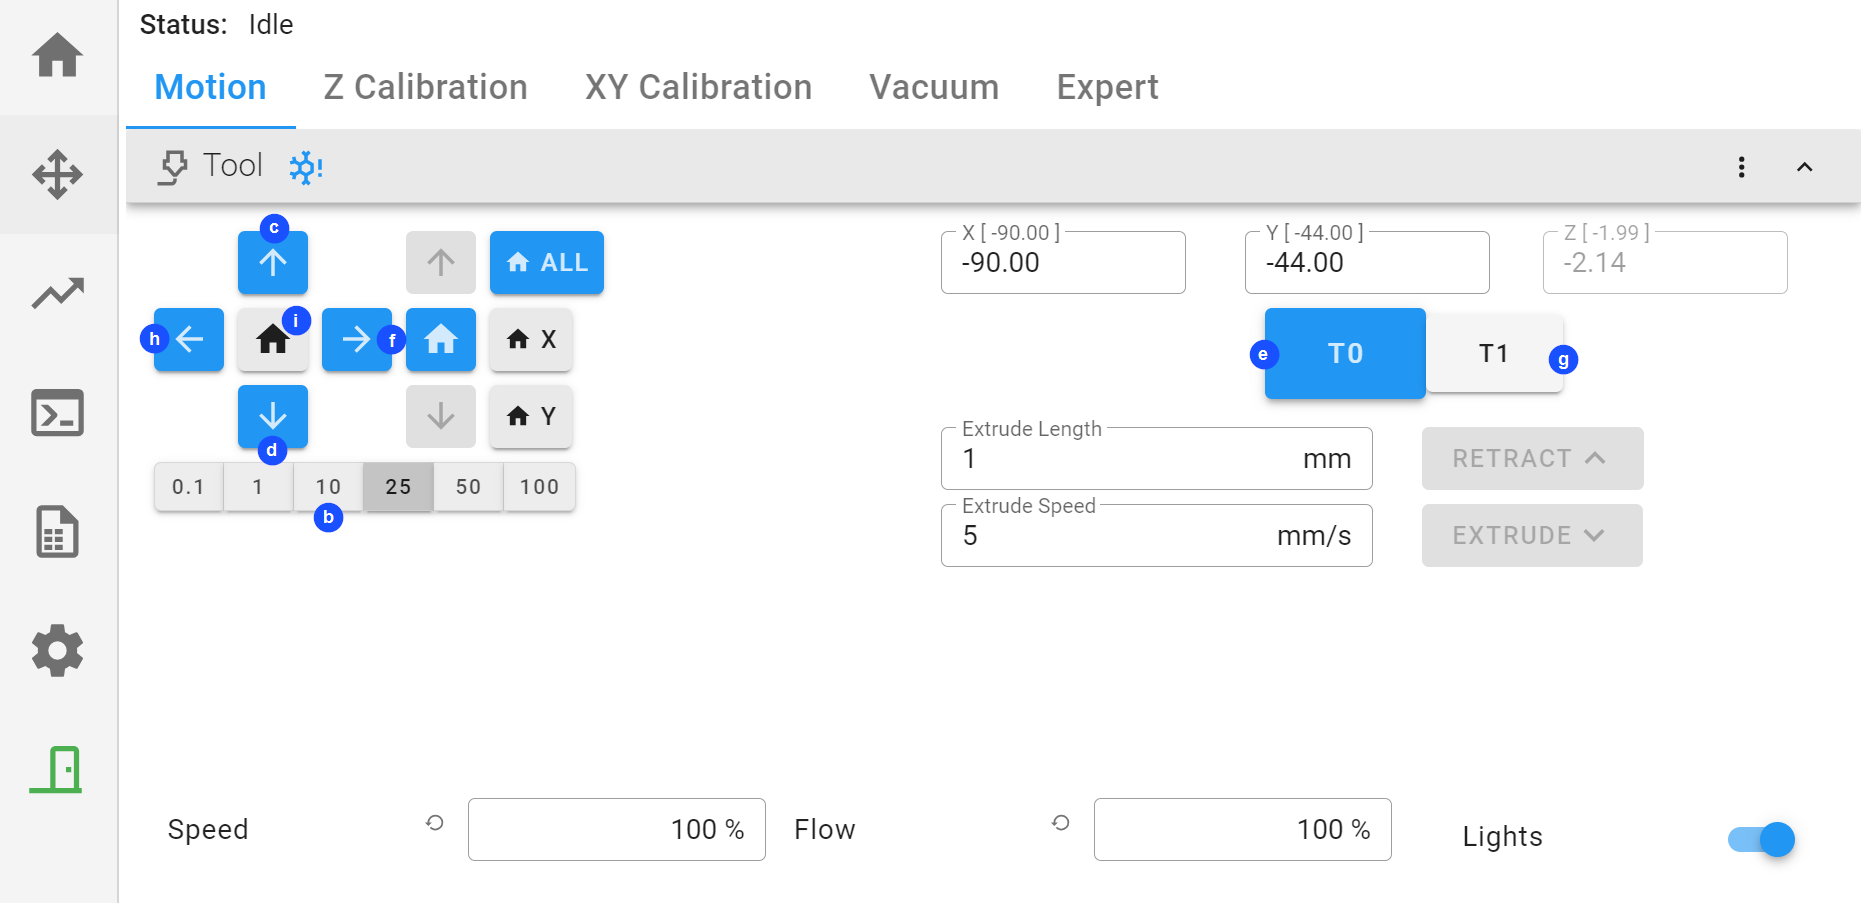
- On the Graphical User Interface (GUI)/web browser, select Control > Motion.
- Set Jog Distance (mm) to
100(b) - Select the up arrow (c) four times to move X-axis gantry to the rear of the Y-axis.
- Select the down arrow (d) four times to return the Y-axis gantry to the home position.
- Select
T0(e). - Select the right arrow (f) four times to move T0 to the right of the linear rail (1).
- Select
T1(g). - Select the left arrow (h) four times to move T1 to the left of the linear rail (1).
- Select ⌂ >
XY(i) to return T1 to home position in the XY-axes.
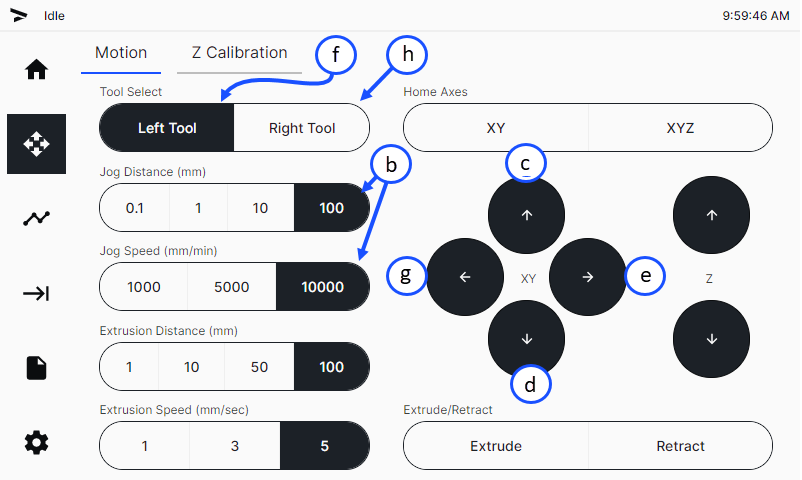
- For the Marlin-based firmware:
- On the Graphical User Interface (GUI)/web browser, select Control > Motion.
- Set Jog Distance (mm) to
100(b) and Jog Speed mm/min to10000(b). - Select the up arrow (c) four times to move X-axis gantry to the rear of the Y-axis.
- Select the down arrow (d) four times to return the Y-axis gantry to the home position.
- Select Left Tool (f).
- Select the right arrow (e) four times to move T0 to the right of the linear rail (1).
- Select Right Tool (h).
- Select the left arrow (g) four times to move T1 to the left of the linear rail (1).
- Select Home Axes >
XYto return T1 to home position.
- Push the E-stop button.
- Open the build chamber door.
- If there is too much grease where the linear rails (1)(6) meet the linear guides (4)(9), clean with lint-free rag(s). Do not use isopropyl alcohol.
- Clean the print surface with clean lint-free rag(s) and isopropyl alcohol as necessary.
- Let the clean surfaces dry for two minutes.
Test and Return to Service
- Make sure that you remove all the tools from the build chamber.
- Close the build chamber door.
- Release the E-stop button.
- Home XYZ.