Inspect and Adjust XYZ-Axes Belt Tension
| Model | [•] AON M2+ (CE) | [•] AON M2+ (R-NZ) | [•] AON M2+ | [•] AON-M2 2020 | [•] AON-M2 |
| Category | [•] Preventive | [•] Corrective | |||
| Frequency | [ ] Daily | [•] Weekly | [ ] Monthly | [ ] Yearly | [ ] As Needed |
Summary
The procedures that follows gives instructions on how to:
- Inspect the XYZ-axes belt tensions.
- Adjust the XYZ-axes belt tensions.
Estimated time: 45 minutes
Tools
| Qty | Description | Specification |
|---|---|---|
| 1 | Sonic Tension Meter | Gates Unitta Asia U-508C |
| 1 | Sonic Tension Meter | Gates Unitta Asia 550C |
| 1 | Hex Key | 4 mm |
| 1 | Wrench | 8 mm, open |
| 1 | Wrench | 10 mm, open |
| 1 | Spacer | 6 mm thick, aluminum |
The Gates Unitta Asia U-508C or the Gates Unitta Asia 550C sonic tension meters can be used to adjust the XYZ-axes belt tensions.
The Gates Unitta Asia U-508C or the Gates Unitta Asia 550C sonic tension meter is available on loan to our Success Plan customers to help with the belt maintenance of the AON-M2. Rental options are also available. Reach out to our Customer Success team at help@aon3d.com for more details on how to obtain the Gates Unitta Asia U-508C or 550C sonic tension meter.
Parts Information
None required.
Personal Protective Equipment
| Qty | Description | Minimum Specification |
|---|---|---|
| 1 | Safety Eyewear | ANSI/ISEA Z87.1 |
| A/R | Nitrile Gloves | ISO 2859-1 or ASTM D6319 |
Prepare the Machine
Make sure that there are no prints on the build surface. Remove print(s) before the procedure that follows is started. Failure to do so can cause a collision and cause damage to the machine component(s).
- Home XYZ.
- Lower the Z-axis by 300 mm.
- Open the build chamber door.
- Push the E-stop button.
- Wait until the build chamber, build platform and hot ends are at room temperature.
Prepare the Sonic Tension Meter
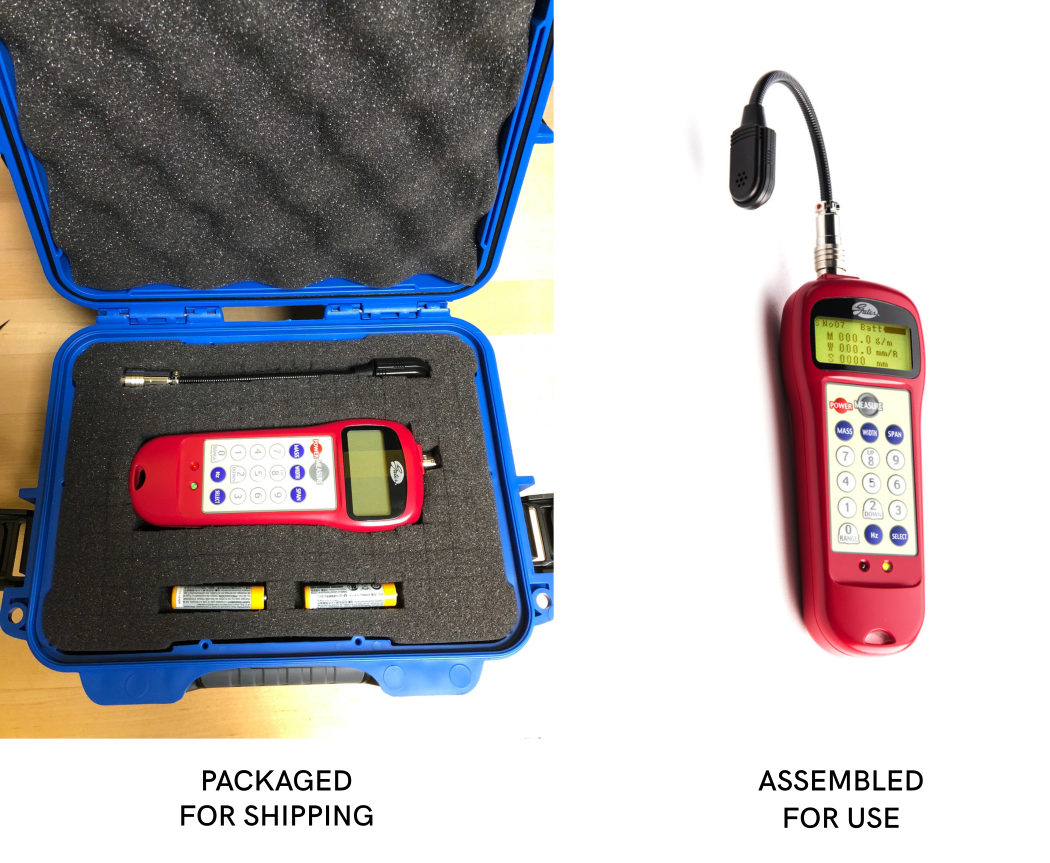
- Remove the sonic tension meter and flexible sensor from the shipping box.
- Install the flexible sensor onto the sonic tension meter.
- Press the
POWERbutton to turn on the sonic tension meter.
If a sonic tension meter other than the Gates Unitta Asia U-508 loaned out by AON3D is used, the sonic tension meter must be programmed with the parameters from the table below.
| Axis | Mass (M) | Width (W) | Span (S) | Preset No. |
|---|---|---|---|---|
| X | 1.4 g/m | 9 mm/R | 600 mm | 1 |
| Y | 1.4 g/m | 9 mm/R | 640 mm | 2 |
| Z | 1.4 g/m | 9 mm/R | 171 mm | 3 |
Inspect XYZ-Axes Belts Tension
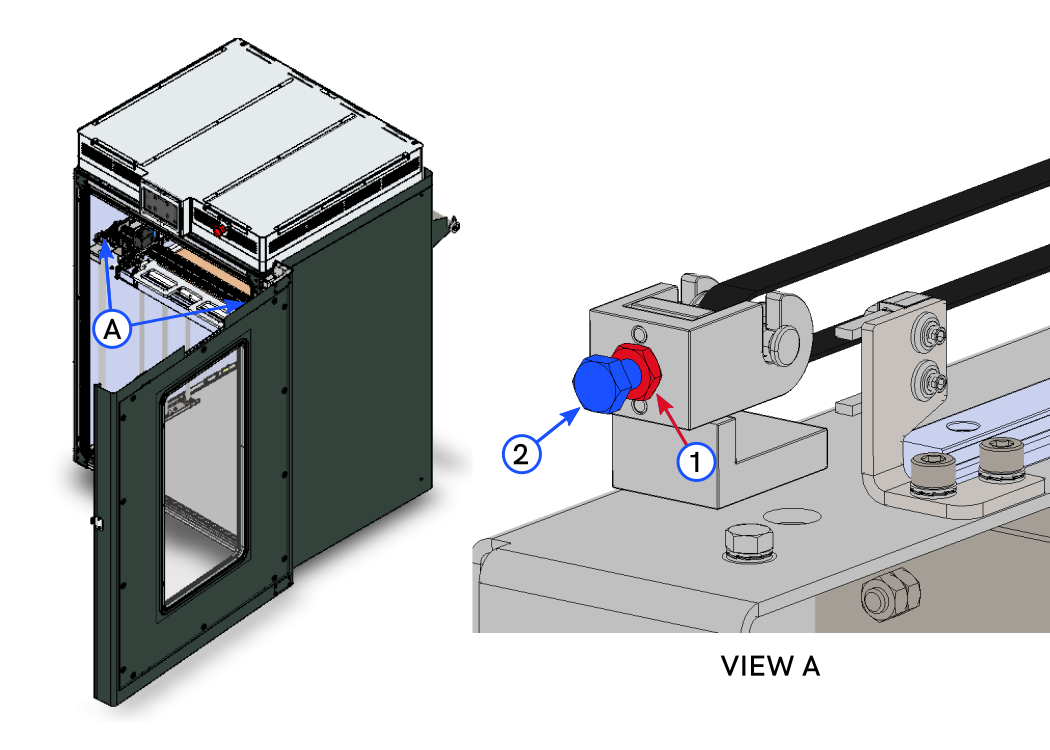
Inspect X-Axis Belt Tension
Wait until all machine components are at room temperature before you continue. Some machine components can be hot if the machine was recently used. Failure to do so can cause injuries.
- Make sure that the two toolheads are in the parked position (the T0 on the far left and T1 on the far right).
- Press the
1button on the sonic tension meter to select the X-axis belt tension test. - Position the flexible sensor of the sonic tension meter as near to the center of the X-axis belt as possible. Do not let the sonic tension meter sensor touch the belt.
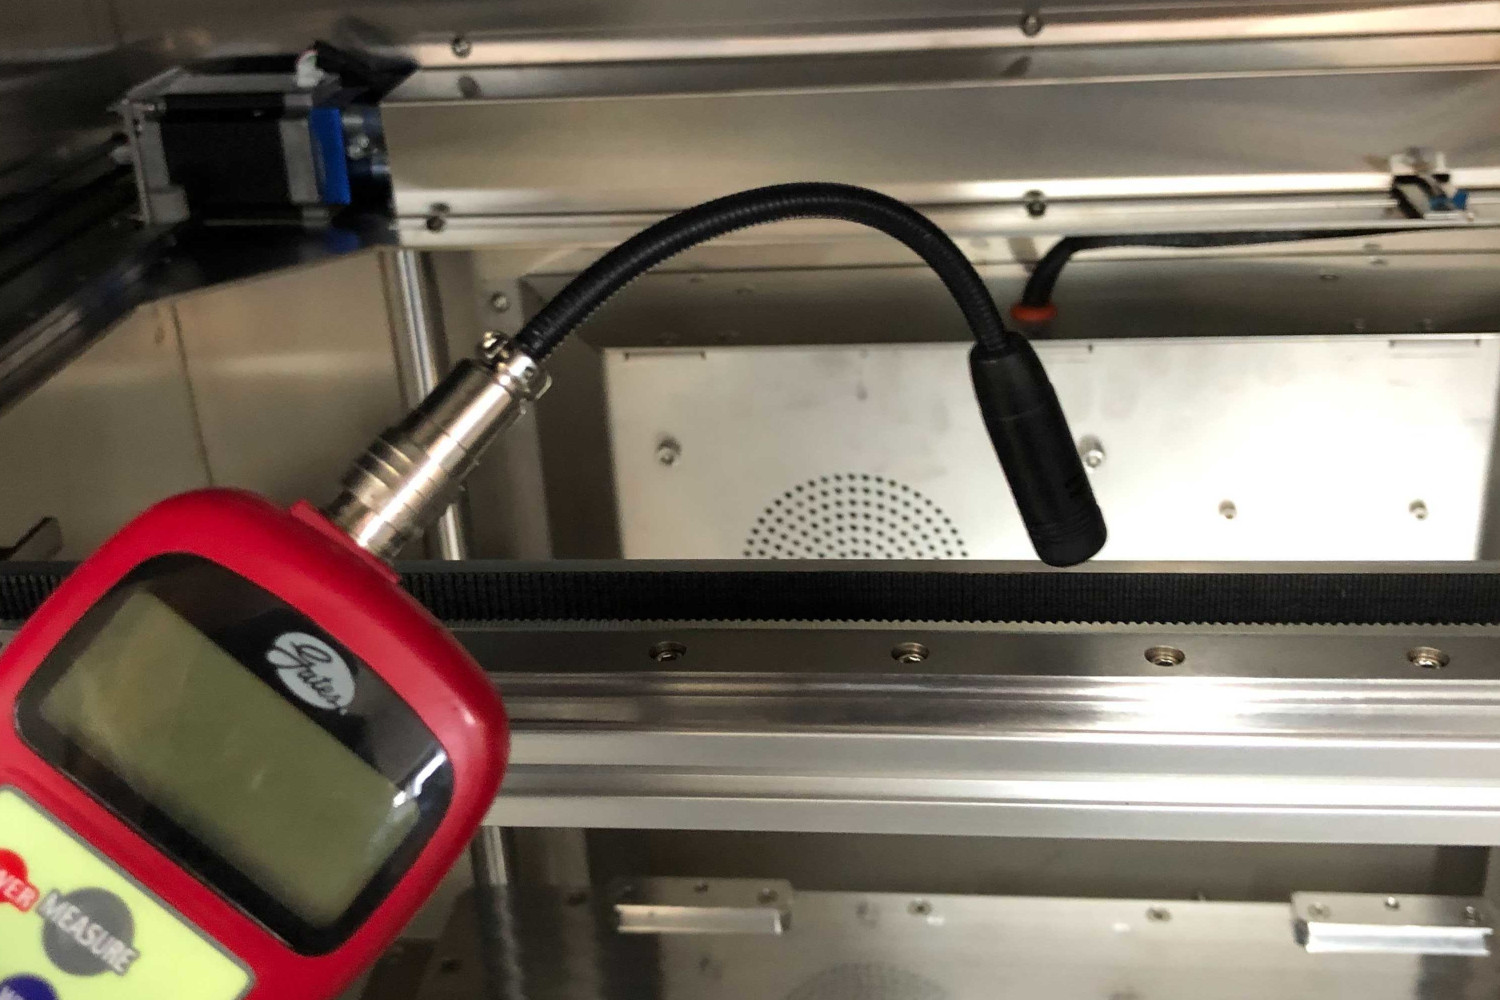
Do not tap the belt at the ends. This will result in incorrect results. The X-axis belt must be tapped in the center to record accurate results.
- Press the
MEASUREbutton on the sonic tension meter, and tap the center of the X-axis belt lightly with a finger. Record the belt tension value. - Do step 4 three times and note all the recorded tension values. Calculate the average of the three recorded tension values.
- If the average of the three recorded belt tension values is not in the permitted 30 N (± 5 N) range, do procedure Adjust X-Axis Belt Tension.
Inspect Y-Axis Belts Tension
The AON-M2 uses two Y-axis belt tensioners. To help with print quality and machine reliability, the two Y-axis belt tensioners require periodic inspection and adjustment.
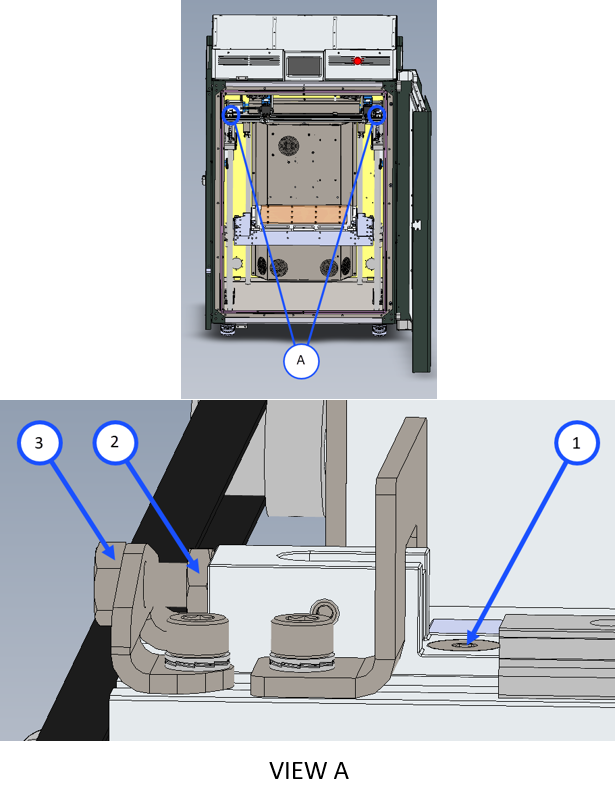
- Manually push the Y-axis gantry to the back of the machine.
- Press the
2button on the sonic tension meter to select the Y-axis belt tension test. - Position the flexible sensor of the sonic tension meter as near to the center of the right Y-axis belt as possible. Do not let the sonic tension meter sensor touch the belt.
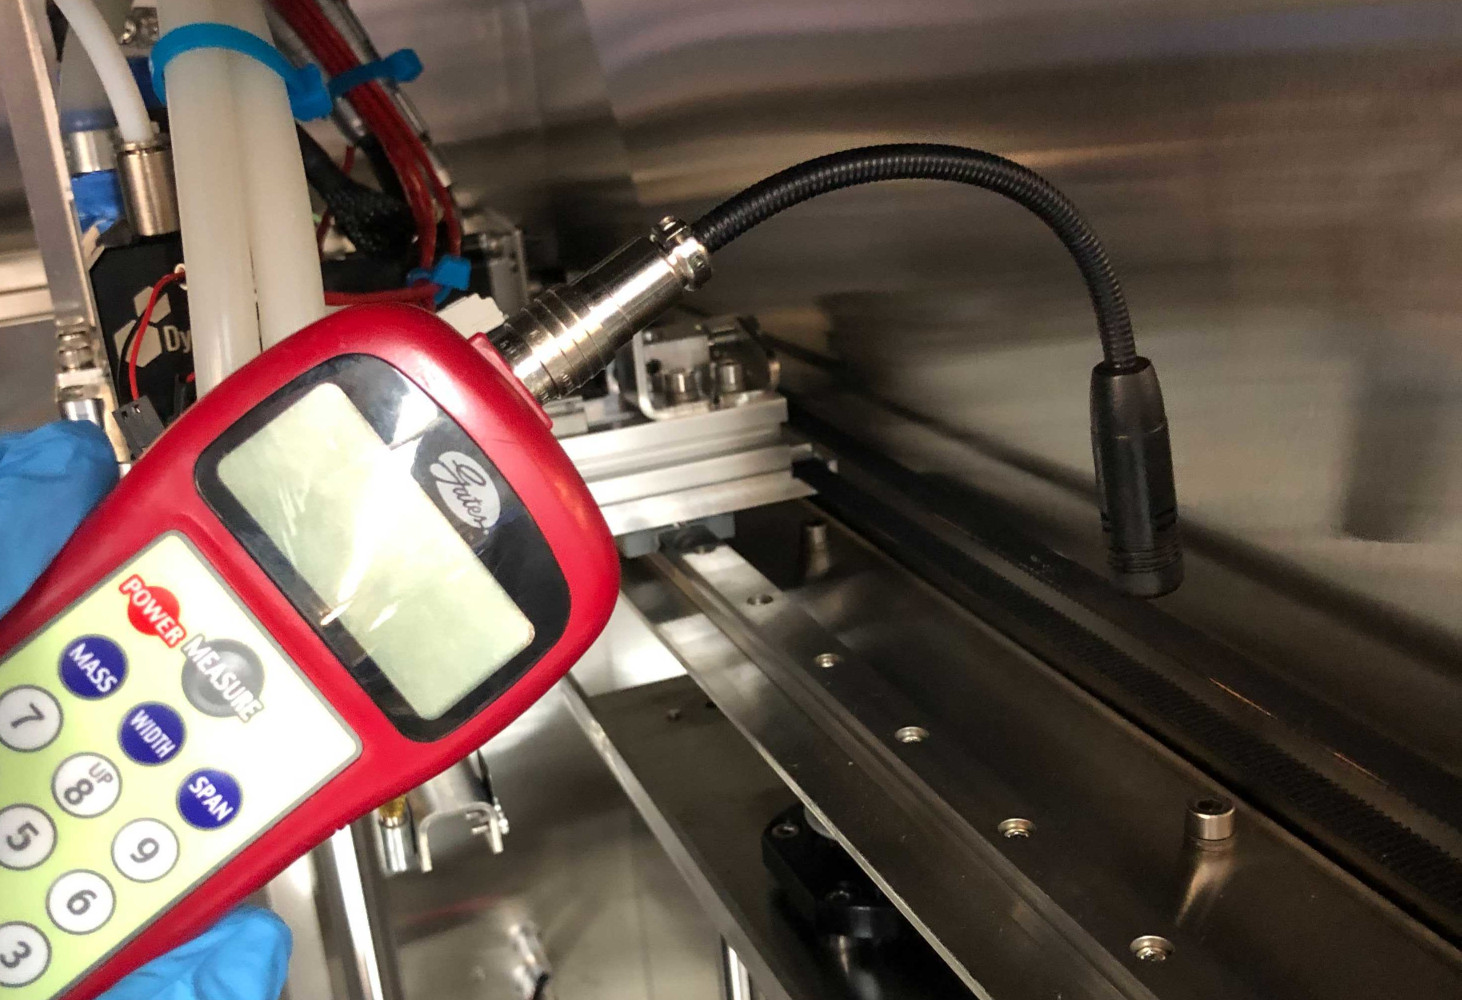
Do not tap the belts at the ends. This will result in incorrect results. The Y-axis belts must be tapped in the center to record accurate results.
- Press the
MEASUREbutton on the sonic tension meter, and tap the center of the right Y-axis belt lightly with a finger. Record the belt tension value. - Do step 4 three times and note all the recorded tension values. Calculate the average of the three recorded tension values.
- If the average of the three noted tension values is not in the permitted 30 N (± 5 N) range, do procedure Adjust Y-Axis Belts Tension.
- Do steps 3 to 6 for the Y-axis belt found on the left side of the machine.
Inspect Z-Axis Belts Tension
- Press the
3button on the sonic tension meter to select the Z-axis belt tension test. - Position the flexible sensor of the sonic tension meter as near to the center of the right Z-axis belt as possible. Do not let the sonic tension meter sensor touch the belt.
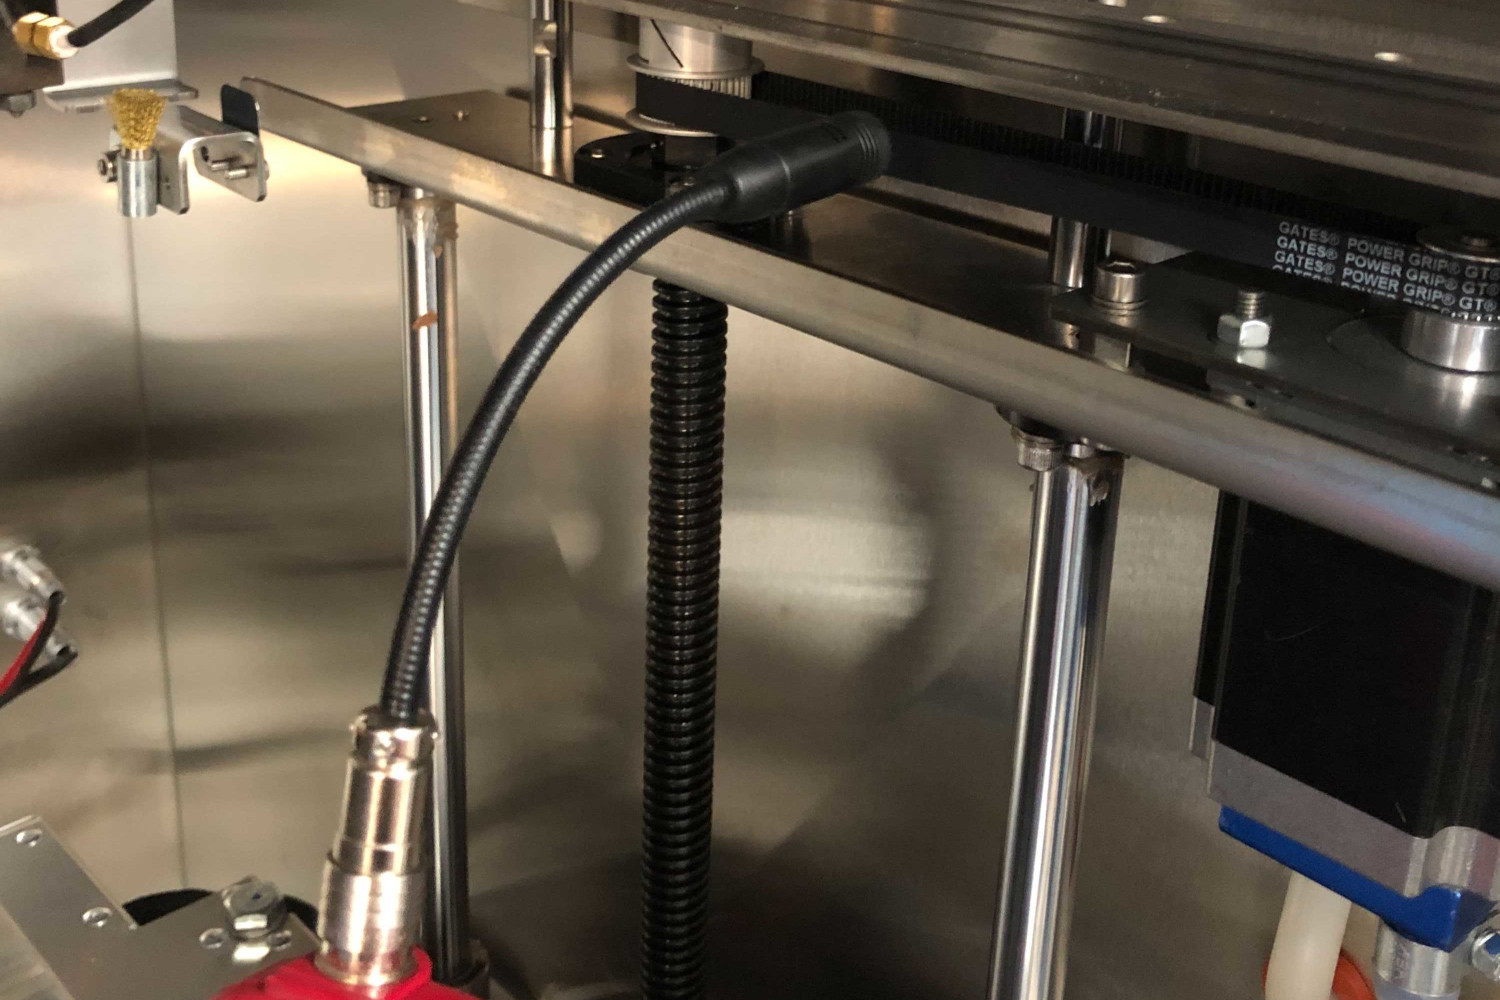
Do not tap the belts at the ends. This will result in incorrect results. The Z-axis belts must be tapped in the center to record accurate results.
- Press the
MEASUREbutton on the sonic tension meter, and tap the center of the right Z-axis belt lightly with a finger. Record the belt tension value. - Do step 3 three times and note all the recorded tension values. Calculate the average of the three recorded tension values.
- If the average of the three noted tension values is not in the 20 N (± 5 N) range, do procedure Adjust Z-Axis Belts Tension.
- Do steps 2 to 5 for the Z-axis belt found on the left side of the machine.
Adjust XYZ-Axes Belts Tension
Adjust X-Axis Belt Tension
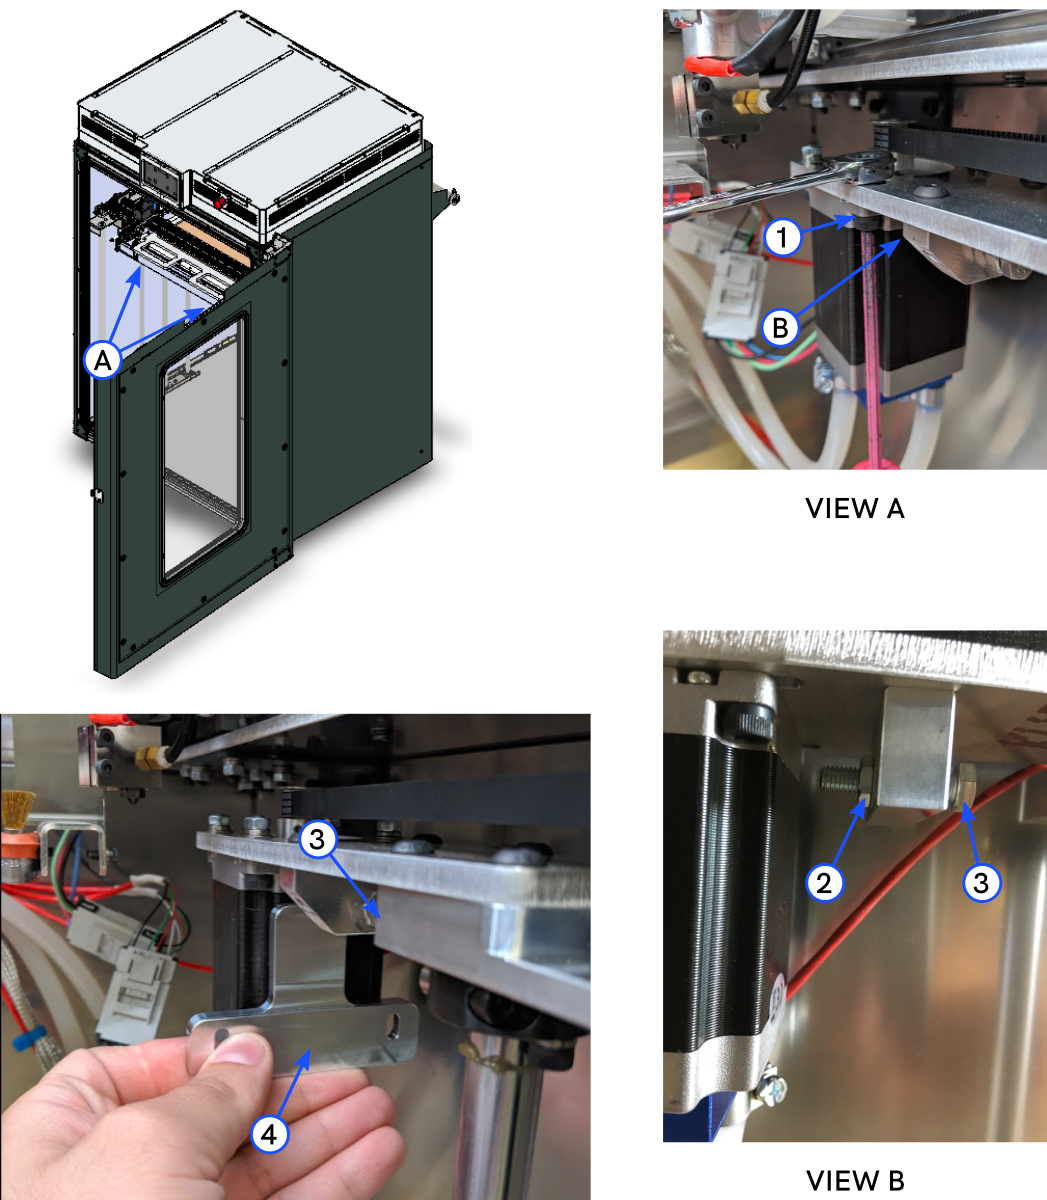
The X-axis belt tension can be adjusted from either the left or the right X-axis belt tensioner. In the procedure that follows, the left X-axis belt tensioner is used as an example.
For machines with jam nuts, do the steps that follow:
- Manually pull the Y-axis gantry to the front of the machine.
- Use the 4 mm hex key to loosen X-axis belt block socket flathead screw (1). Do not remove the socket flathead screw (1).
- Use the 10 mm open wrench to loosen X-axis belt jam nut (2).
- Use the 10 mm open wrench to tighten or loosen the X-axis belt block adjustment screw (3) as necessary.
- Do procedure Inspect X-Axis Belt Tension.
- When the X-axis belt tension is set to 30 N (± 5 N):
- Use the 4 mm hex key to tighten the socket flathead head screw (1).
- Use the 10 mm open wrench to tighten the jam nut (2).
- Do procedure Inspect X-Axis Belt Tension.
- If X-axis belt tension is not in the permitted 30 N (± 5 N) range, do steps 2 to 7 as necessary.
- Once belt tension is set, make sure the socket flathead screw (1) and the jam nut (2) are tight.
For machines without jam nuts, do the steps that follow:
- Manually pull the Y-axis gantry to the front of the machine.
- Use the 4 mm hex key to loosen X-axis belt block socket flathead screw (1). Do not remove the socket flathead screw (1).
- Use the 10 mm open wrench to tighten or loosen the X-axis belt block adjustment screw (2) as necessary.
- Do procedure Inspect X-Axis Belt Tension.
- When the X-axis belt tension is set to 30 N (± 5 N):
- Use the 4 mm hex key to tighten the socket flathead head screw (1).
- Do procedure Inspect X-Axis Belt Tension.
- If X-axis belt tension is not in the permitted 30 N (± 5 N) range, do steps 2 to 6 as necessary.
- Once belt tension is set, make sure the socket flathead screw (1) is tight.
Adjust Y-Axis Belts Tension
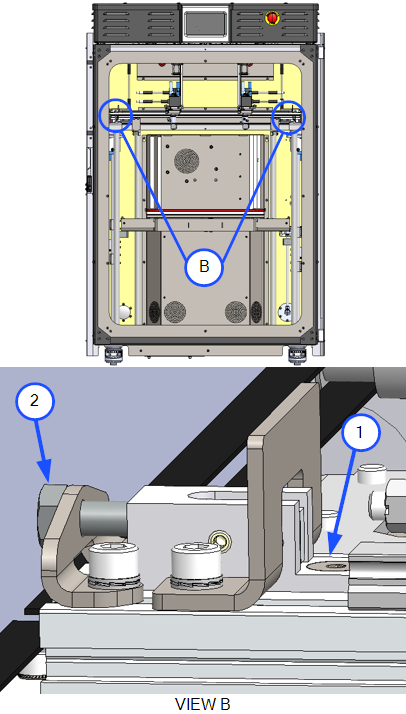
The Y-axis idlers belt tensioners must be adjusted on both left or the right sides. In the procedure that follows, the left Y-axis belt tensioner is used as an example.
- Manually push the Y-axis gantry to the back of the machine.
- Use the 10 mm open wrench to loosen the jam nut (1).
- Use the 10 mm open wrench to tighten or loosen the adjustment screw (2) as necessary.
- Do procedure Inspect Y-Axis Belts Tension.
- When the Y-axis belt tension is set to 30 N (± 5 N), use the 10 mm open wrench to tighten the jam nut (1).
- Do procedure Inspect Y-Axis Belts Tension.
- If Y-axis belt tension is not in the permitted 30 N (± 5 N) range, do steps 2 to 6 as necessary.
- Do steps 1 to 7 for the Y-idler assembly found on the right side.
Make sure that the left and right Y-axis belt tensions are ± 10 N from each other.
Adjust Z-Axis Belts Tension
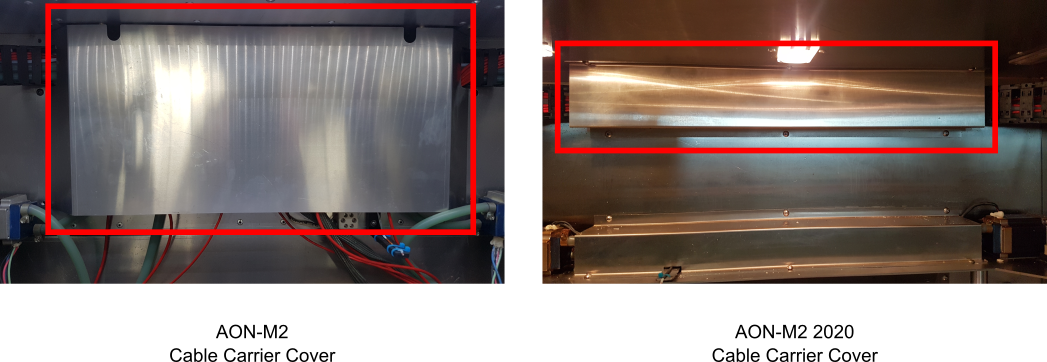 Identify if the machine is an AON-M2 or an AON-M2 2020. Look at the Cable Carrier Cover found at the back of the build chamber.
- If the machine is an AON-M2, refer to Adjust Z-Axis Belts Tension - AON-M2.
- If the machine is an AON M2+ or a AON-M2 2020, refer to Adjust Z-Axis Belt Tension - AON M2+ and AON-M2 2020.
Adjust Z-Axis Belts Tension - AON-M2
The Z-axis belts must be adjusted on both left or the right sides. In the procedure that follows, the right Z-axis belt is used as an example.
- Use the 8 mm open wrench to loosen the jam nut (2).
- Insert the aluminum spacer (4) between the Z-axis motor and the Z-axis adjustment screw (3). Hold the aluminum spacer (4) in this position.
- Use the 8 mm open wrench to position the adjustment screw (3) against the aluminum spacer (4). Do not tighten the adjustment screw (3) at this time.
- Use the 4 mm hex key and the 8 mm open wrench to loosen the four socket head screws (1) which secure the Z-axis motor top plate.
- Use the 8 mm open wrench to tighten or loosen the Z-axis adjustment screw (3) as necessary.
- Do procedure Inspect the Z-Axis Belts Tension.
- When the Z-axis belt tension is set to 20 N (± 5 N), use the 4 mm hex key and the 8 mm open wrench to tighten four socket head screws (1).
- Use the 8 mm open wrench to loosen the Z-axis adjustment screw (3).
- Remove the aluminum spacer (4).
- Do procedure Inspect the Z-Axis Belts Tension.
- Use the 8 mm open wrench to tighten the jam nut (2).
- If Z-axis belt tension is not in the permitted 20 N (± 5 N) range, do steps 4 to 9 as necessary.
- Do steps 1 to 11 for Z-axis belt found on the left side.
Make sure that the left and right Z-axis belt tensions are ± 10 N from each other.
Adjust Z-Axis Belt Tension - AON M2+ and AON-M2 2020
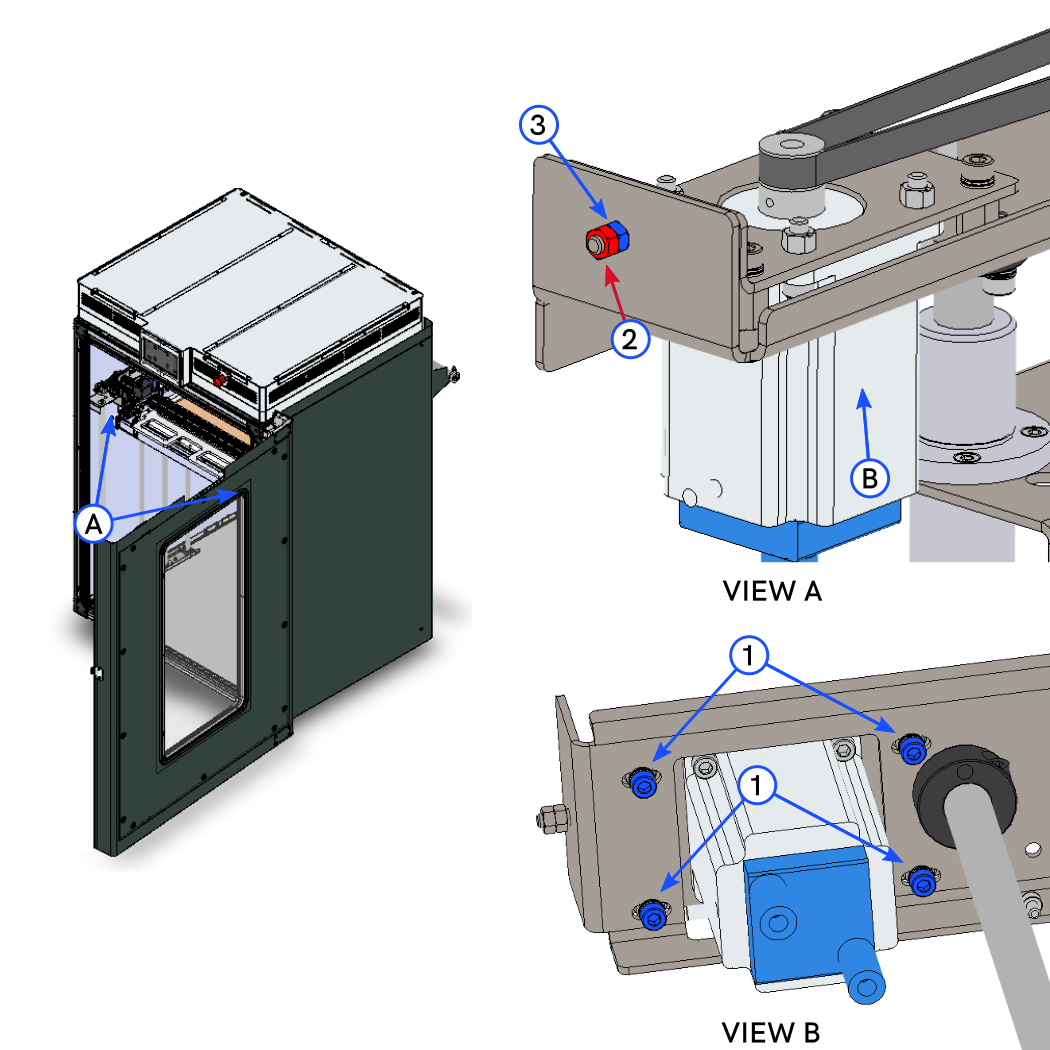
The Z-axis belts must be adjusted on both left or the right sides. In the procedure that follows, the right Z-axis belt is used as an example.
- Use the 4 mm hex key and 8 mm open wrench to loosen the four socket head screws (1).
- Use the 8 mm open wrench to loosen the jam nut (2).
- Use the 8 mm open wrench to tighten or loosen the Z-axis adjustment nut (3) as necessary.
- Do procedure Inspect the Z-Axis Belts Tension.
- When the Z-axis belt tension is set at 20 N (± 5 N), use the 4 mm hex key and 8 mm open wrench to tighten the four socket head screws (1).
- Use the 8 mm open wrench to tighten the jam nut (2).
- Do procedure Inspect the Z-Axis Belts Tension.
- If Z-axis belt tension is not in the permitted 20 N (± 5 N) range, do steps 3 to 7 as necessary.
- Once belt tension is set, make sure the jam nut (2) and the Z-axis adjustment screw (3) are tight.
- Do steps 1 to 9 for Z-axis belt found on the left side.
Make sure that the left and right Z-axis belt tensions are ± 10 N from each other.
Test and Return to Service
- Make sure that you remove all the tools from the build chamber.
- Close the build chamber door.
- Release the E-stop button.
- Home XYZ.
- Move the XYZ-axes in all directions. If there are unexpected behaviors and/or noises occur, check and adjust all the belts as necessary.
- Remove the flexible sensor from the sonic tension meter.
- Put the sonic tension meter and flexible sensor into the shipping box.
- Return the sonic tension meter to AON3D.
Reach out to our Customer Success team at help@aon3d.com for detailed instructions on how to return the sonic tension meter to AON3D.