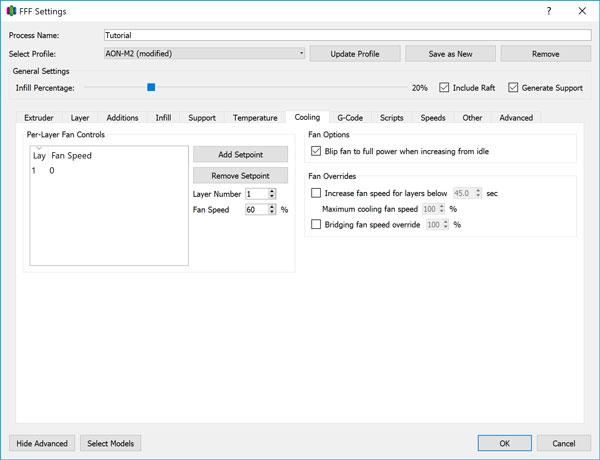
Cooling Tab

Toolhead-mounted part cooling fans are not currently available on the AON-M2.
Per-Layer Fan Controls
You can adjust the fan speed on a layer-by-layer basis by choosing a layer number and how strongly the fan should run at that point. This level of control is useful when you only want to apply cooling to specific parts of the model.
Add or remove setpoints using the buttons. You can double click on the listed items to change the layer number or fan speed values. It is recommended to not use the fan for the first 5-20 layers to prevent the print from separating from the bed. To identify which layer number corresponds to which part of the model, slice the model first and use the G-code preview screen to identify the layer number on the bottom left corner of the Simplify3D® screen.
Use of the cooling fan may decrease the inter-layer bonding strength. Refer to the supplier materials guide for specific guidelines on individual materials.
Blip Fan
The cooling fan power is adjusted via PWM - below a certain fan speed % value, the fan may fail to activate at all unless initial momentum is provided by spinning the fan up to 100% first before decreasing to the desired value. This option should always be on.
Increase Fan Speed
If a single layer’s printing time falls below a selected value, the part cooling fan turns on instead of slowing down the print speed.
In general, the Adjust Printing Speed approach is favoured over using the cooling fan. If the material you are using is not strongly affected by the application of forced cooling or adjusting the printing speed is not sufficient, this feature may be used in conjunction.
Bridging Fan Speed
When bridging is detected by the slicer, the cooling fan can automatically kick in to assist - this helps “freeze” the material in place as it’s coming out of the hot end. Ideally, the use of proper supports is much better than bridging. In situations where this isn’t possible, as much cooling as possible is desired in a bridging scenario so set this to 100%.