Infill Tab
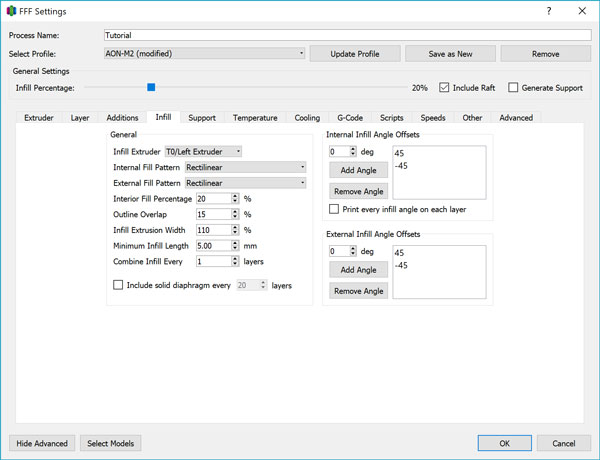
3D printed parts generally have a semi-hollow interior. The Infill tab allows you to control the parameters for the interior fill.
Infill Extruder
Choose the toolhead you would like to print the infill with. Generally you will use the same extruder as the Layer Primary Extruder - T0.
Internal Fill Pattern
Six different infill patterns to are available to choose from in Simplify3D, each with tradeoffs and advantages between print time, strength, and material usage. Unless the geometry or application specifically calls for fine-tuning, we recommend the Rectilinear fill pattern.
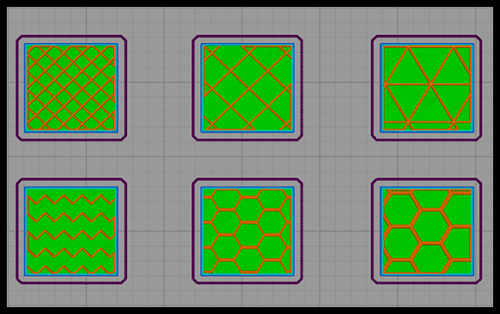
- Rectilinear
- Grid
- Triangular
- Wiggle
- Fast Honeycomb
- Slow Honeycomb
Rectilinear
The rectilinear pattern is the simplest and most versatile fill pattern with the best balance of speed, strength, and material usage. At each layer, it will create a single pass of parallel lines according to the Internal Infill Angle settings.
Grid
The grid pattern is similar to rectilinear except that for each layer, it will make multiple passes to print every angle offset in the Internal Infill Angle box.
Triangular
The triangular pattern offers slightly greater strength than the rectilinear, at the expense of longer print times at higher fill percentages and less flexibility to properly fill geometries with complex cross sections.
Wiggle
Aside from potential aesthetic value, the wiggle mode doesn’t serve to add much in terms of strength to a print. The rapid acceleration moves required for this zig-zag pattern will increase overall print time.
Fast Honeycomb
The honeycomb can provide the greatest part strength for specific loading orientations and is better suited for space-filling of complex cross sectional geometries. However at higher fill percentages, the honeycomb begins to approximate a rectilinear fill at the expense of high vibration and slower movement, so this is better suited for increased strength at lower fill percentages.
Slow Honeycomb
Similar to the difference between rectilinear and grid - the slow honeycomb makes two passes every layer to print the full honeycomb pattern.
Internal Infill Angle
For any internal fill pattern, this box allows you to arbitrarily set the angle of each successive layer of fill. 0 degrees is a straight line parallel to the X axis. The default is 45/-45.
External Fill Pattern
External fill pattern determines how the top and bottom solid layers are filled. The concentric fill option follows the perimeter outline towards the centre, while the rectilinear fills the space with straight-line passes.
Unless trying to achieve a specific aesthetic effect, rectilinear is almost always the better choice. For models with perimeters that don’t adhere to simple geometries, concentric fill is prone to leaving gaps in the top and bottom.
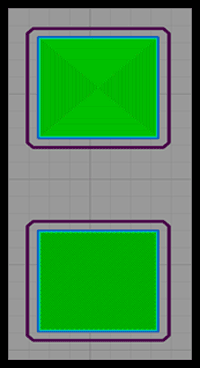
top figure shows concentric fill, bottom shows rectilinear
External Infill Angle
When using rectilinear external fill, this box allows you to arbitrarily set the angle of each successive layer of fill. 0 degrees is a straight line parallel to the X axis.
Interior Fill Percentage
This value determines the fill density of the interior. 20% is a good place to start for everyday prototyping applications. 50-70% is the maximum we recommend for high-strength applications.
Between 90-100%, increasing the fill percentage may actually result in a decrease in mechanical properties unless the extrusion flow is extremely well tuned due to overlap and overextrusion creating microvoids in the cross section.
Outline Overlap
Outline overlap is the degree to which the infill toolpath overlaps with the perimeter toolpath. 15-20% is a good place to start. For composite-filled materials, the material flow becomes more viscous and you may need to increase this value to upwards of 30% to ensure proper adhesion between infill and perimeter.
Infill Extrusion Width
This allows you to override the default extrusion width set in the Extruder tab for the infill only. Setting this to a value slightly higher than 100% usually results in stronger parts.
Minimum Infill Length
For features where a single infill pass will be smaller in length than this value, Simplify3D® will ignore it altogether. Ignoring small features will decrease unnecessary travel and print moves, and can result in cleaner prints.
5mm is a good default to start with.
Combine Infill
When printing with a small layer height, it may be advantageous to print the infill every other layer or even less frequently to cut down on the print time.
For example, a value of 2 here with the layer height set to 0.1mm would mean that your infill will print at a layer thickness of 0.2mm every other layer.
Include Solid Diaphragm
This feature allows you to print a layer of 100% fill every X layers should you wish to add additional strength without significantly increasing print time and material usage.