Replace Vacuum Pump Vanes
| Model | [ ] AON M2+ (CE) | [ ] AON M2+ (R-NZ) | [•] AON M2+ | [ ] AON-M2 2020 | [ ] AON-M2 |
| Category | [•] Preventive | [•] Corrective | |||
| Frequency | [ ] Daily | [ ] Weekly | [ ] Monthly | [•] Yearly | [ ] As Needed |
Summary
The procedure that follows gives the instructions on how to:
- Replace the five vacuum pump vanes.
- Inspect and clean the vacuum pump filter cartridge.
- Inspect and clean the vacuum pump blow-off valve.
Estimated time: 60 minutes
Do not operate the AON3D machine in an area where the quality of air is not clean. Make sure that the work area is clean at all times. A clean work area will help increase the quality of air that is used to operate the vacuum circuit in the AON3D machine.
AON3D recommends that the five vacuum pump vanes be replaced at 3000 hours of operation.
Tools
| Qty | Description | Specification |
|---|---|---|
| 1 | Camera, Digital | N/A |
| 1 | Air Compressor | 15 psi (maximum) |
| 1 | Hex Key | 6 mm |
| 1 | Hex Key | 4 mm |
| 1 | Parts Pick | Non-ferrous, small |
| 1 | Work Light | Portable |
| A/R | Rags | Lint-free |
| A/R | Isopropyl Alcohol | 99% |
Parts Information
| Qty | Part Number | Description |
|---|---|---|
| 1 | D5BDEF3E | Vacuum Pump Vanes VT 4.4 (set of 5) |
| 1 | 0BE7A871 | Vacuum Pump Filter Cartridge T 4.4, Optional |
Reach out to our Customer Success team at help@aon3d.com for genuine AON3D replacement part(s).
Personal Protective Equipment
| Qty | Description | Minimum Specification |
|---|---|---|
| 1 | Safety Eyewear | ANSI/ISEA Z87.1 |
| 1 | Safety Footwear | EN ISO 20345 or ASTM F2413 |
| A/R | Nitrile Gloves | ISO 2859-1 or ASTM D6319 |
| A/R | Face Mask | Respiratory |
Prepare the Machine
- Home XYZ.
- Use the Graphical User Interface (GUI) to power OFF the vacuum pump.
- Open the build chamber door.
- Push the E-stop button.
- Turn the power OFF with the ON/OFF switch found behind the machine.
- Disconnect the main power cord from the receptacle.
Dangerous voltages continue to be found in the electrical panel when the ON/OFF switch is set to OFF. Disconnect the main power cord from the machine while maintenance is done. Failure to do so can cause electric shock.
- Turn the vacuum circuit power OFF with the ON/OFF switch found on vacuum control box.
- Disconnect the power cord from the the vacuum circuit electrical enclosure.
- Wait until the build chamber, build platform, and hot ends are at room temperature.
Remove the Vacuum Pump Assembly
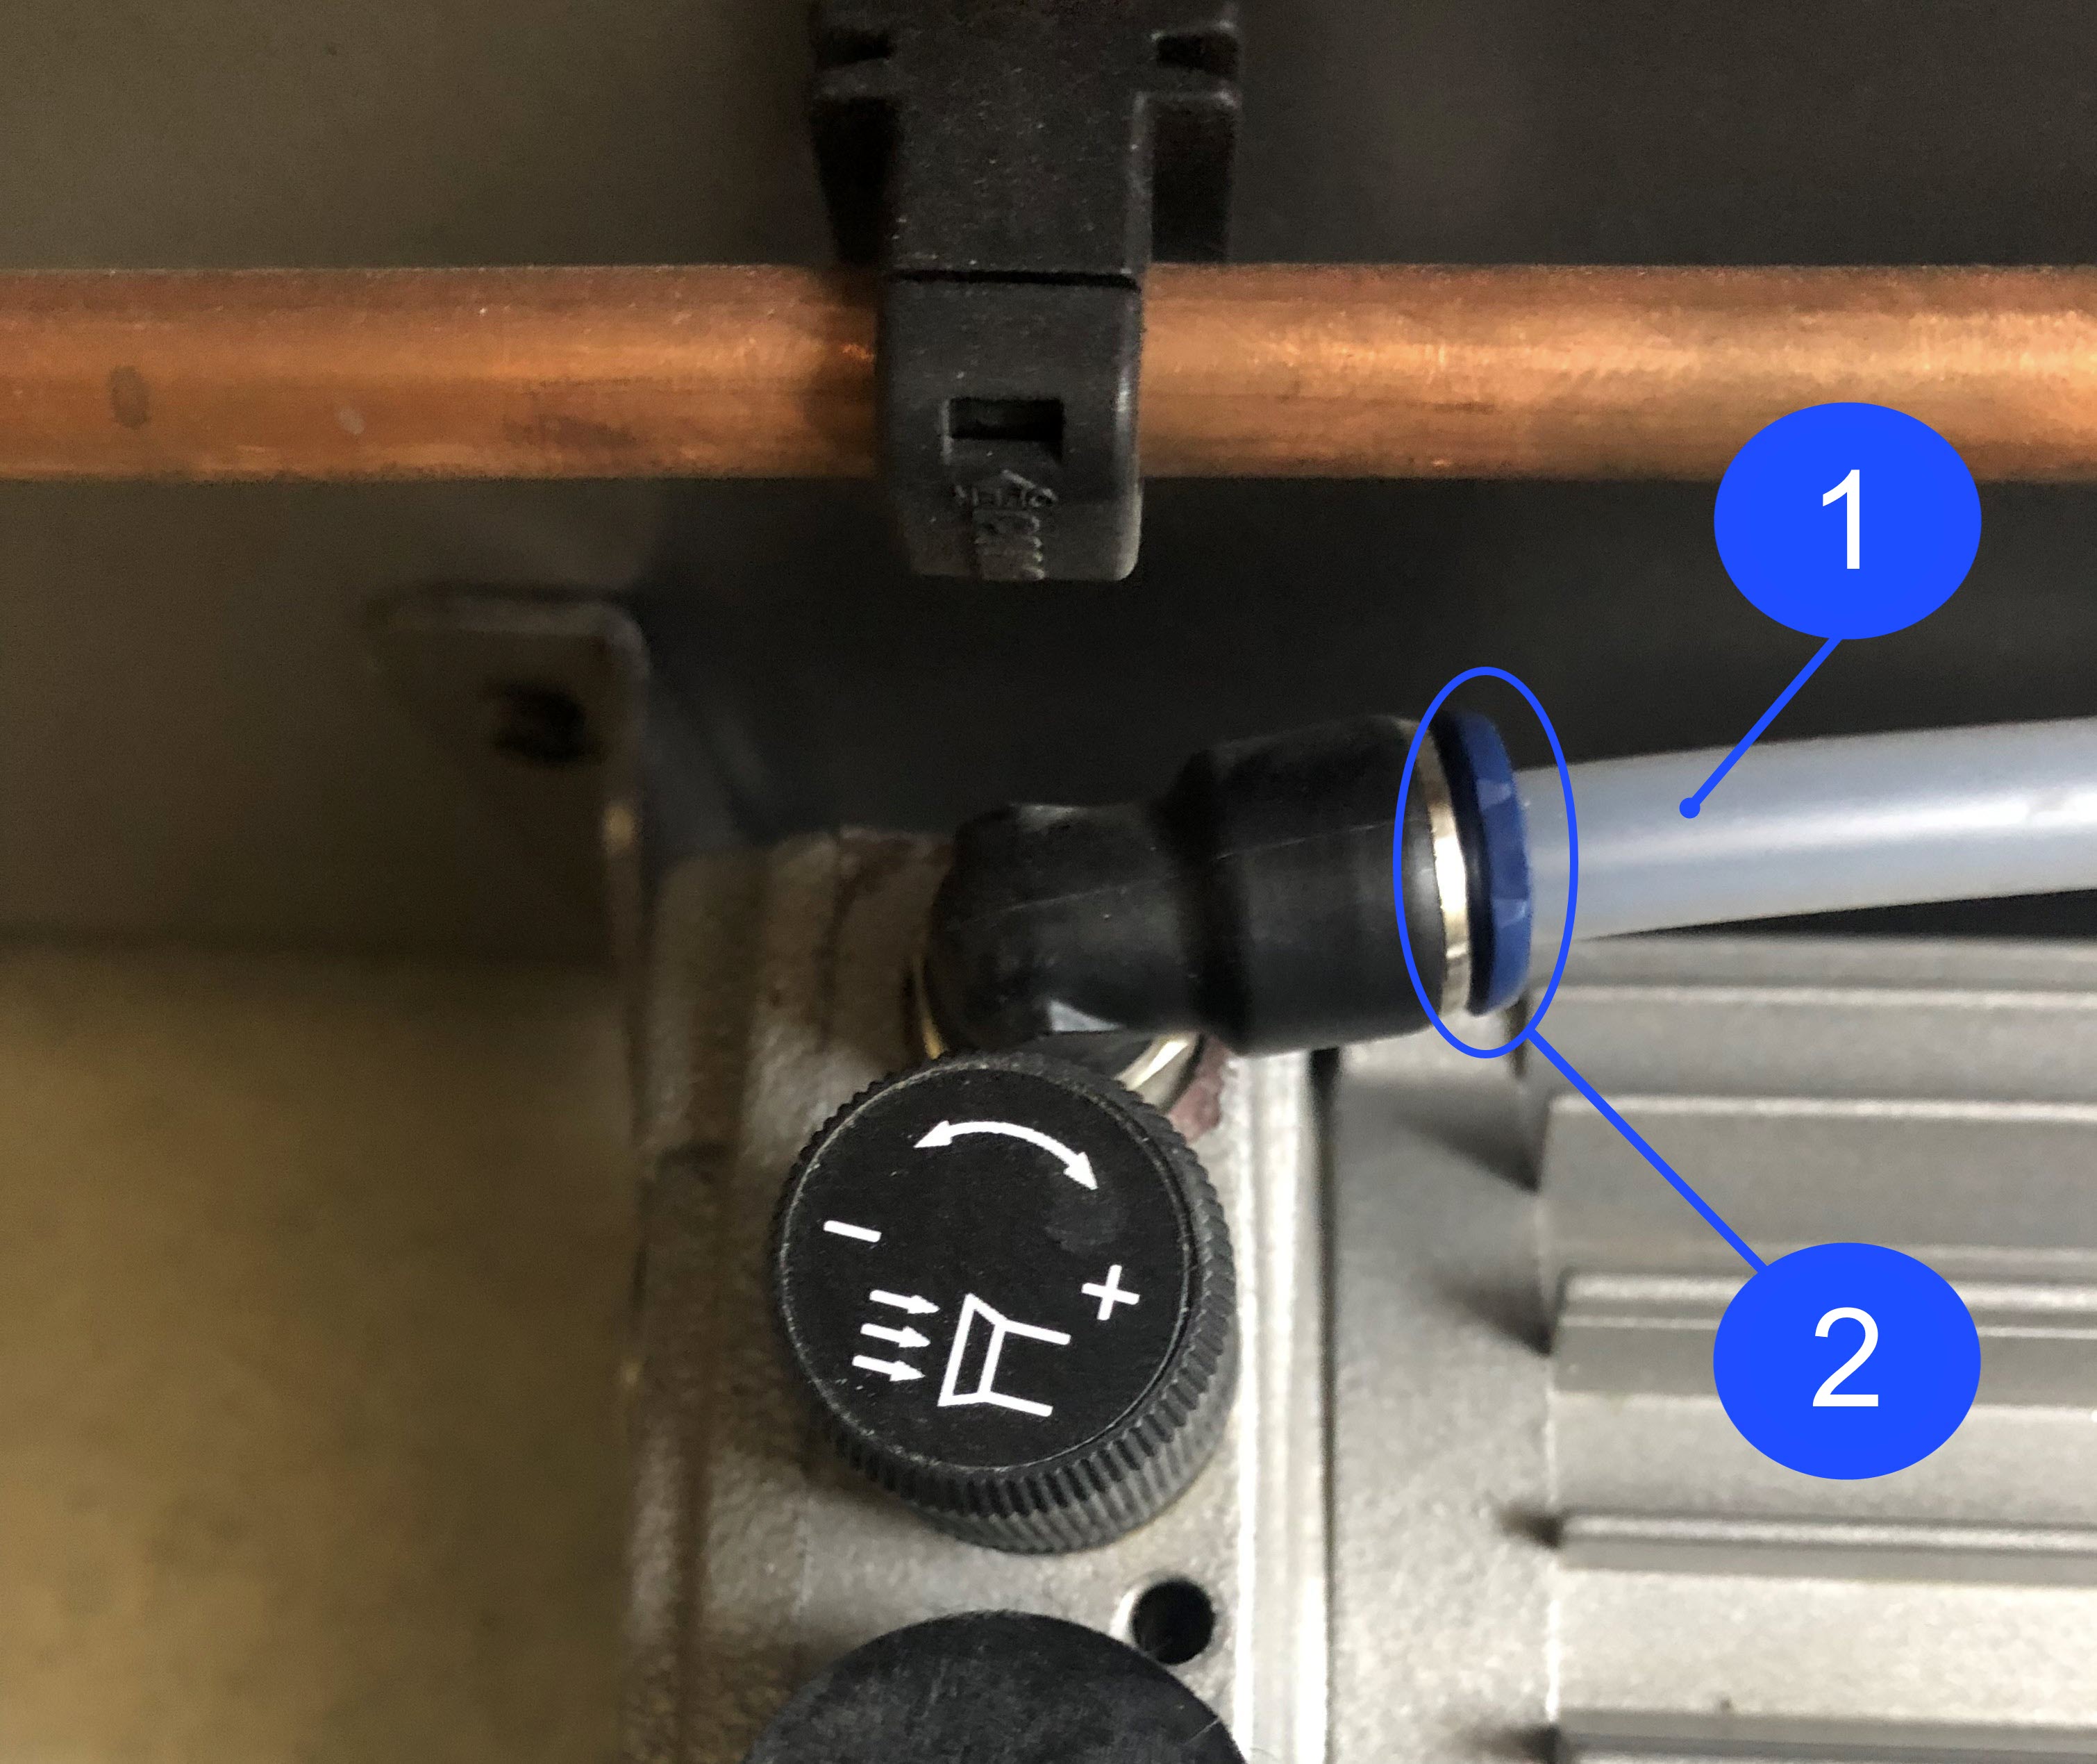
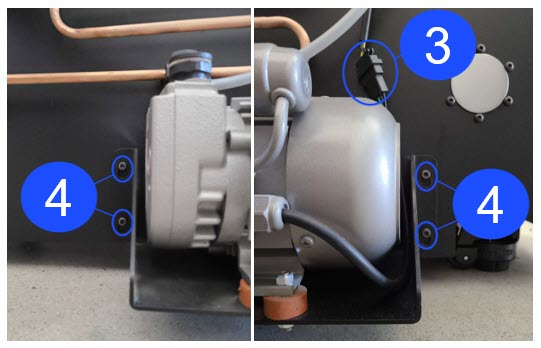
- Disconnect the vacuum tube (1) from the vacuum pump fitting (2) as follows:
- Compress the vacuum pump fitting (2) collar.
- With the vacuum pump fitting (2) collar compressed, pull out the vacuum tube (1).
- Disconnect the vacuum pump wire harness (3).
- Use the 4 mm hex key to loosen the four screws (4) that hold the vacuum pump assembly onto the rear panel of the machine. Do not remove the four screws (4).
- Carefully lift and pull out the vacuum pump assembly.
- Put the vacuum pump assembly on a clean workbench.
Inspect the Vacuum Pump Vibration Dampeners
Because the vacuum pump is removed from the machine, AON3D recommends that the vacuum pump vibration dampeners be inspected and/or replaced. Refer to the Replace Vacuum Pump Vibration Dampeners procedure.
Remove the Vacuum Pump Vanes and Components
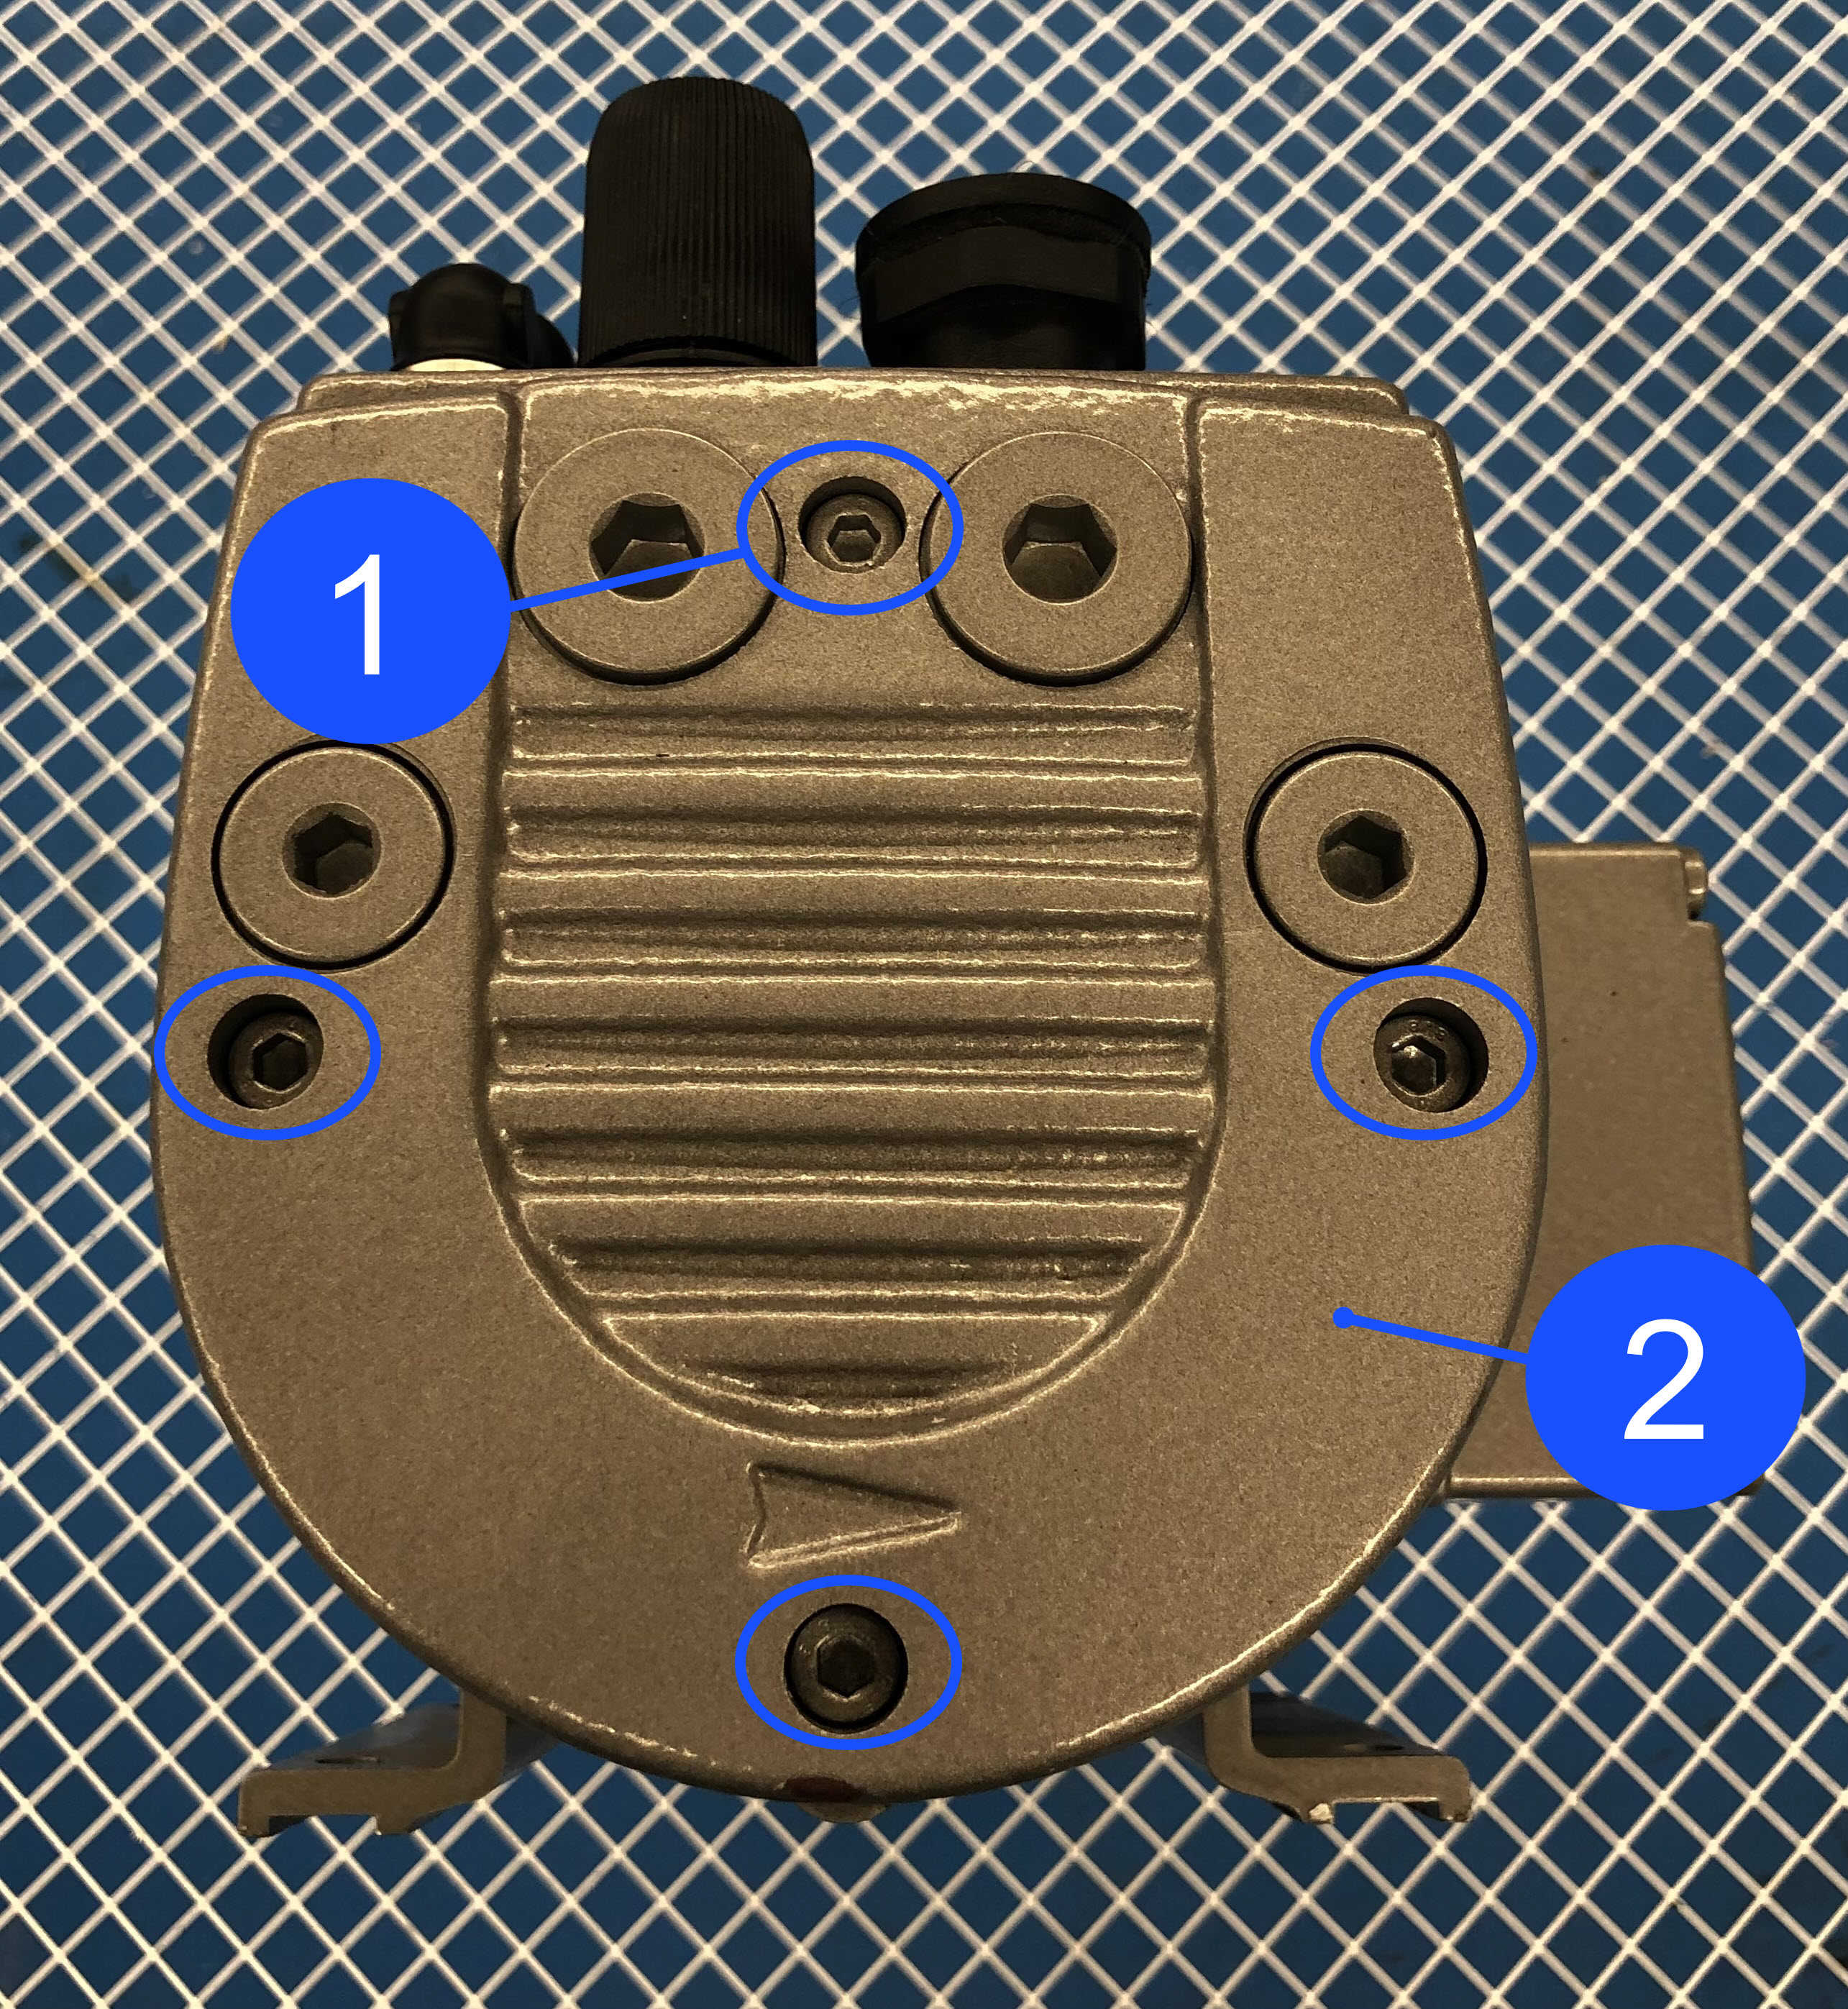
- Use the 6 mm hex key to remove the four screws (1) found on the front vacuum pump cover (2).
- Remove the front vacuum pump cover (2). Set the front vacuum pump cover (2) aside.
Use the digital camera to take photograph(s) of the orientation of the five vanes in the vacuum pump rotor. The photograph(s) can be used to help with the vacuum pump vane installation procedure.
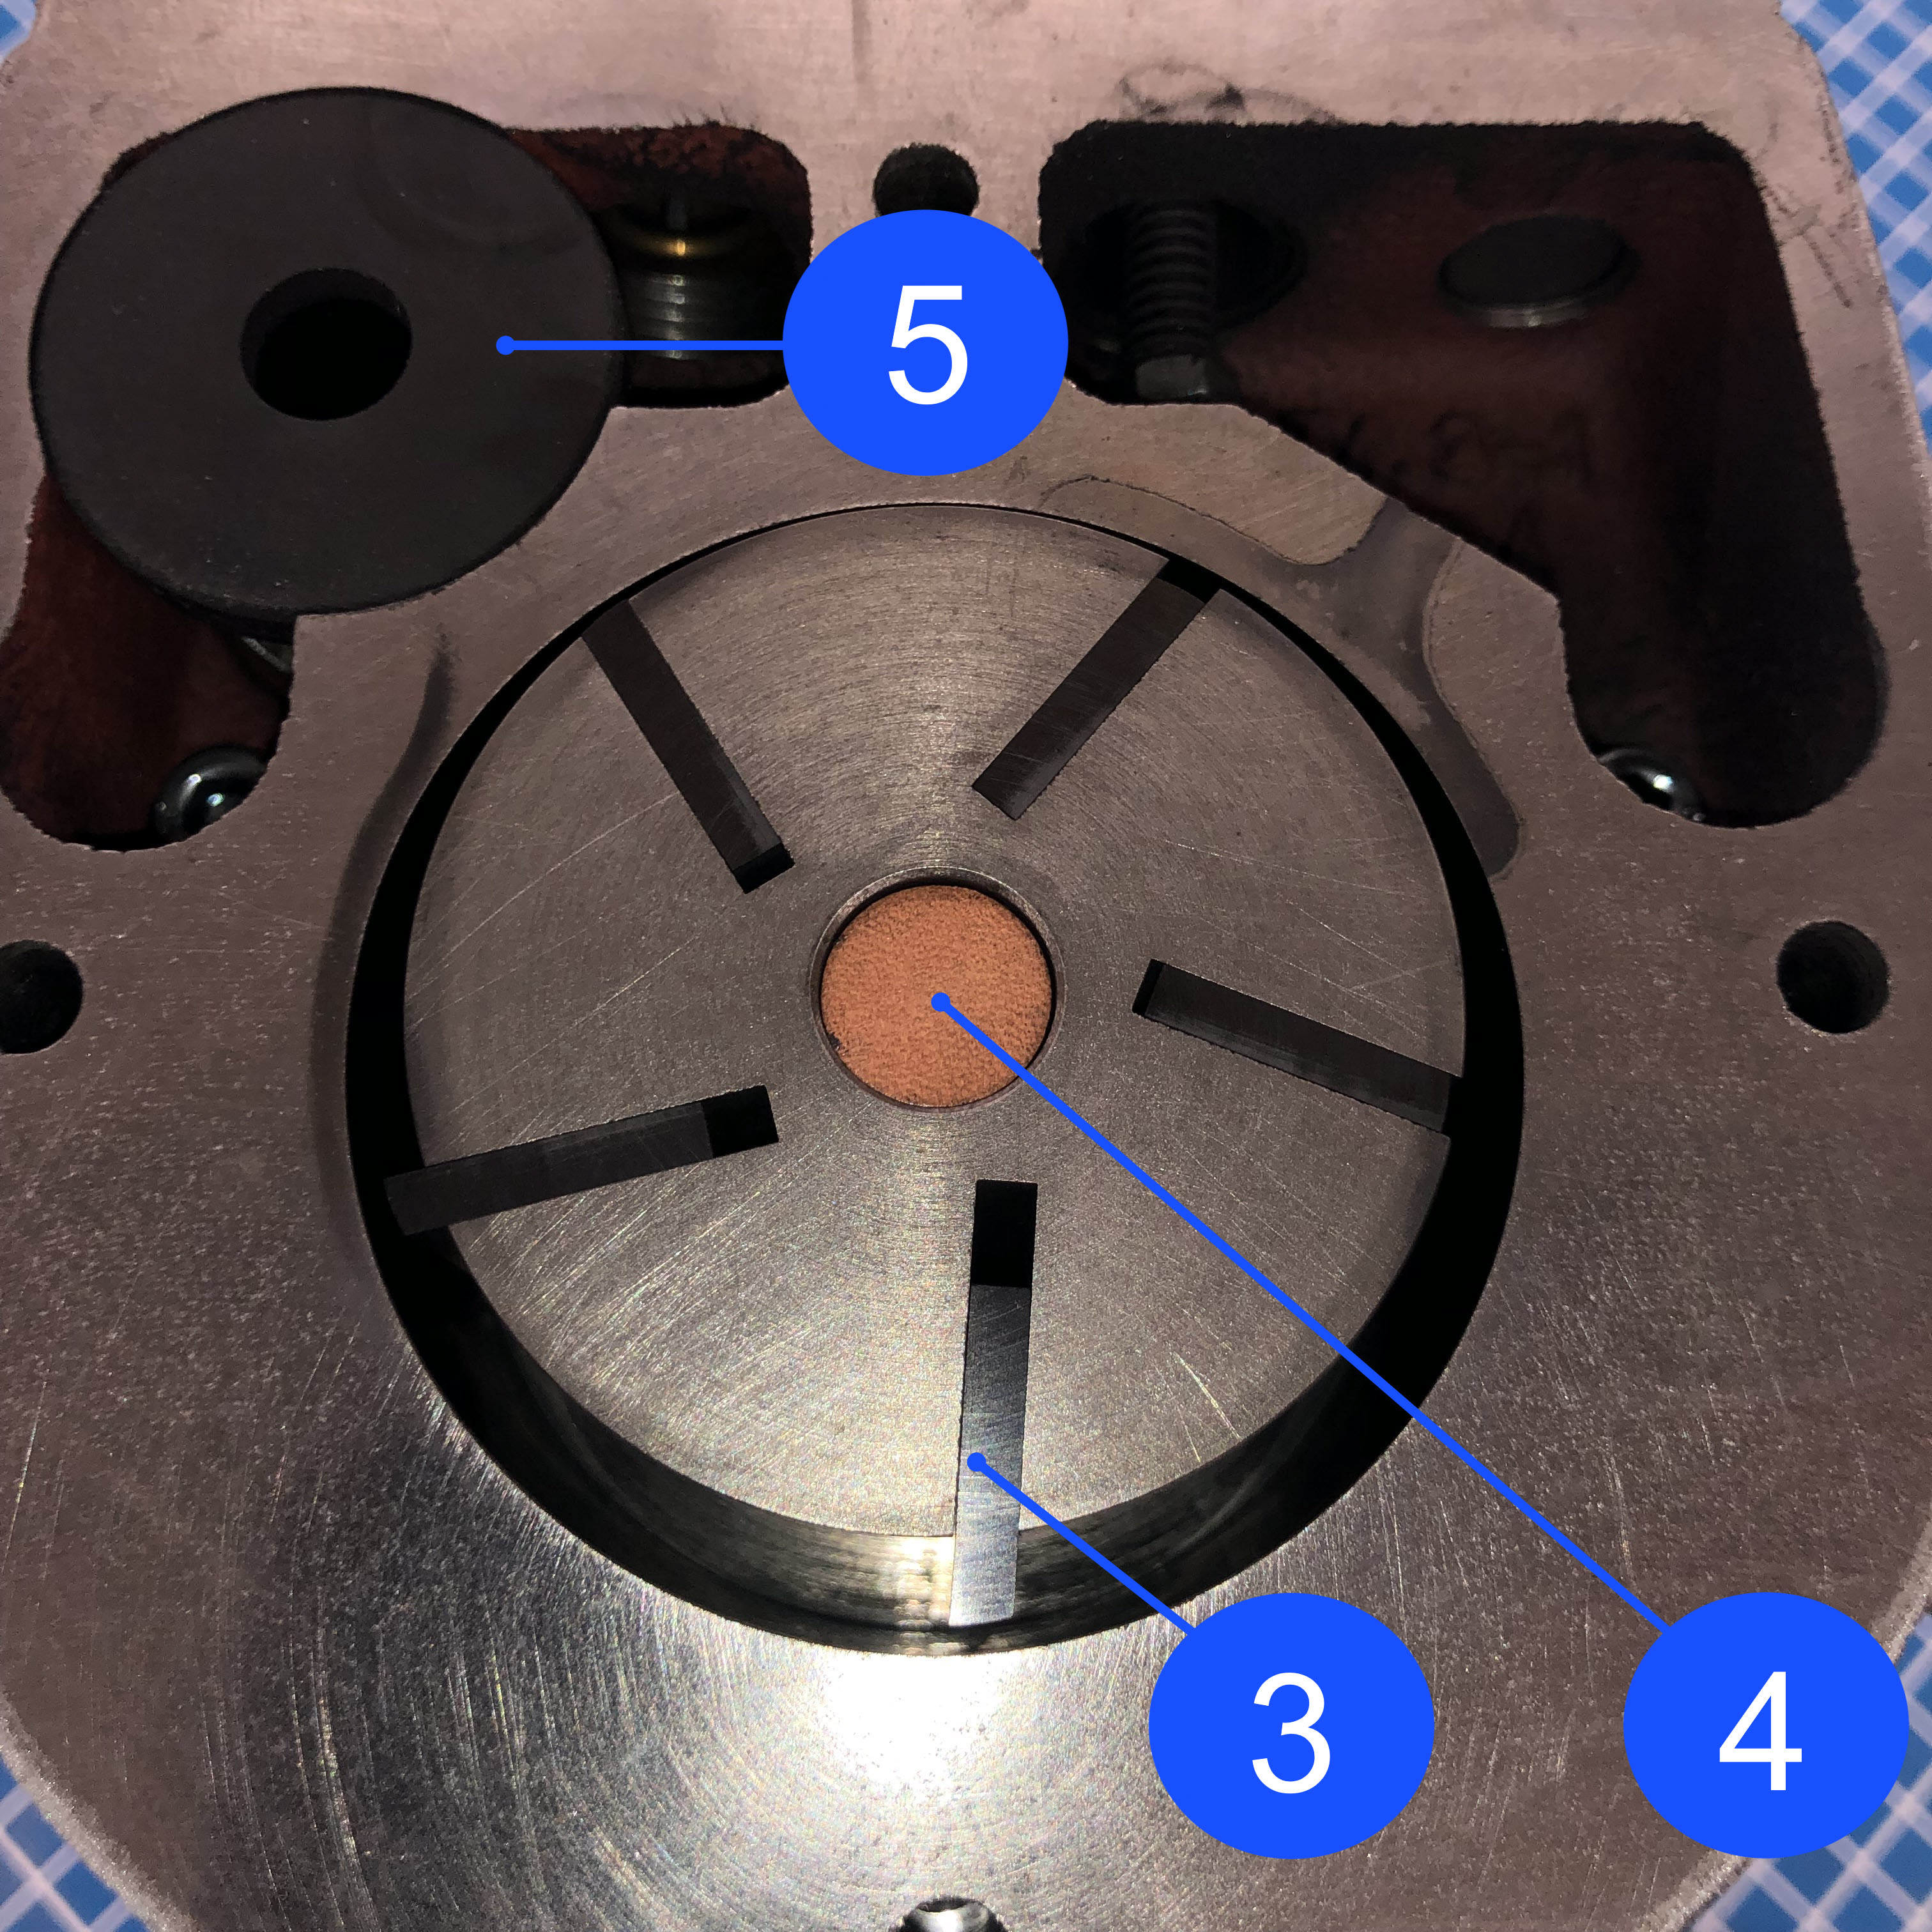
- Use the non-ferrous pick to carefully remove the components that follow:
- The five vacuum pump vanes (3)
- The bronze thrust bearing (4)
- The filter cartridge (5).
- Discard the five vacuum pump vanes (3).
Inspect and Clean the Vacuum Pump Filter Cartridge
- Use compressed air to clean the vacuum pump filter cartridge. Make sure that the vacuum pump filter cartridge is clean. Replace, if necessary.
- Inspect the vacuum pump filter cartridge for rips, holes, and/or tears. Replace, if necessary.
Clean the Vacuum Pump Components
- Use the isopropyl alcohol, lint-free rag(s), and compressed air to clean:
- The vacuum pump housing cavities and components
- The front vacuum pump cover cavities.
- Let dry for two minutes.
- Use the work light to make sure that the vacuum pump cavities and components are clean.
- Put a clean lint-free rag on top of the components that follow to prevent contamination:
- The vacuum pump housing cavities and components
- The front vacuum pump cover cavities.
Prepare the New Vacuum Pump Vanes
- Use a lint-free rag and isopropyl alcohol to clean the new five vacuum pump vanes. Make sure that the five vacuum pump vanes are clean.
- Let the five vacuum pump vanes dry for two minutes.
Assemble the Vacuum Pump
• The five vacuum pump vanes must be installed into the vacuum pump rotor in the correct orientation. Failure to install the five vanes correctly will cause the vacuum pump to operate too hot and cause damage to machine component(s).
• Do not apply lubricants to the components found in the vacuum pump cavity. All components found in the vacuum pump cavity must operate dry. The addition of lubricants to the vacuum pump cavity can cause damage to machine component(s).
To help install the five vacuum pump vanes, AON3D recommends that the vacuum pump be placed vertically, with the fan end on a clean workbench. This will help the user correctly install the five vacuum pump vanes into the vacuum pump rotor.
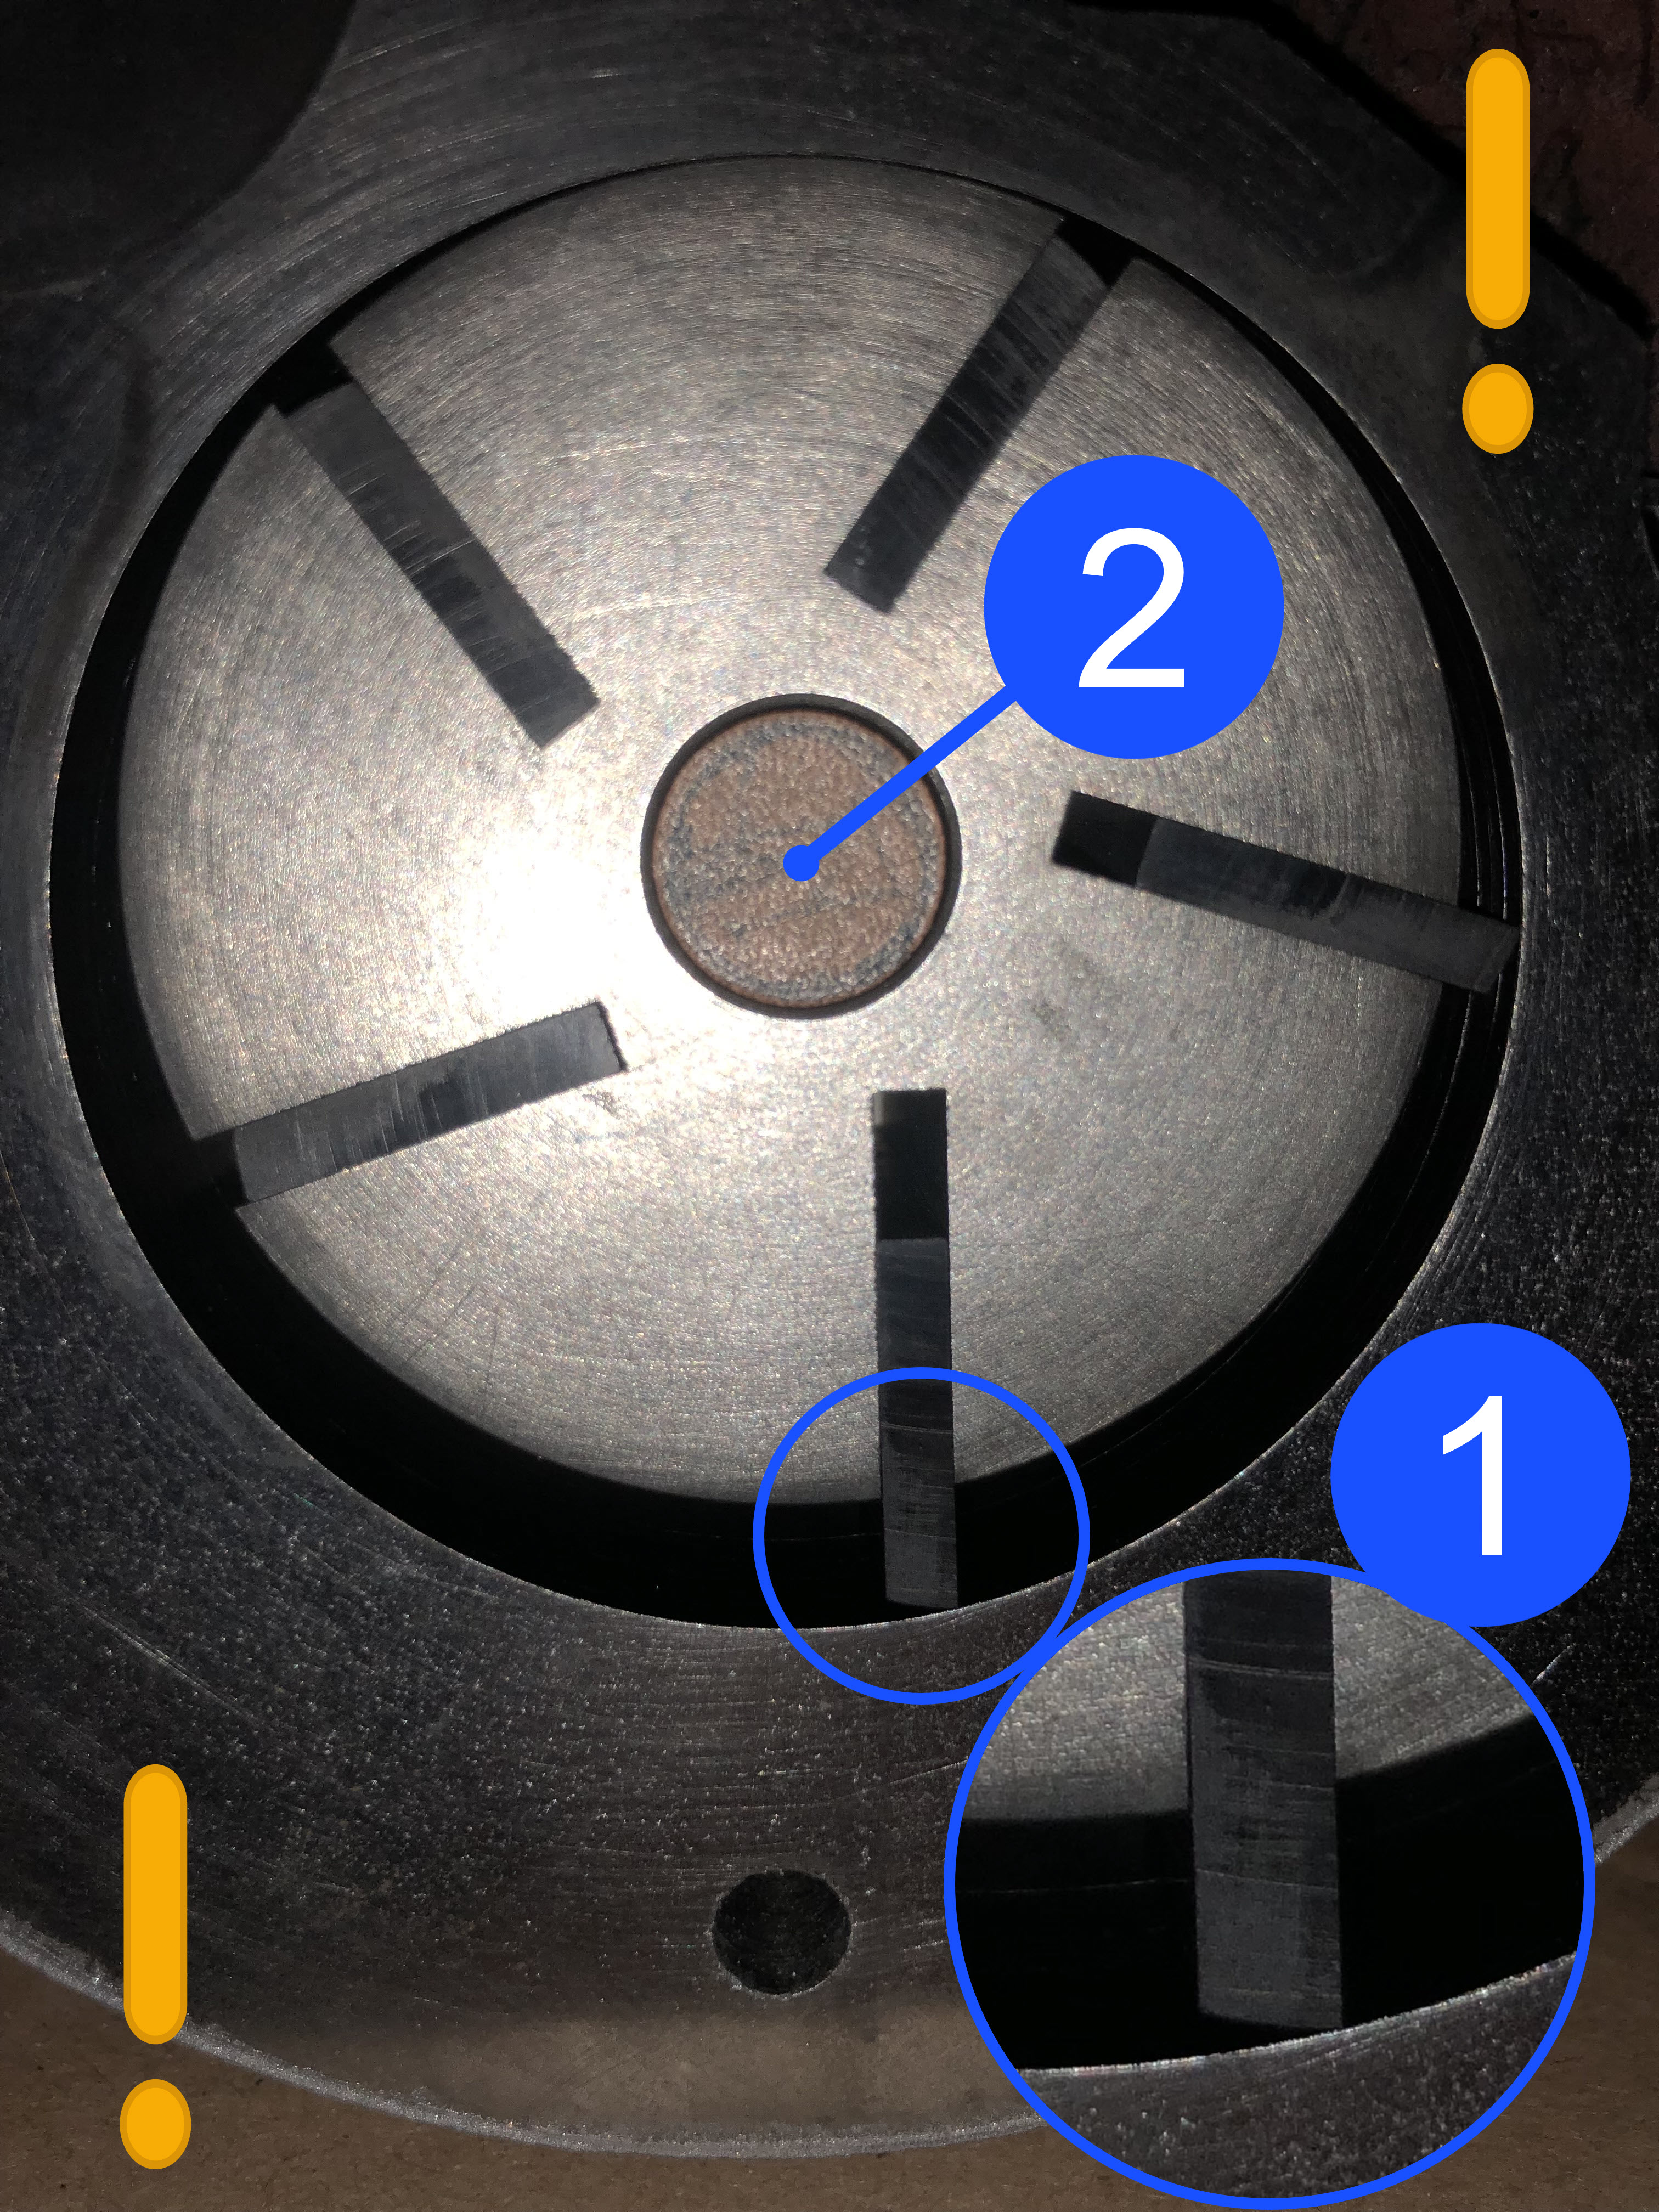
- Remove the clean lint-free rag from the top of the vacuum pump cavity.
- Install the five new vacuum pump vanes (1) into the vacuum pump rotor.
- Make sure that the five vacuum pump vanes (1) are correctly installed in the vacuum pump rotor.
- Install the bronze thrust bearing (2) in the center of the vacuum pump main shaft.
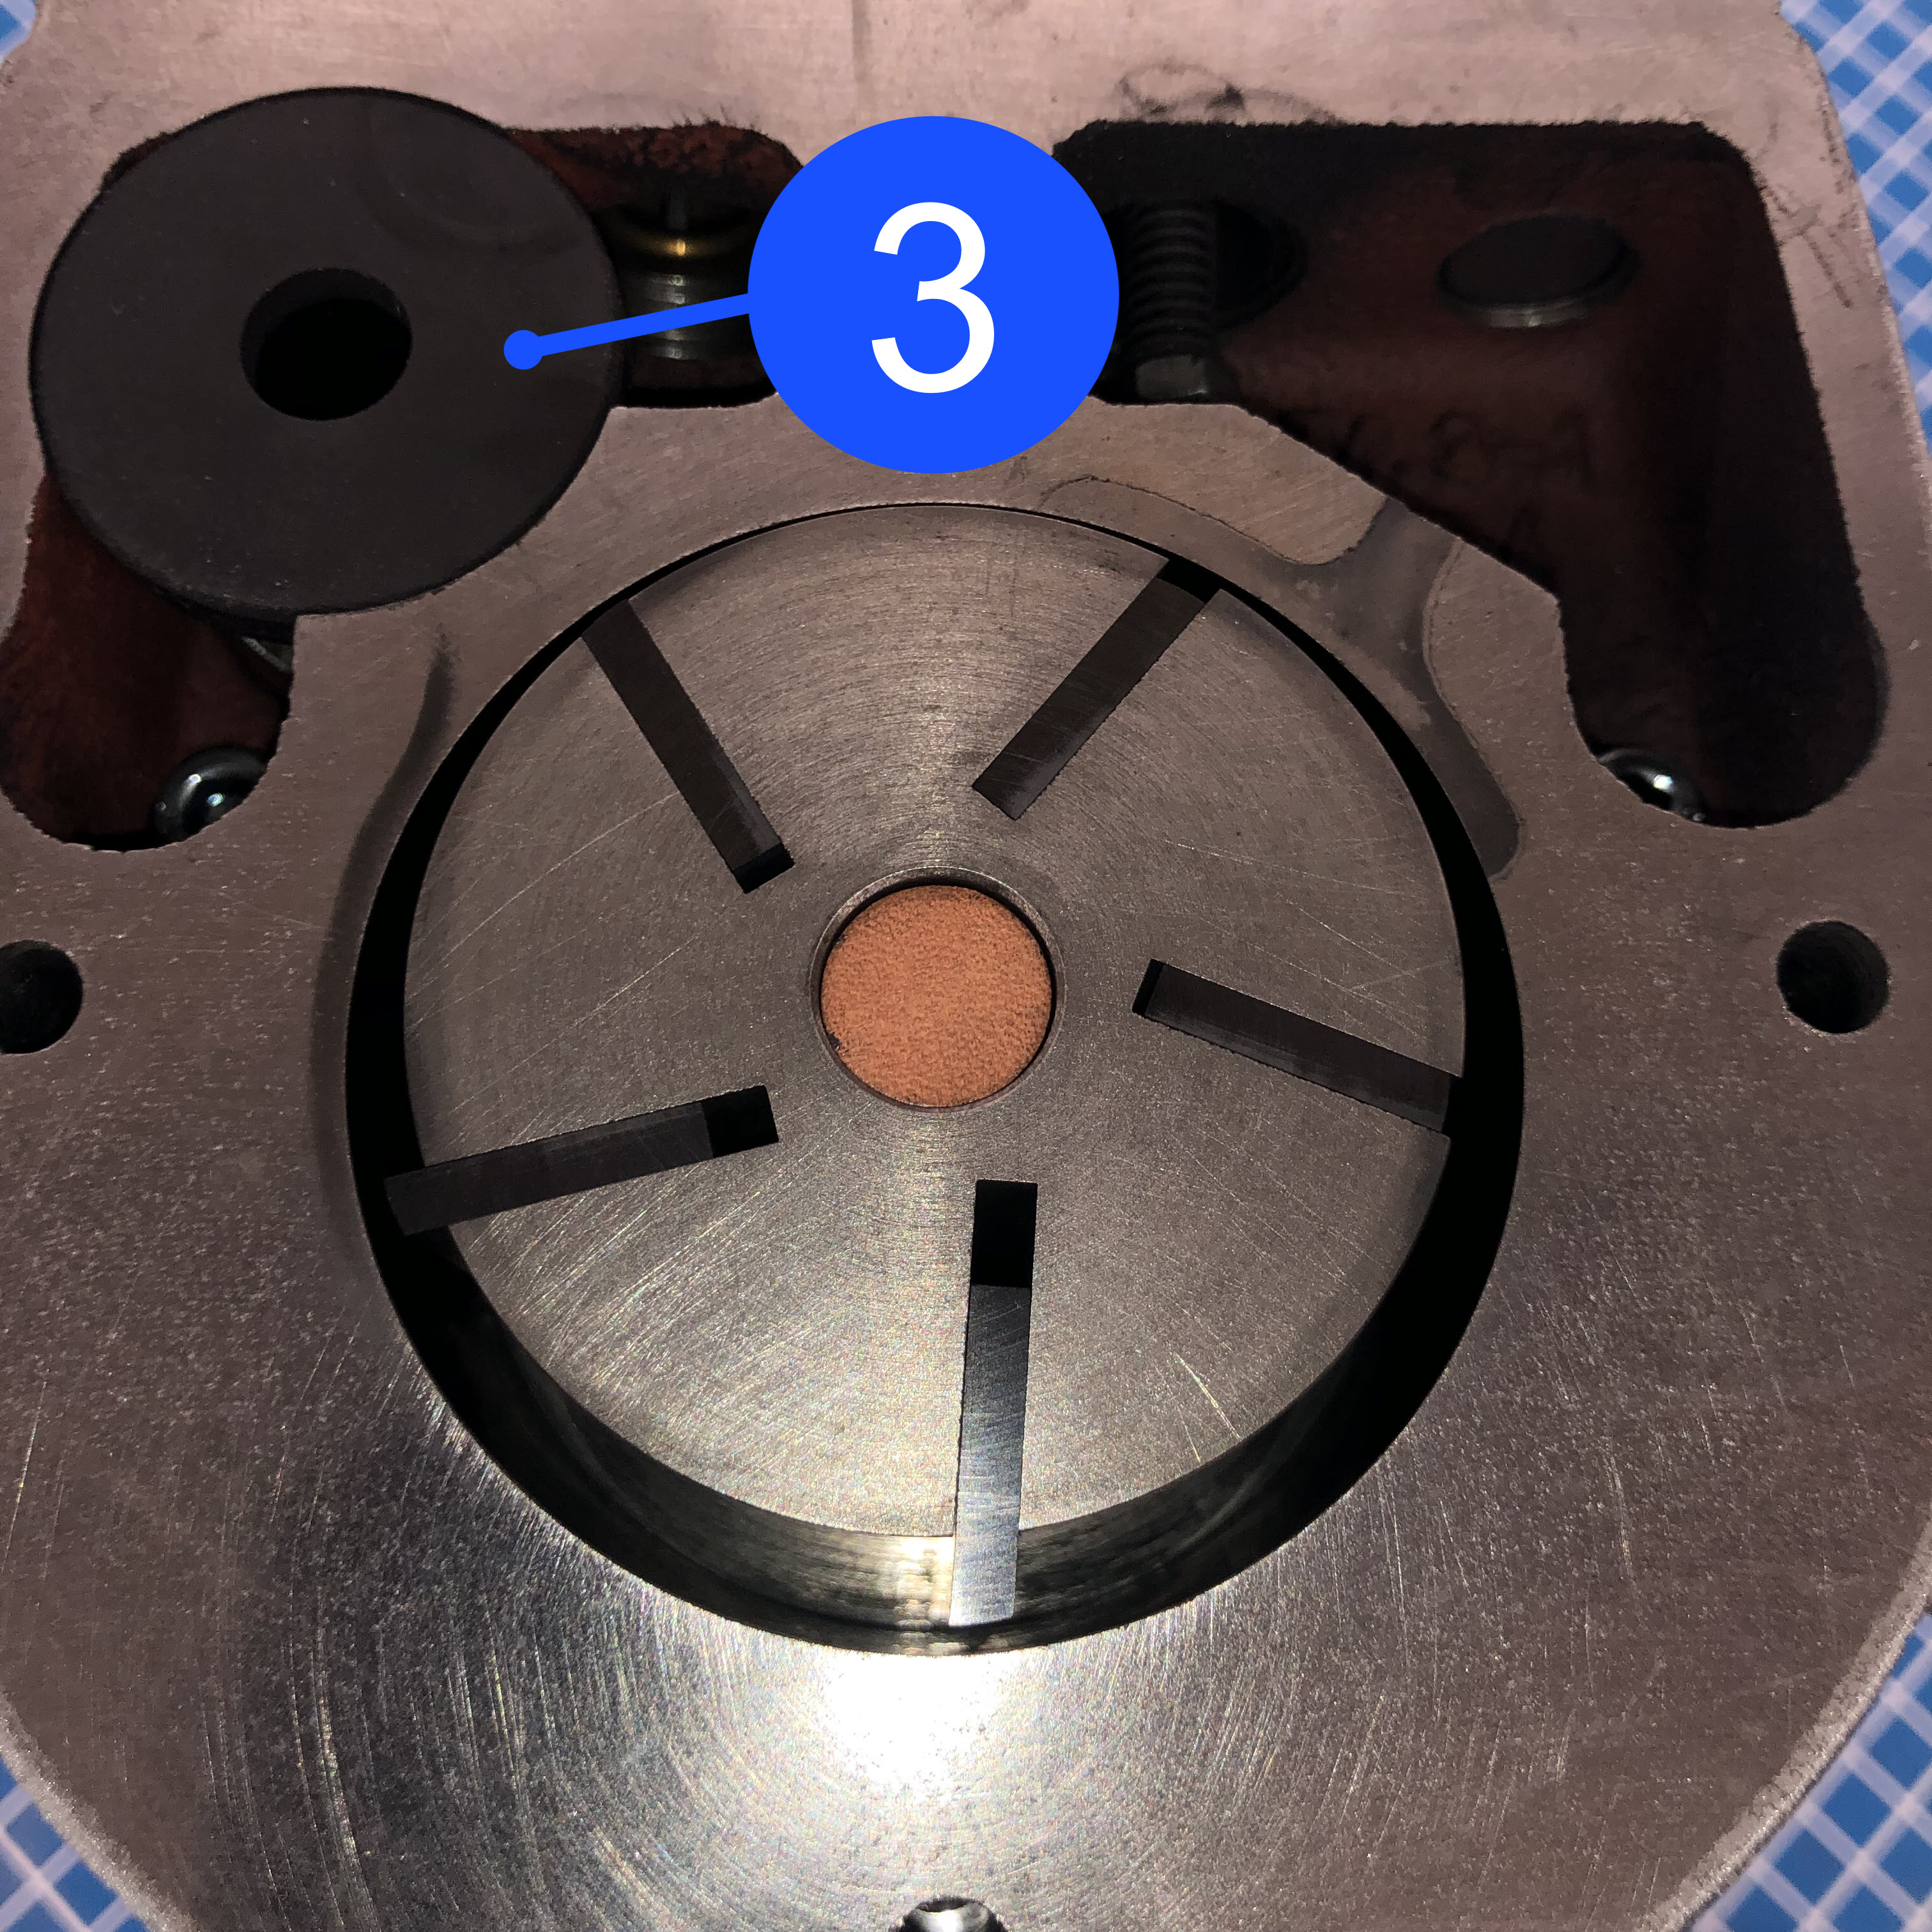
- Install the vacuum pump filter cartridge (3) into the vacuum pump housing cavity.
- Make sure the components that follow are correctly installed:
- The five vacuum pump vanes (1)
- The bronze thrust washer (2)
- The vacuum pump filter cartridge (3).
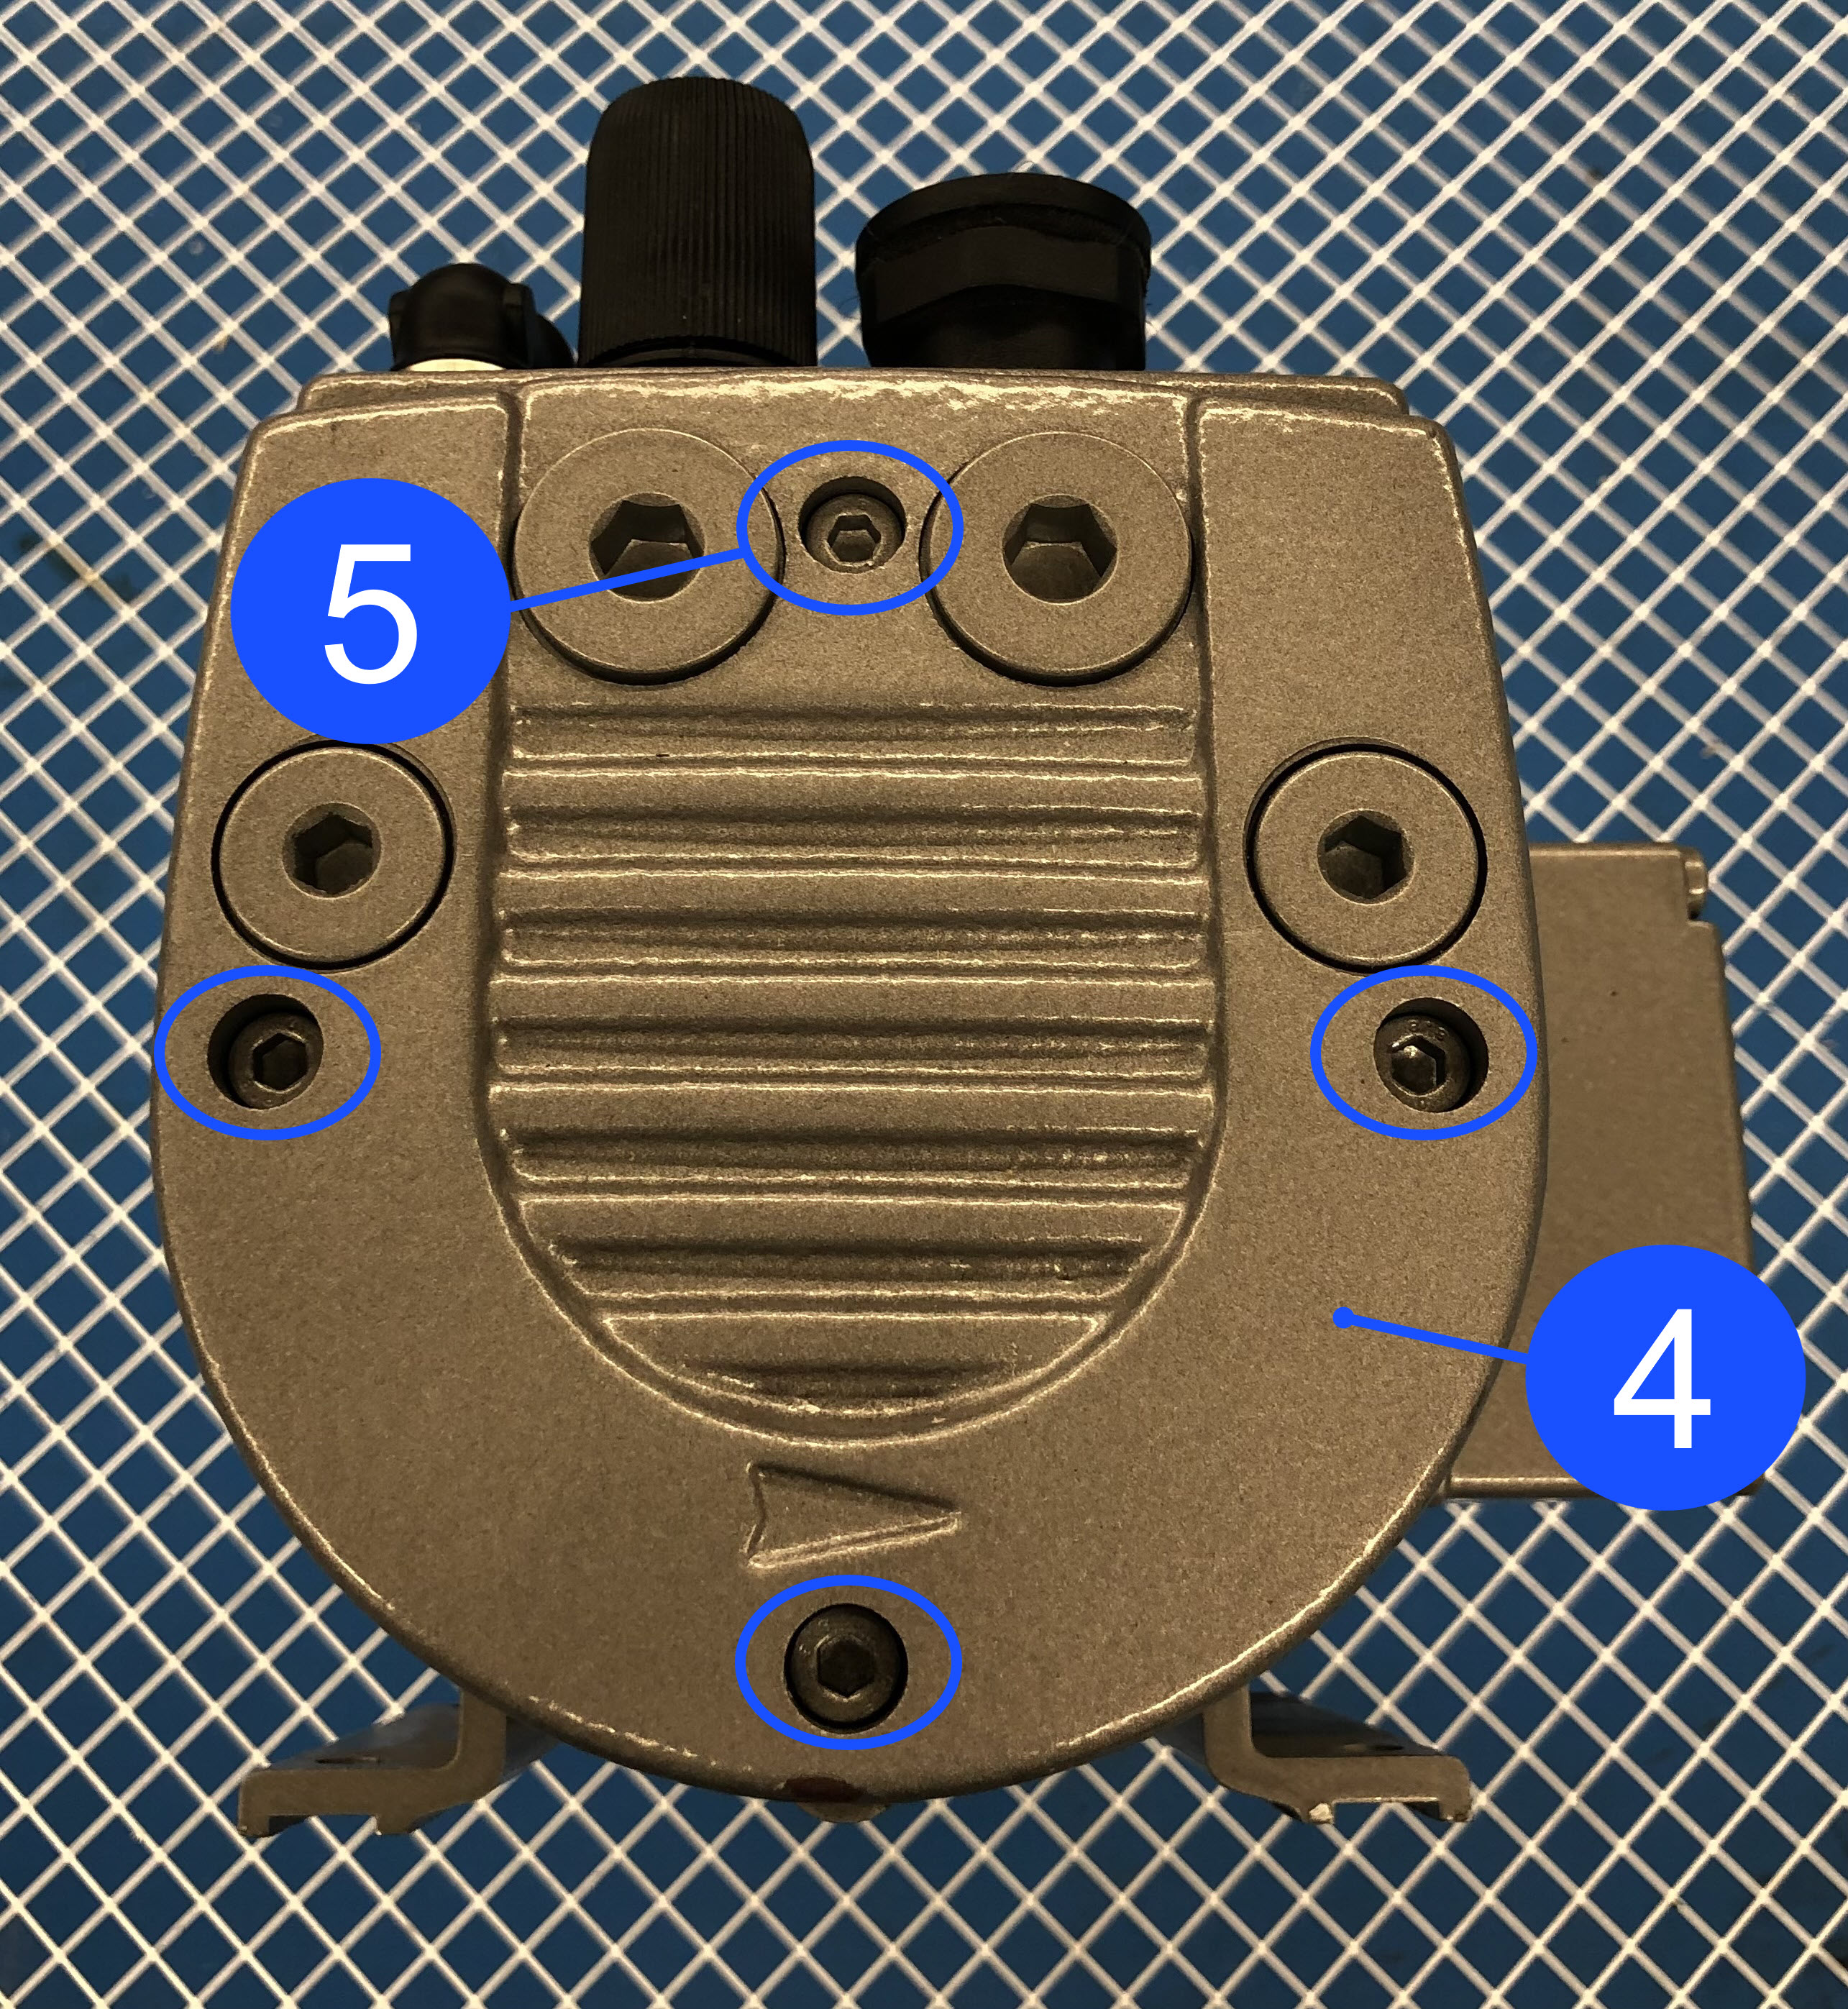
- Remove the clean lint-free rag from the top of the vacuum pump front cover (4).
- Install the front vacuum pump cover (4) onto the vacuum pump housing as follows:
- Put the vacuum pump front cover (4) into position onto the vacuum pump housing.
- Install the four screws (5) through the vacuum pump front cover (4) and into the vacuum pump housing.
- Use the 6 mm hex key to tighten the four screws (5). Make sure that the four screws (5) are tight.
Inspect the Vacuum Pump Vibration Dampeners
- Inspect the vacuum pump vibration dampeners. Refer to the Replace Vacuum Pump Vibration Dampeners procedure.
Inspect and Clean the Vacuum Pump Blow-Off Valve (BOV)
Do not use isopropyl alcohol to clean the vacuum pump BOV. The use of isopropyl alcohol can cause damage to the BOV component(s).
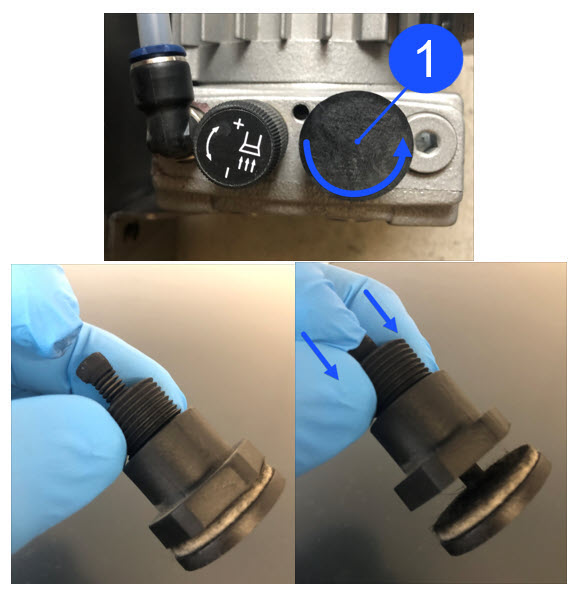
- Remove the vacuum pump BOV (1) found on the top of the vacuum pump housing.
- Use the soft bristle brush, and/or compressed air, to clean vacuum pump BOV (1).
- Compress the vacuum pump BOV (1) valve five times to make sure that the valve moves without restriction(s).
Do not apply Teflon™ tape to the threads found on the vacuum pump BOV. The Teflon™ tape can cause damages to the the vacuum pump components and/or vacuum circuit.
- Install the vacuum pump BOV (1) into the vacuum pump housing. Do not tighten too much.
Install the Vacuum Pump Assembly
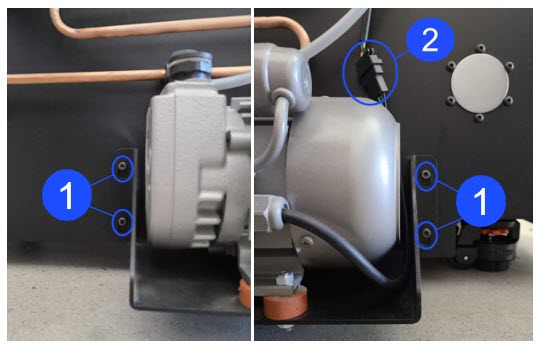
- Carefully install the vacuum pump assembly onto the four screws (1) found at the rear panel of the machine.
- Use the 4 mm hex key to tighten the four screws (1) that hold the vacuum pump assembly onto the rear panel of the machine. Make sure that the four screws (1) are tight.
- Connect the vacuum pump wire harness (2).
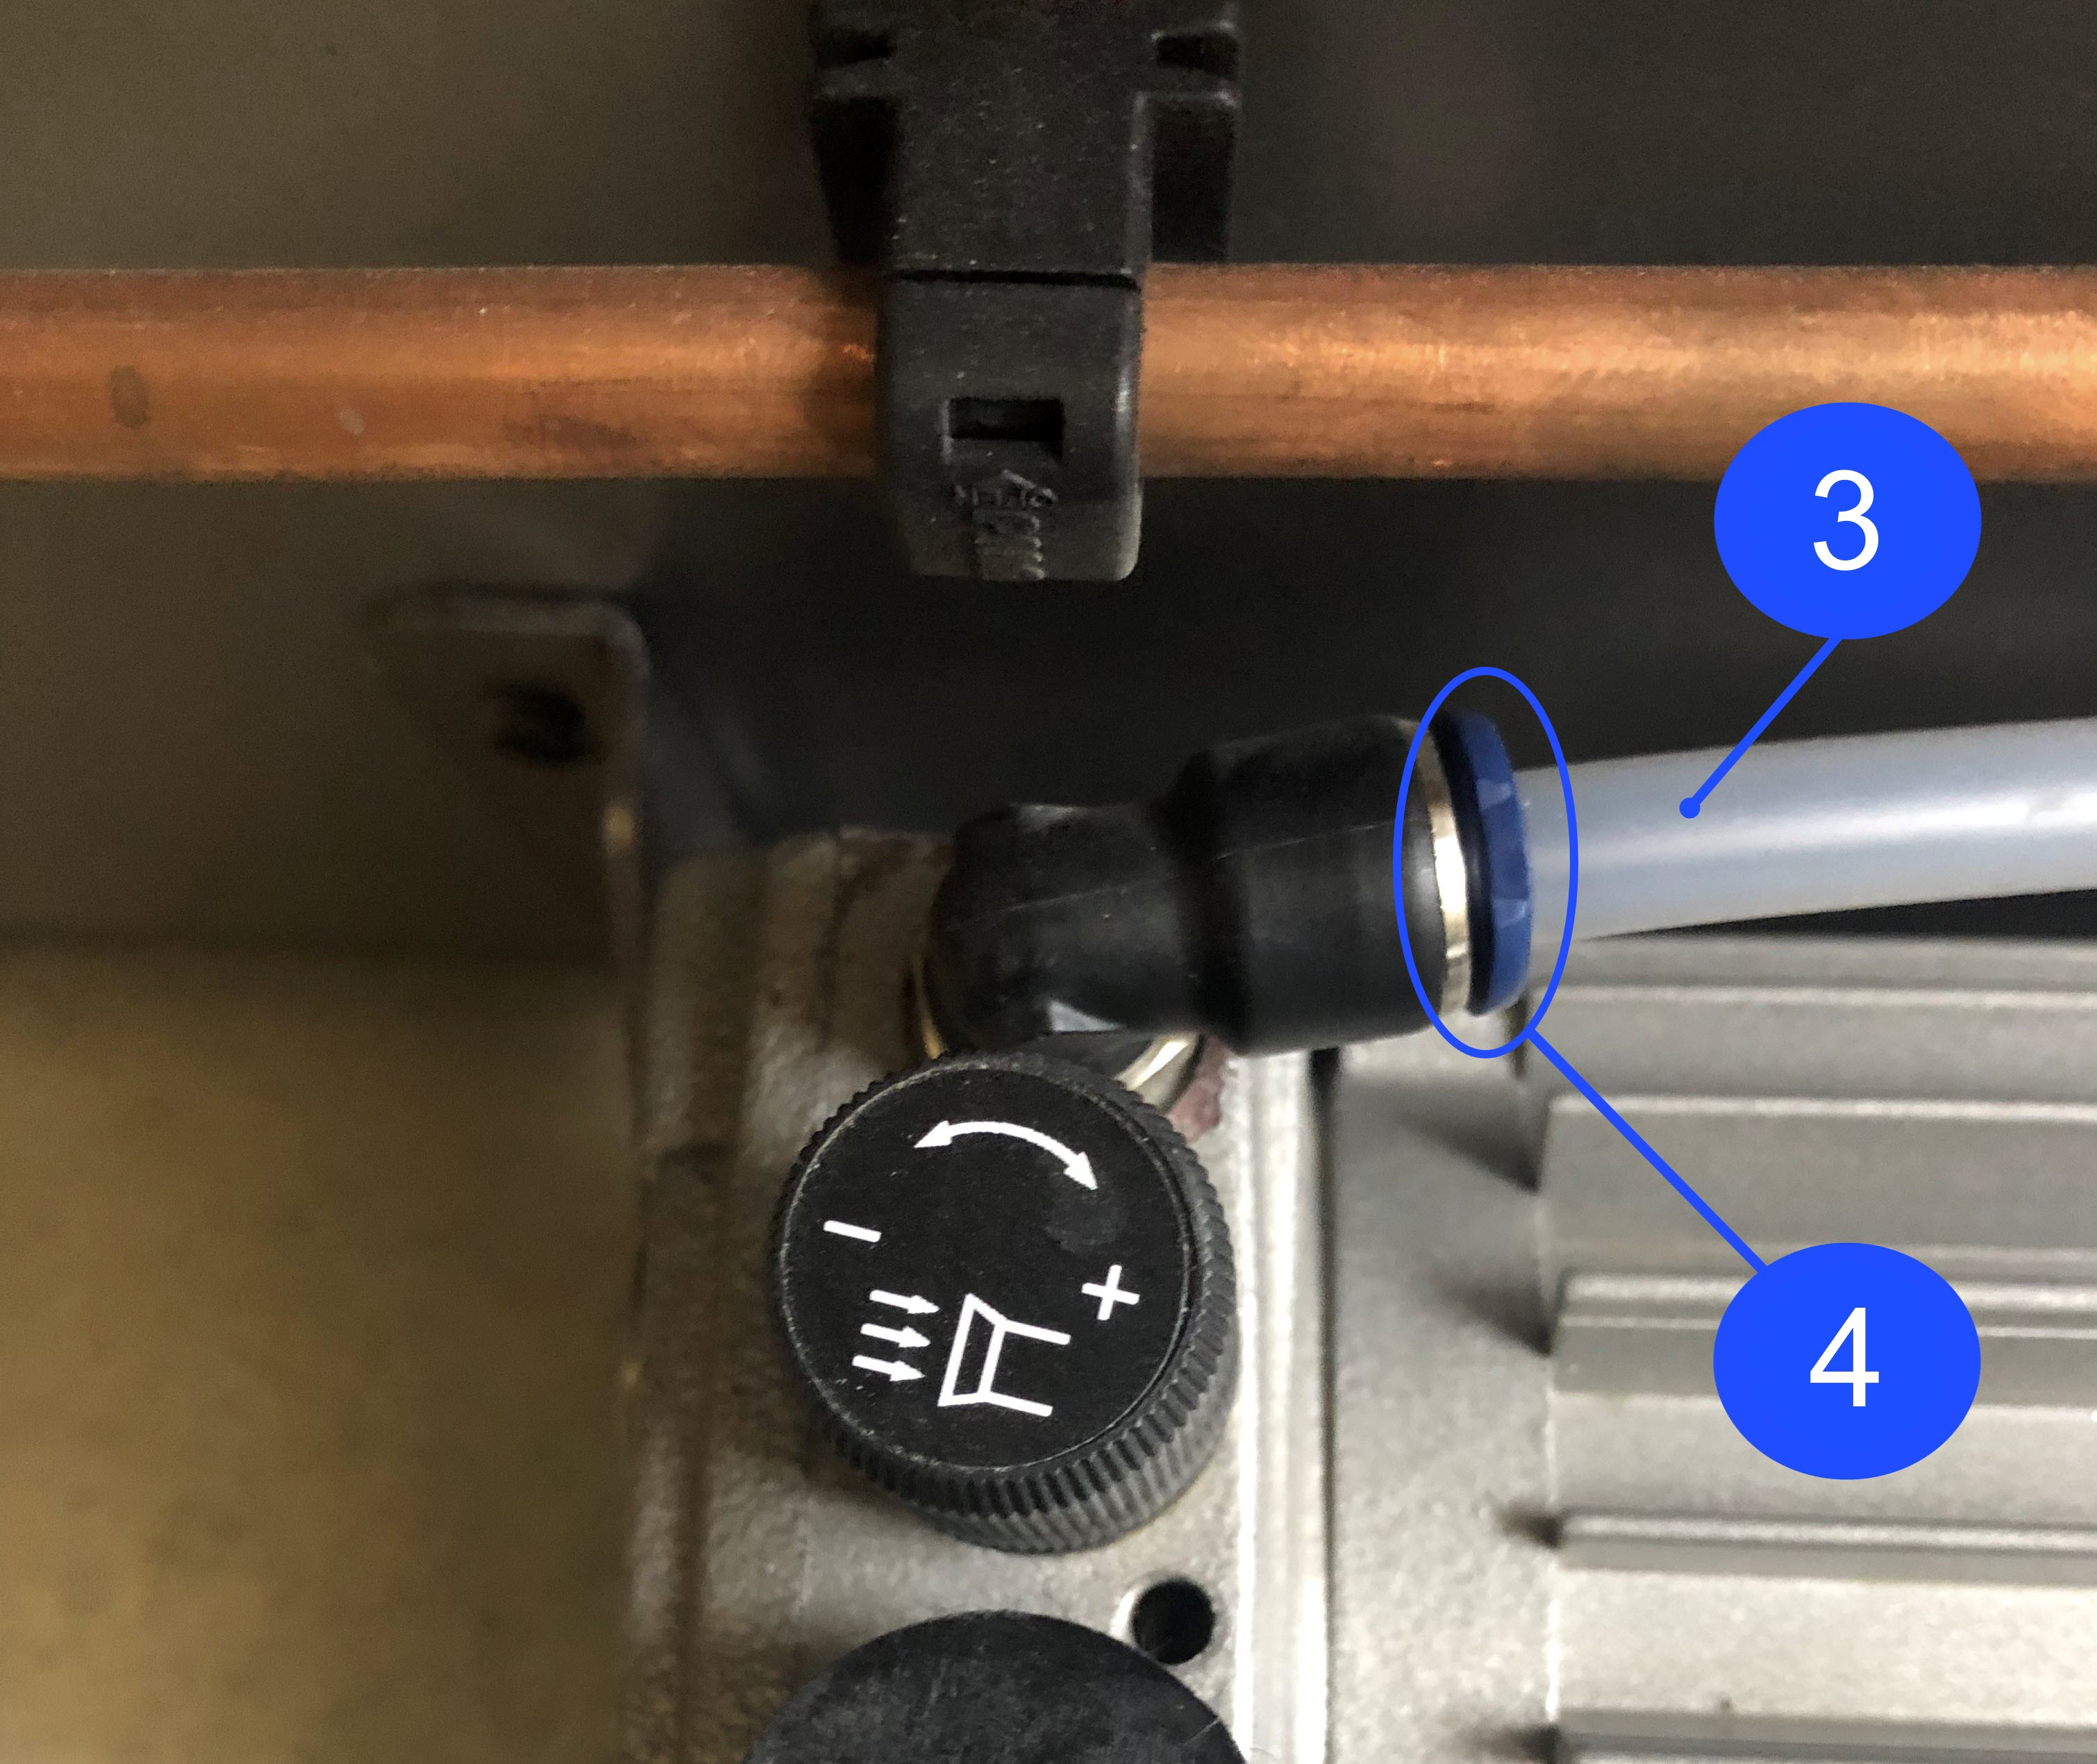
- Connect the vacuum tube (3) into the vacuum pump fitting (4). Lightly pull on the vacuum tube (3) to make sure that it is correctly installed in the vacuum pump fitting (4).
Test and Return to Service
- Connect the main power cord to the receptacle.
- Connect the power cord to the the vacuum circuit electrical enclosure.
- Turn the power ON with the ON/OFF switch found on the rear panel of the machine.
- Turn the vacuum circuit power ON with the ON/OFF switch found on vacuum control box.
- Close the build chamber door.
- Release the E-stop button.
- Home XYZ.
- Use the Graphical User Interface (GUI) to power ON the vacuum pump.
- Make sure that the build sheet seals correctly onto the vacuum chuck. Refer to Install Build Sheet.