Inspect and Test PT100 RTD Sensors
| Model | [•] AON M2+ (CE) | [•] AON M2+ (R-NZ) | [•] AON M2+ | [•] AON-M2 2020 | [•] AON-M2 |
| Category | [•] Preventive | [ ] Corrective | |||
| Frequency | [•] Daily | [ ] Weekly | [ ] Monthly | [ ] Yearly | [ ] As Needed |
Summary
The procedure that follows gives instructions on how to inspect and test the two PT100 Resistance Temperature Detectors (RTD) sensors.
Functional PT100 RTD sensors prevents:
- Incorrect heat applied to the polymer material(s).
- Blockages in the hot end(s).
- Damage to the filament feed path.
Estimated time: 15 minutes
Tools
None required.
Parts Information
None required.
Personal Protective Equipment
| Qty | Description | Minimum Specification |
|---|---|---|
| 1 | Safety Eyewear | ANSI/ISEA Z87.1 |
| A/R | Nitrile Gloves | ISO 2859-1 or ASTM D6319 |
Prepare the Machine
Make sure that there are no prints on the build surface. Remove print(s) before the procedure that follows is started. Failure to do so can cause a collision and cause damage to the machine component(s).
- Home XYZ.
- Open the build chamber door.
- Wait until the build chamber, build platform and hot ends are at room temperature.
Inspect the PT100 RTD Sensors
Wait until all machine components are at room temperature before you continue. Some machine components can be hot if the machine was recently used. Failure to do so can cause injuries.
- Disable the motors:
- For Klipper-based firmware:
- On the Graphical User Interface (GUI), select Control > Motion.
- Select the
MOTORS OFFbutton. TheMOTORS OFFbuttons disables all the stepper motors to prevent movement in the XYZ-axes.
- For Marlin-based firmware:
- On the Graphical User Interface (GUI), select Terminal.
- Input the
M18command. TheM18machine code (M-Code) disables all the stepper motors to prevent movement in the XYZ-axes.Do not home the XYZ-axes when maintenance is performed inside the build chamber. This will cause the axes to move, even with the
M18command or theMOTORS OFFbutton is active. Failure to do so can lead to personal injury.
- For Klipper-based firmware:
- Make sure that the T0 connections that follow are correct:
- Heater plugs (1)
- PT100 RTD sensor electrical plugs (2).
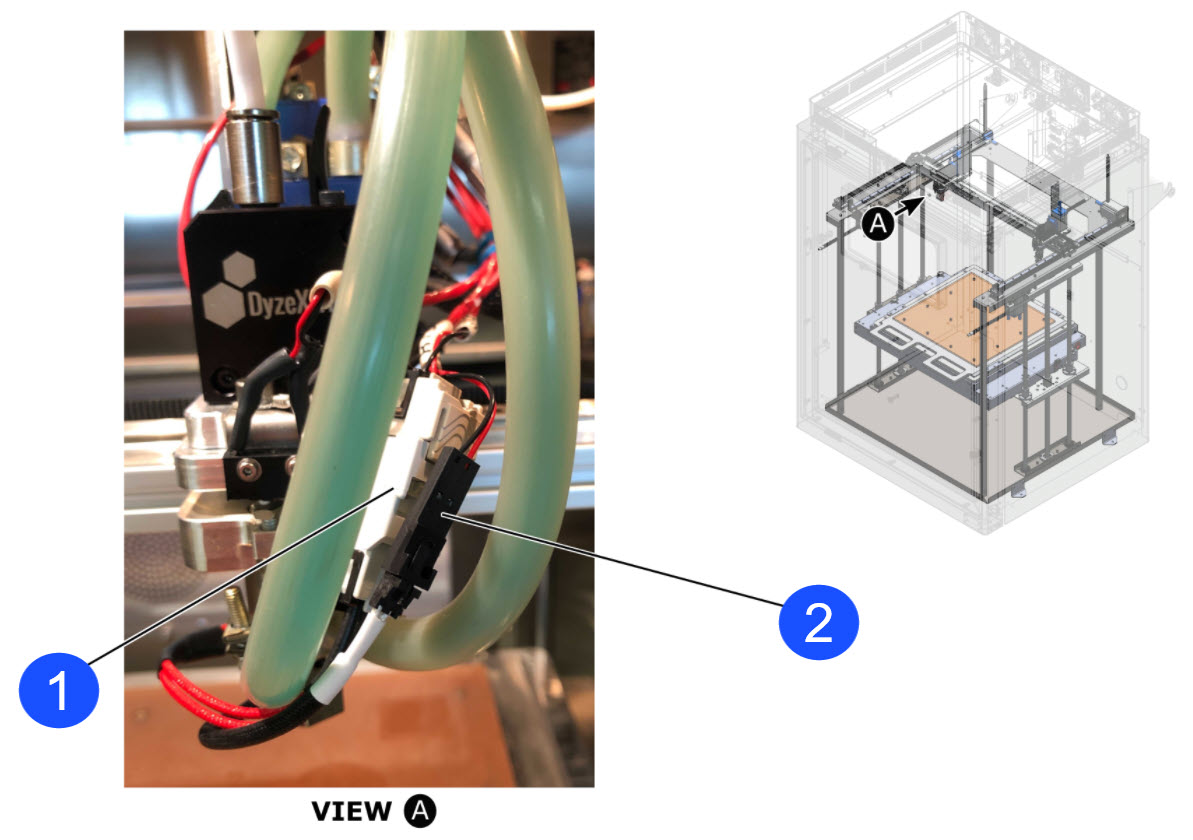
- Make sure that the PT100 RTD sensor connects correctly into the hot end.
- Tighten by hand as necessary. Do not tighten too much.
- Make sure that the PT100 RTD sensor wires are in good condition.
- Do steps 2 to 4 for the PT100 RTD sensor found on the adjacent toolhead.
Test the PT100 RTD Sensors
- Do the steps that follow to test the T0 PT100 RTD sensor:
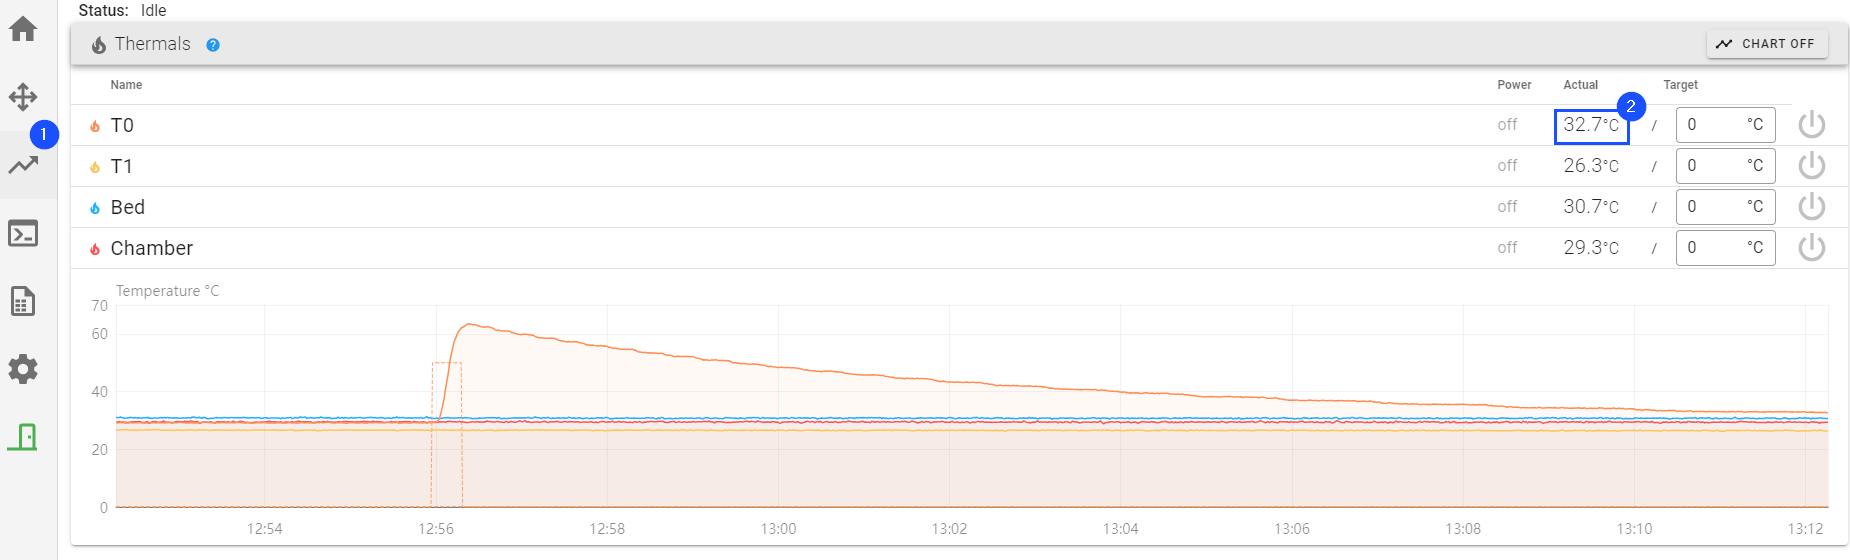
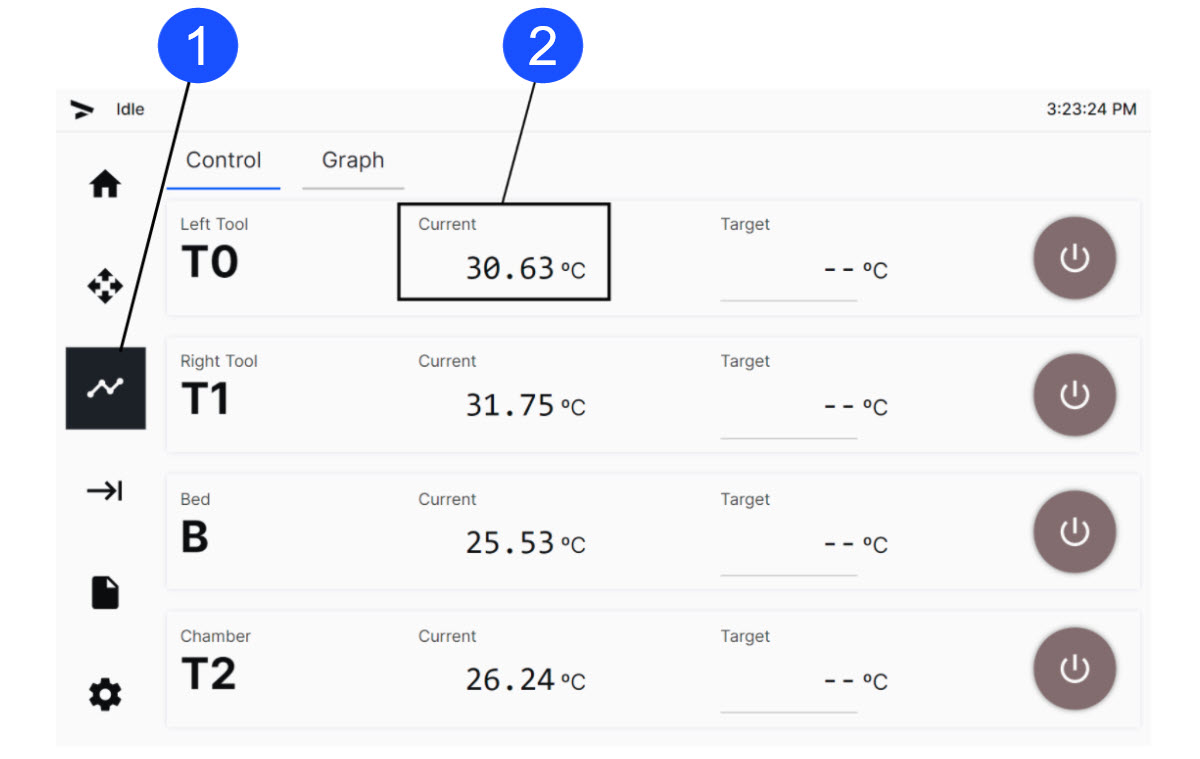
- On the GUI, select Temperatures (1) or Temp (1).
- Pinch the T0 PT100 RTD sensor wires close to where they connect on the T0 heater block assembly.
- Carefully move the T0 PT100 RTD sensor wires around to simulate X/Y-axes movement.
- Monitor the T0 temperature on the GUI as you do steps 1b and 1c. Make sure the T0 temperature does not change more than ± 5ºC.
- Close the build chamber door.
- Set the T0 target temperature to 50ºC.
- After approximately 30 seconds, make sure that T0 temperature is 50ºC (± 5ºC).
- Set the T0 temperature to the necessary print target temperature.
Make sure to use the correct build chamber and/or hot end print temperatures. The operation temperatures vary for all polymers. Failure to use the correct print temperatures can damage the hot end and/or the filament feed system.
- When the T0 print target temperature is stable, make sure that T0 temperature shown on the GUI is at the same set target temperature entered in step 4 (± 5ºC).
- If the temperature shown on the GUI is not in the satisfactory range, replace the PT100 RTD sensor.
- Refer to Replace Cartridge PT100 RTD Sensors for replacement instructions on the most recent version of the heater block assembly.
- Refer to Replace PT100 RTD Sensors for replacement instruction on the initial version of the heater block assembly.
- Do steps 1 to 7 for the PT100 RTD sensor found on the adjacent toolhead.
Power OFF the hot end heater(s) if the machine is not ready for operation. If the power to the hot end heater(s) are powered ON for extended periods of time without extrusion, the polymer filament can burn and cause clogs in the nozzle(s). The Hot End Heater Timeout Feature (Klipper) or Hot End Heater Timeout Feature (Marlin) can be enabled to automatically power OFF the hot end heater(s) after a period of inactivity.
Test and Return to Service
- Home XYZ.