Replace Cartridge PT100 RTD Sensors
| Model | [•] AON M2+ (CE) | [•] AON M2+ (R-NZ) | [•] AON M2+ | [•] AON-M2 2020 | [•] AON-M2 |
| Category | [ ] Preventive | [•] Corrective |
Summary
The procedure that follows gives the instructions on how replace the Cartridge PT100 Resistance Temperature Detector (RTD) sensor.
Estimated time: 15 minutes
Tools
| Qty | Description | Specification |
|---|---|---|
| 1 | Hex Key | 1.5 mm, open |
| 1 | Wire Brush | Clean, Soft bristle |
| A/R | Rags | Lint-free |
| A/R | Isopropyl Alcohol | 99% |
Parts Information
| Qty | Part Number | Description |
|---|---|---|
| 1 | A-0504-001-R04 | Cartridge Style PT100 Harness |
Reach out to our Customer Success team at help@aon3d.com for genuine AON3D replacement part(s).
To help with machine reliability, AON3D recommends that the two cartridge PT100 RTD sensors be replaced as a pair.
Personal Protective Equipment
| Qty | Description | Minimum Specification |
|---|---|---|
| 1 | Safety Eyewear | ANSI/ISEA Z87.1 |
| A/R | Nitrile Gloves | ISO 2859-1 or ASTM D6319 |
Prepare the Machine
- Remove the heater block assembly. Refer to Replace Heater Block Assemblies.
Replace the Cartridge RTD Sensor

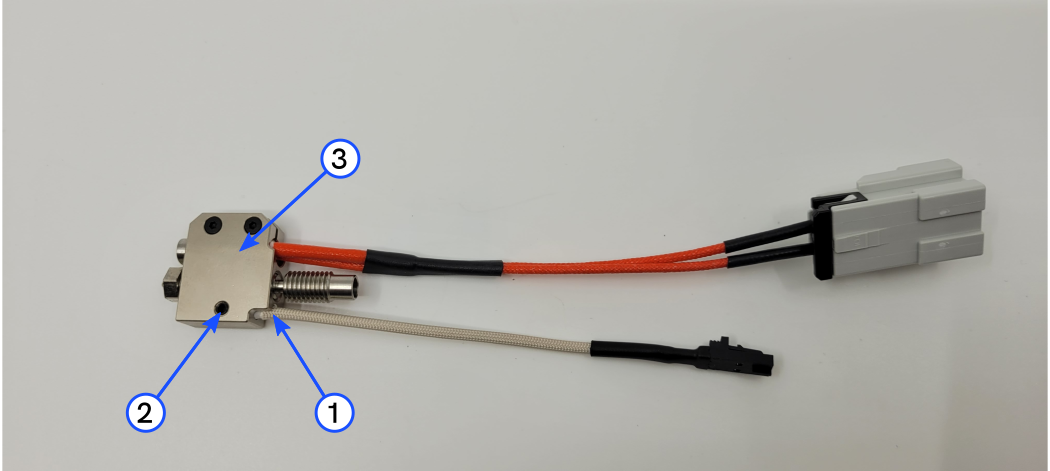
- Use the soft bristle brush to remove any contaminants that are buildup on the heater block assembly (3), if necessary.
- Use a clean lint-free rag and isopropyl alcohol to clean any solvents and/or residue from the RTD sensor head.
- Use the 1.5 mm hex key to loosen the set screw (2).
- Remove and discard the cartridge PT100 RTD sensor (1).
- Clean the surface of the heater block assembly (3) to remove any unwanted material.
- Install the new cartridge PT100 RTD sensor (1) into the heater block assembly (3). Make sure that the top of the cartridge (1) is flush with the top of the heater block assembly (3).
- Use the 1.5 mm hex key to tighten the set screw (2). Do not tighten too much.
Test and Return to Service
- Install the heater block assembly. Refer to Replace Heater Block Assemblies.