Adjust the Door and Latch
| Model | [•] AON M2+ (CE) | [•] AON M2+ (R-NZ) | [ ] AON M2+ | [ ] AON-M2 2020 | [ ] AON-M2 |
| Category | [ ] Preventive | [•] Corrective |
Summary
The procedure that follows gives the instructions on how to adjust the door latch mechanism and magnet.
Estimated time: 30 minutes
Tools
| Qty | Description | Specification |
|---|---|---|
| 1 | Hex Key | 2 mm |
| 1 | Hex Key | 2.5 mm |
| 1 | Hex Key | 4 mm |
| 1 | Hex Key | 5 mm |
| 1 | Wrench | 7 mm |
Parts Information
| Qty | Part Number | Description |
|---|---|---|
| N/A | N/A | N/A |
Personal Protective Equipment
| Qty | Description | Minimum Specification |
|---|---|---|
| 1 | Safety Eyewear | ANSI/ISEA Z87.1 |
Prepare the Machine
Make sure that there are no prints on the build surface. Remove print(s) before the procedure that follows is started. Failure to do so can cause a collision and cause damage to the machine component(s).
- Home XYZ.
- Open the build chamber door.
- Push the E-stop button.
- Make sure that the feet of the machine are correctly adjusted.
The feet keep the machine level. A machine that is not level can move suddenly on the floor surface and cause injury or damage to machine components. Refer to the Level the Machine procedure.
- Wait until the build chamber, build platform and hot ends are at room temperature.
Adjust the Latch
Wait until all machine components are at room temperature before you continue. Some machine components can be hot if the machine was recently used. Failure to do so can cause injuries.
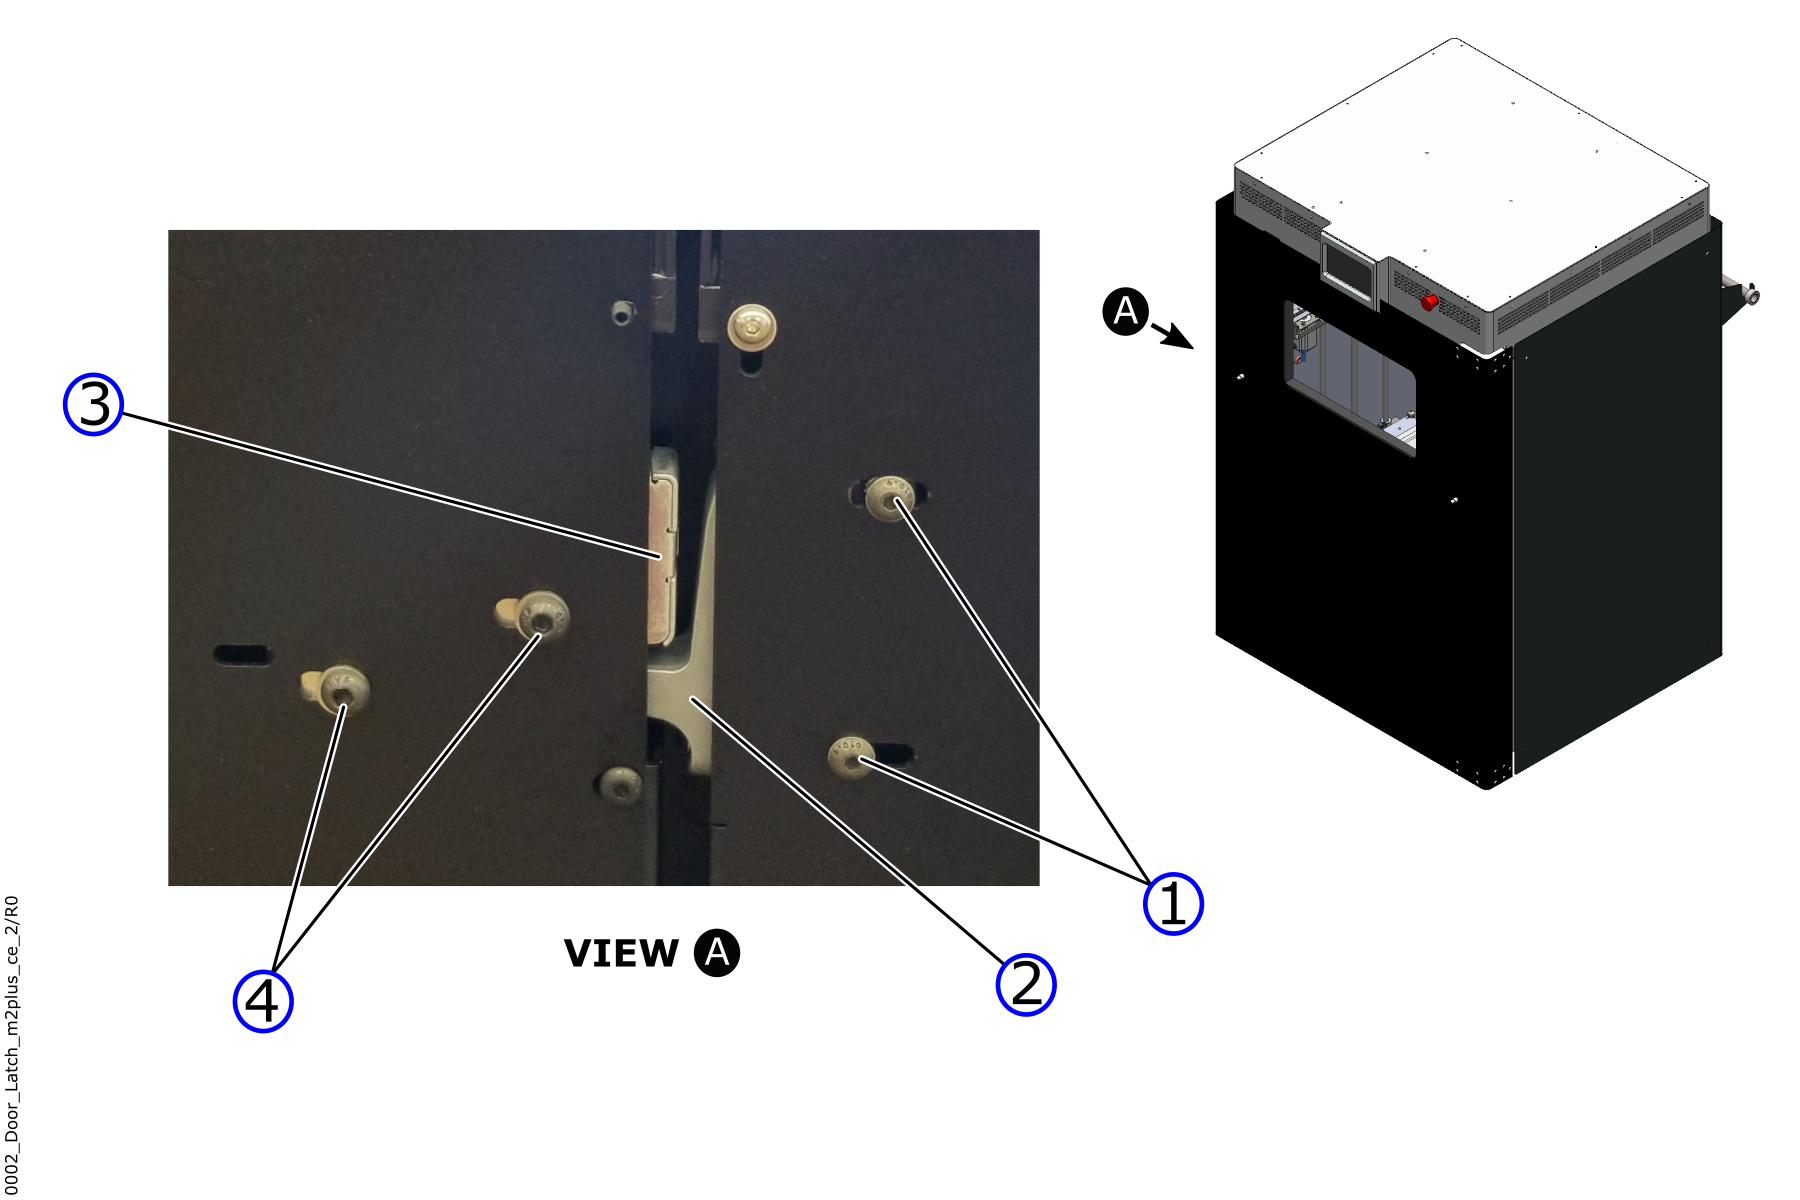
- With a 4 mm hex key, loosen the two screws (1) on the door latch (2).
- With a 4 mm hex key, loosen the two screws (4) on the door strike plate (3).
- Move the two screws (1) and two screws (4) to the front of their slot.
Do not tighten the screws too much. Failure to do so can cause damage to the machine component(s).
- Tighten the two screws (1) and the two screws (4).

- With a 5 mm hex key, remove the set screws (5) on the top hinge and the bottom hinge.
- Almost fully close the door and examine the distance between the latch and the strike plate.
- Do the steps below as necessary:
- If the strike plate (3) is too low, do as follows:

- Loosen the set screw (5) on the bottom hinge.
- With a 4 mm hex key, tighten the three screws (6) on the bottom hinge.
Loosen the set screw (5) of the bottom hinge to move the hinge closer to the machine.
- Loosen the set screw (5) on the top hinge.
- Loosen the three screws (6) on the top hinge.
Tighten the screws (6) of the top hinge to move the hinge farther from the machine.
- Tighten the set screw (5) on the top hinge.
- Tighten the three screws (6) equally.
- If the strike plate (3) is too high, do as follows:
- Loosen the set screw (5) on the top hinge.
- Loosen the three screws (6) on the top hinge.
Tighten the three screws (6) of the top hinge to move the hinge farther from the machine.
- Tighten the set screw (5) on the top hinge.
- Gradually tighten the three screws (6).
- Loosen the set screw (5) on the bottom hinge.
- With a 4 mm hek key, tighten the three screws (6) on the bottom hinge.
Loosen the set screw (5) of the bottom hinge to move the hinge closer to the machine.
- If the strike plate (3) is too low, do as follows:
- If after step 7 the strike plate is not aligned, turn the strike plate in its slot.
Adjust the Door Magnet

- With a 2.5 mm hex key and a 7 mm wrench, loosen the two screws (8) and nuts (9).
- Move the magnet (7) as necessary to vertically align the door sensor (10) and the magnet (7).
- Horizontally move the magnet (7) as close as possible to the door sensor (10).
Do not tighten the screws and nuts too much. Failure to do so can cause damage to the machine component(s).
- Tighten the two screws (8) and two nuts (9) to hold the door magnet in the new position.
- With a 2 mm hex key, loosen the set screws (8).
- Horizontally move the door sensor (10) as close as possible to the magnet (7).
- Tighten the set screws (8).
- Release the E-stop button.
- In the GUI, make sure that the machine detects the closed door.
- Make sure that the door latches easily.
- If necessary, close the door and adjust the hinges in their slots and bring the door towards you.
- Do the steps below to make sure the door functions correctly:
- Open the door.
- Close the door.
- Make sure that the latch is aligned and that the GUI senses the closed door.
- Repeat steps 11.A to 11.C five times.
The latch needs 2 to 3 seconds to reset.
- If the latch does not function correctly, do steps 1 to 7 of the adjustment procedure.
Test and Return to Service
- Make sure that you remove all the tools from the build chamber.
- Close the build chamber door.
- Release the E-stop button.
- Home XYZ.