Replace Build Chamber Door
| Model | [ ] AON M2+ (CE) | [ ] AON M2+ (R-NZ) | [•] AON M2+ | [•] AON-M2 2020 | [•] AON-M2 |
| Category | [ ] Preventive | [•] Corrective |
Summary
The procedure that follows gives the instructions on how to replace the build chamber door.
Estimated time: 60 minutes
Tools and Equipment
| Qty | Description | Specification |
|---|---|---|
| 1 | Wrench | 10 mm |
| 1 | Hex Key | 4 mm |
| 1 | Support Object | Wood 2 in. x 4 in. (recommended) |
Parts Information
| Qty | Part Number | Description |
|---|---|---|
| 1 | A-0200-003-R00 | Door Assembly (AON M2+) |
| 1 | A-0200-001 | Door Assembly (AON-M2 2020) |
| 1 | M2-SUB-DOOR | Door Assembly (AON-M2) |
| 1 | HW-NUT-DIS-M6 | M6 Locknut |
| 1 | HW-SHLDR-SCREW-M6-55 | M6 Shoulder screw 55mm |
| 1 | HW-SHLDR-SCREW-M6-60 | M6 Shoulder screw 60mm |
Reach out to our Customer Success team at help@aon3d.com for genuine AON3D replacement part(s).
Personal Protective Equipment
| Qty | Description | Minimum Specification |
|---|---|---|
| 1 | Safety Eyewear | ANSI/ISEA Z87.1 |
| 1 | Safety Footwear | EN ISO 20345 or ASTM F2413 |
| A/R | Gloves | Work |
Prepare the Machine
- Push the E-stop button.
- Turn the power OFF with the ON/OFF switch found on the rear panel of the machine.
- Wait until the build chamber, build platform and hot ends are at room temperature.
Remove the Build Chamber Door
Wait until all the machine components are at room temperature before you continue. Some machine components can be hot if the machine was recently used. Failure to do so can cause injuries.
- Open the build chamber door (1).
- Put a support object (2) below the build chamber door (1).

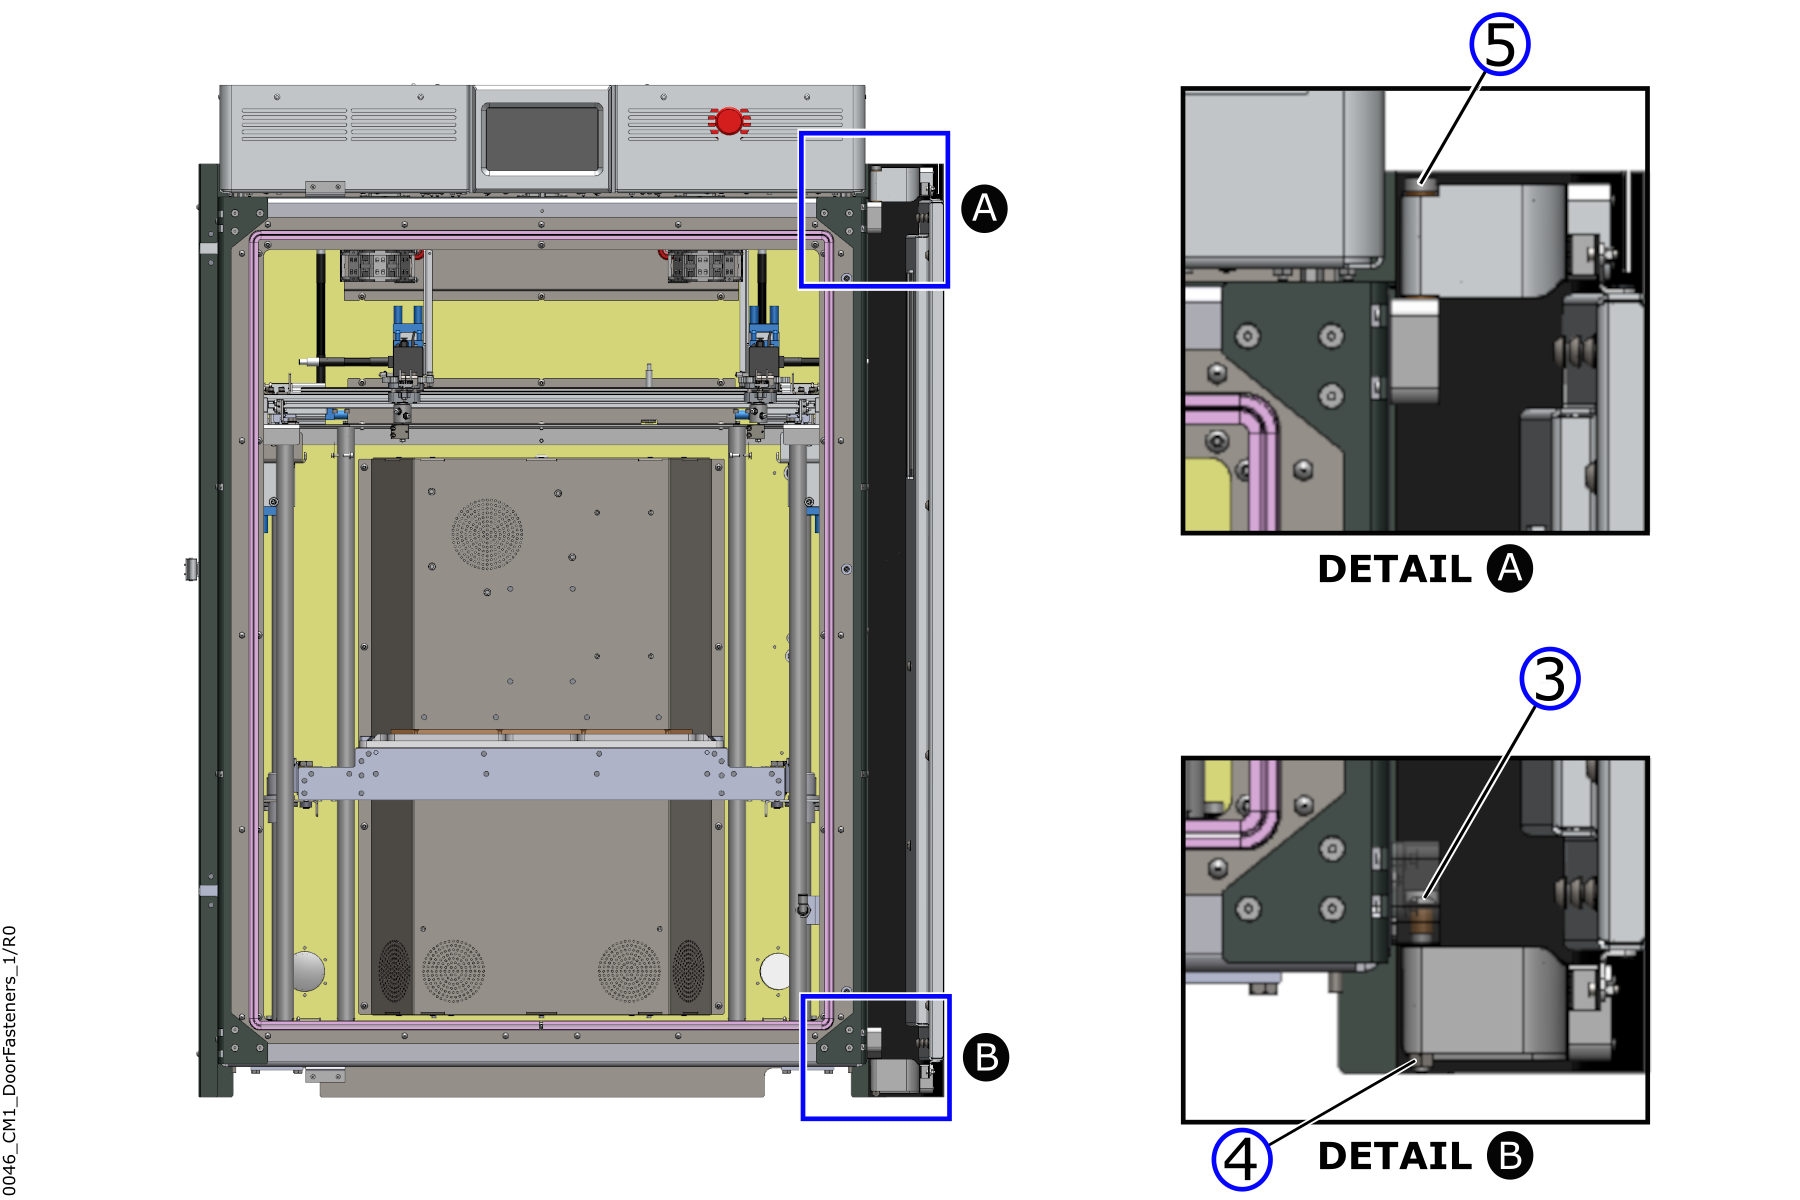
- Use the 4 mm hex key and the 10 mm wrench to carefully remove the bottom screw (3) and locknut (4).
- Discard the locknut (4).
AON3D recommends the use of two persons for the procedure that follows. The build chamber door weights approximately 27 kg (60 lbs.) and can cause injury, and/or damage equipment, if it is dropped.
- Use the 4 mm hex key to carefully remove the top screw (5).
- Carefully remove the build chamber door (1). Leave the support object under the build chamber door (1).
- Discard the build chamber door (1) in accordance to local laws and/or regulations.

Install the New Build Chamber Door
- Carefully put the new build chamber door on the support object.
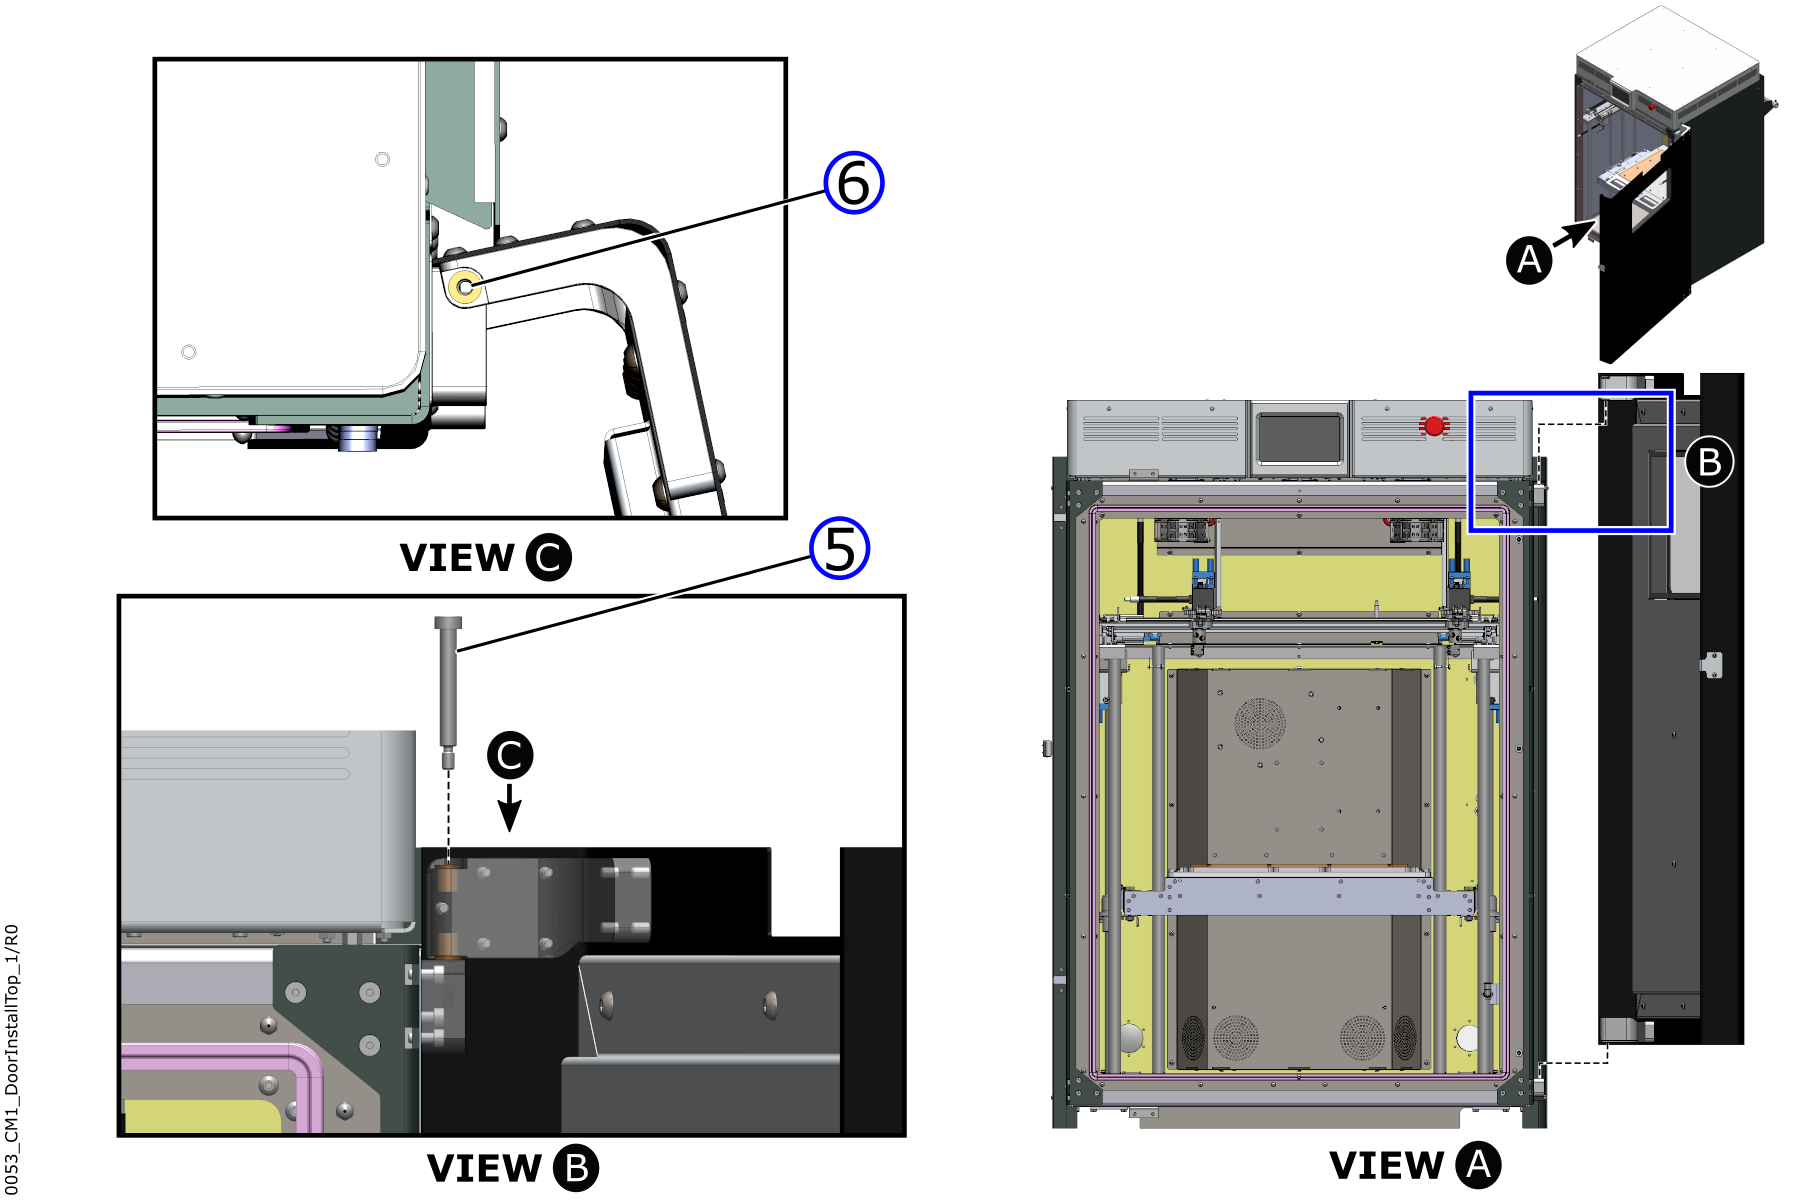
- Align the holes (6) of the top build chamber door hinge with the holes on the top machine hinge.
- Carefully install the top screw (5) into the hole of the machine hinge.
In illustrations that follow, the distance between the build chamber door and the machine is to help give the user a visual aid. Always put the build chamber door on a support object when the build chamber door is removed and/or installed.

- Use the 4 mm hex key to install the top screw (5). Do not tighten the top screw (5) at this point in time.
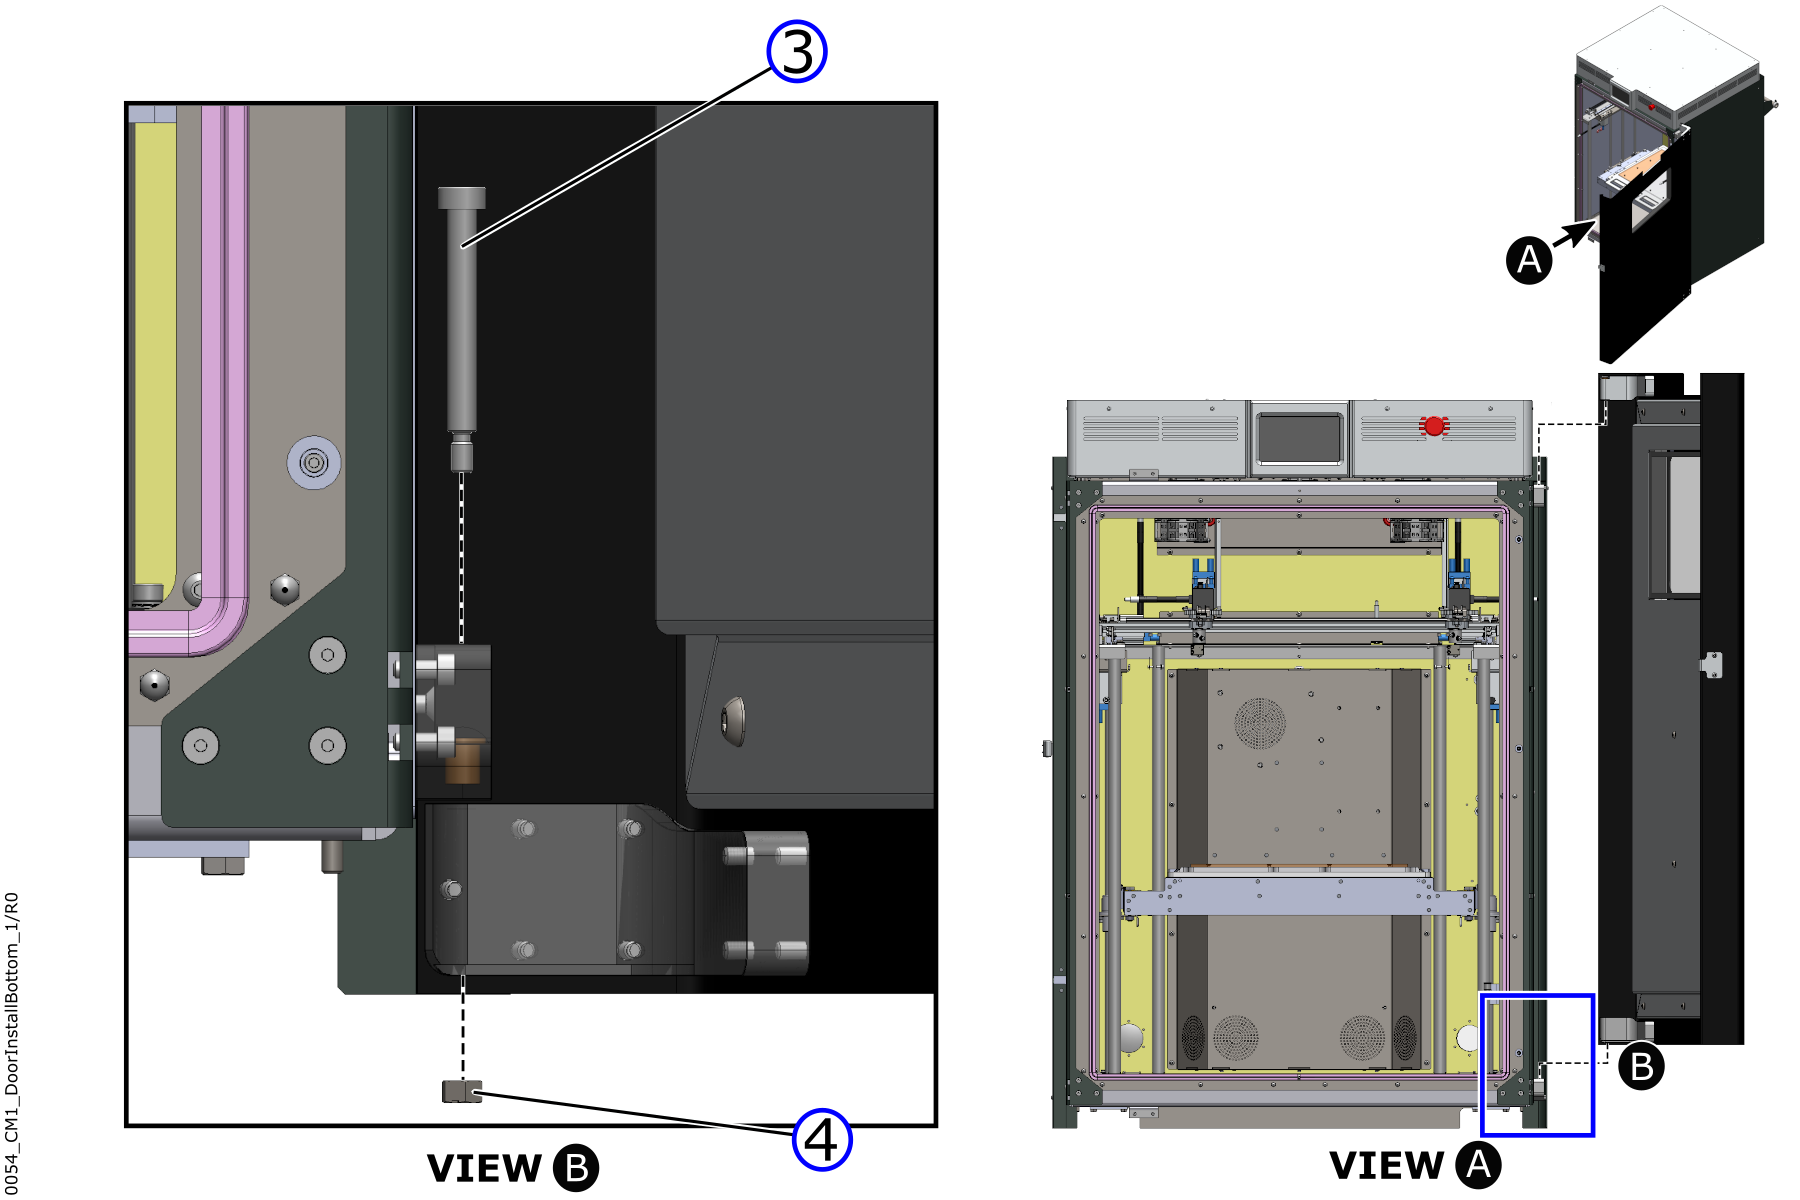
- Align the holes of the bottom build chamber door hinge with the holes on the bottom machine hinge.
- Carefully install the bottom screw (3) in the hole of bottom build chamber door hinge and in the hole on the bottom machine hinge.
- Install the new locknut (4) into the bottom screw (3). Do not tighten the new locknut (4) at this point in time.

- Use the 4 mm hex key to tighten the tops screw (5). Do not tighten too much.
- Use the 4 mm hex key and the 10 mm wrench to tighten the bottom screw (3) and the bottom locknut (4). Do not tighten too much.
- Remove the support object from under the build chamber door.
Test and Return to Service
- Carefully swing the build chamber door and do the the steps that follow:
- Listen for squeaks and/or unusual vibration(s).
- Look for components that bind.
- Make sure that you remove all the tools from the build chamber.
- Carefully close the build chamber door and do the the steps that follow:
- Make sure that build chamber door seals onto the machine correctly.
- Make sure the build chamber lock mechanism functions correctly.
- Turn the power ON with the ON/OFF switch found on the rear panel of the machine.
- Release the E-stop button.
- Home XYZ.