Temperature Tab
All of your temperature settings will be controlled here.
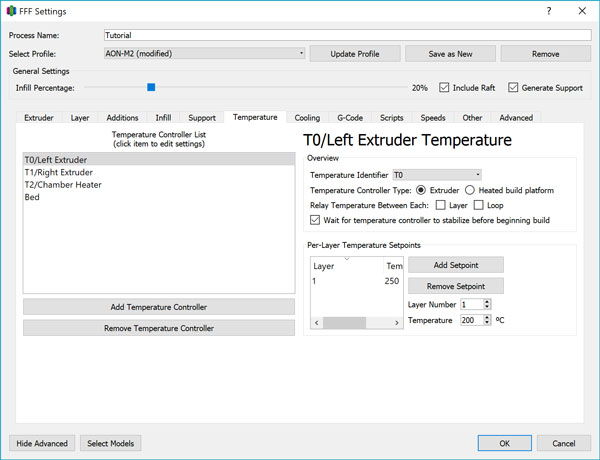
Temperature Controller List
This functions similarly to the Extruder List under the Extruder tab. It should be set up as in the above photo and left unchanged afterwards.
Temperature Identifier
The Temperature Identifier maps the labels in the Temperature Controller List to G-code compatible values the firmware can understand.
- T0/Left Extruder is mapped to T0
- T1/Right Extruder is mapped to T1
- T2/Chamber Heater is mapped to T2
- Bed is mapped to T0
Temperature Controller Type
This also maps the labels in the Temperature Controller List to specific heater types for proper G-code generation.
- T0/Left Extruder is set to Extruder
- T1/Right Extruder is set to Extruder
- T2/Chamber Heater is set to Extruder
- Bed is set to Heated Build Platform
While the chamber heater is not an extruder, Simplify3D® does not offer native support for a heated build chamber and thus a workaround has been implemented at the firmware level.
Relay Temperature
Set both of these checkboxes to off at all times.
Wait for Controller
When activated, this feature will preheat the selected heater at the beginning of a print job and wait until it stabilizes at the target temperature before proceeding with the print.
We recommend the bed and chamber be preheated prior to printing, to ensure thermal equilibrium has been reached. Since this must be done before probing the bed and starting the print, the Wait for Controller setting is not particularly useful. You may want to adjust your workflow such that you manually start preheating while you prepare the G-code for example, and turn this option off such that you do not wait too long before the print job begins.
Temperature Setpoints
For each heater, this box allows you to set the target temperatures. You have the option of specifying different temperatures for different layers. This can be useful in the case of a part geometry which is pointed at the top - normally you may be at risk of overheating the part, but by manually lowering the temperature you have finer control to ensure a clean print.