Level Vacuum Chuck
| Model | [•] AON M2+ (CE) | [•] AON M2+ (R-NZ) | [•] AON M2+ | [ ] AON-M2 2020 | [ ] AON-M2 |
| Category | [ ] Preventive | [•] Corrective |
Summary
The procedure that follows gives the instructions on how to level the vacuum bed found on the AON M2+ (CE), AON M2+ (R-NZ), and AON M2+ that operates on the Marlin-based firmware only.
Estimated time: 20 minutes
To level the vacuum chuck on a machine that operates the Klipper-based firmware, go to Control > Expert and select START and skip to step 3 - Level Vacuum Chuck.
Tools
| Qty | Description | Specification |
|---|---|---|
| 1 | Hex Key | 4 mm |
| 1 | Socket | 13 mm |
| 1 | Socket Wrench | N/A |
| 1 | Torque Wrench | 0-10 N·m Range, Calibrated |
| 1 | Feeler Gauge | 0.003 inch (0.076 mm), Blade-type |
Parts Information
| Qty | Part Number | Description |
|---|---|---|
| 1 | P-0610-024 | PEI Build Sheet |
Reach out to our Customer Success team at help@aon3d.com for genuine AON3D replacement part(s).
Personal Protective Equipment
| Qty | Description | Minimum Specification |
|---|---|---|
| 1 | Safety Eyewear | ANSI/ISEA Z87.1 |
| 1 | Safety Footwear | N/A |
| A/R | Nitrile Gloves | ISO 2859-1 or ASTM D6319 |
Prepare the Machine
Make sure that there are no prints on the build surface. Remove print(s) before the procedure that follows is started. Failure to do so can cause a collision and cause damage to the machine component(s).
- Remove the filament. Refer to the Replace Filament procedure.
- Home XYZ.
- Open the build chamber door.
- Press the E-stop button.
- Wait until the build chamber, build platform and hot ends are at room temperature.
Wait until all the machine components are at room temperature before you continue. Some machine components can be hot if the machine was recently used. Failure to do so can cause injuries.
- Make sure that the feet of the machine are correctly adjusted.
The feet keep the machine level. A machine that is not level can move suddenly on the floor surface and cause injury or damage to machine components. Refer to the Level the Machine procedure.
- Put the PEI build sheet (part #P-0610-024) on the vacuum bed.
- Release the E-Stop button.
- Start the vacuum pump.
- Make sure that the vacuum is stable and that the build sheet is flat.
Leveling the Vacuum Bed
- Home XYZ and press the E-Stop button immediately before the Z-axis end stop engages.
- Type code
M18 XYto release the XY gantry.This command lets you move the XY gantry by hand.
The
M18 XYcommand disables the X and Y gantry stepper motors. Do not home the axes when you do work in the machine as the motors will engage automatically. Failure to do so can cause injuries and/or cause damage to machine components.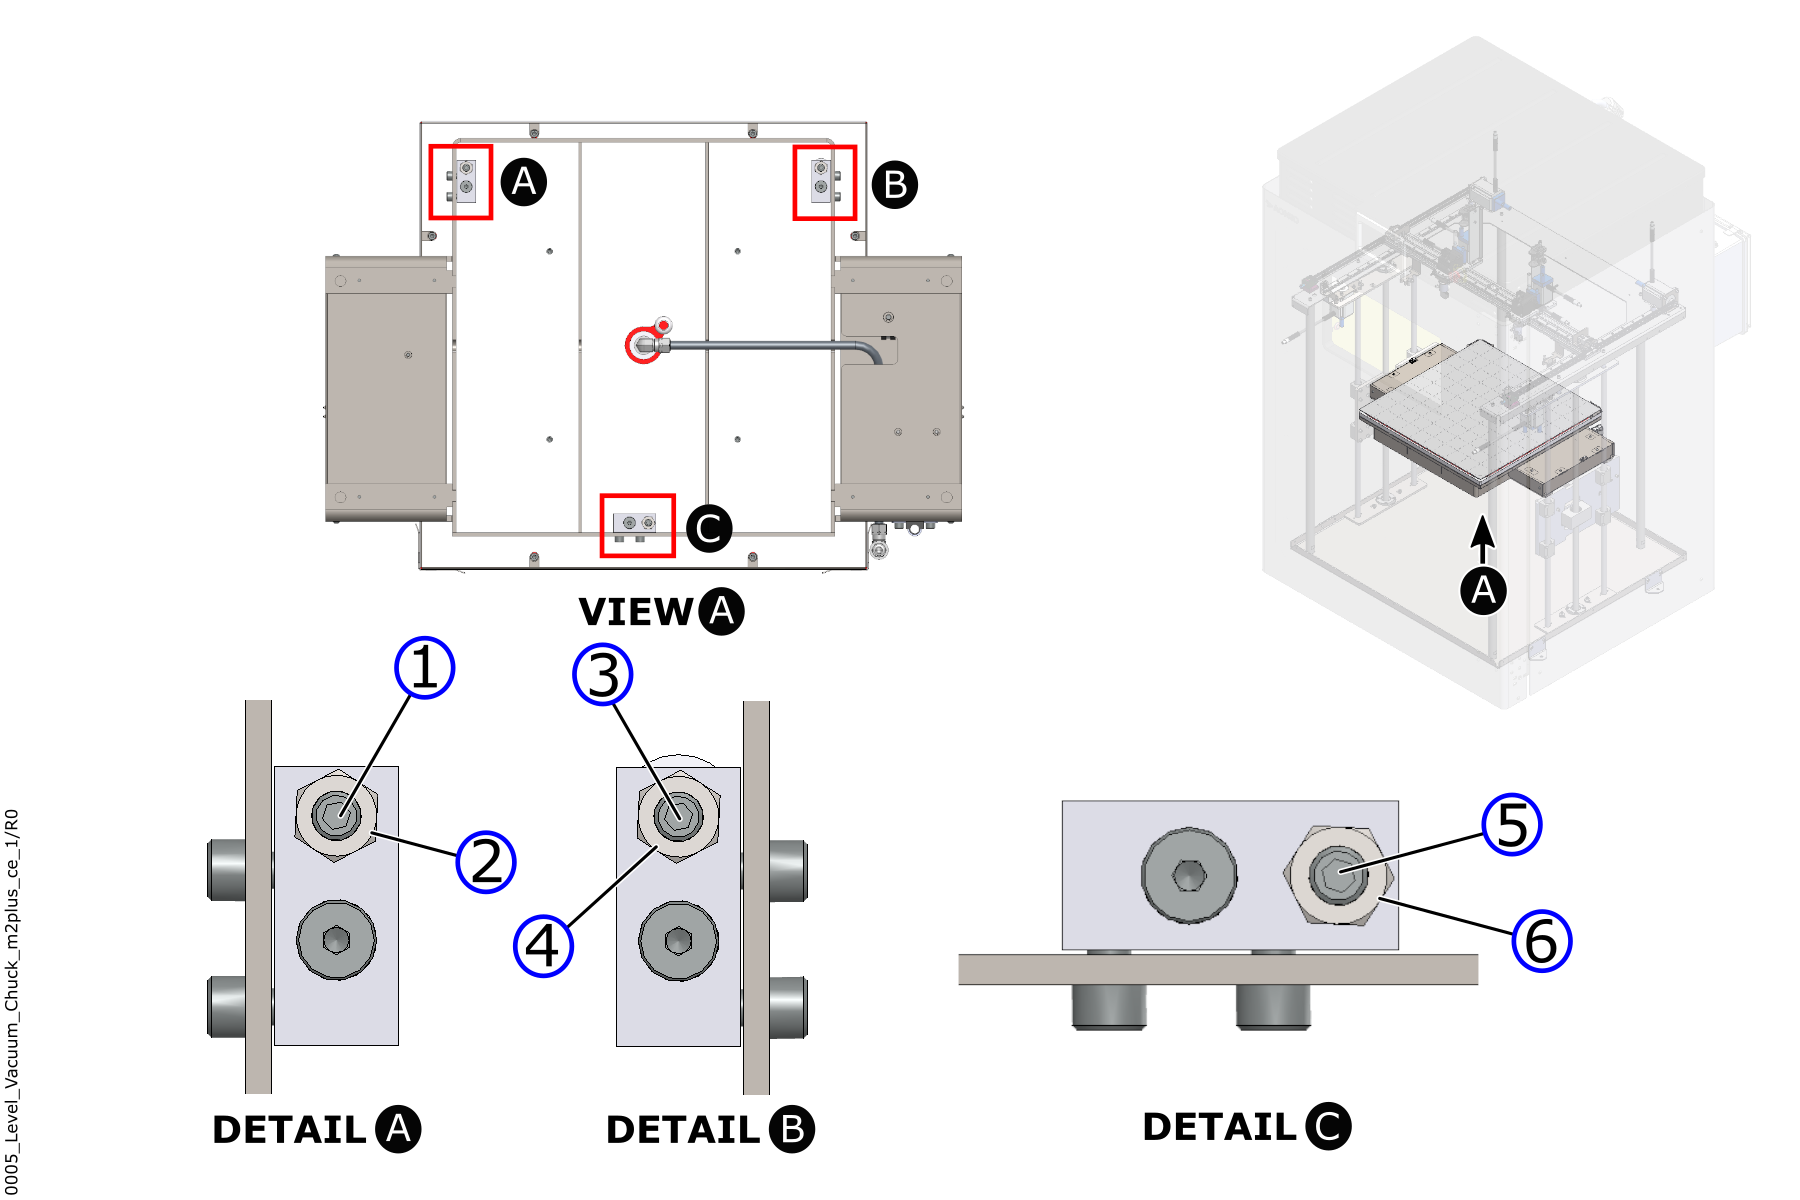
- Move the tool head
T0above the leveling screw (1). - With a 13 mm socket and a socket wrench, loosen the jam nuts (2), (4), and (6).
- With a 4 mm hex key and the leveling screw (1), adjust the height of the build sheet to have a space of about 0.5 mm between the nozzle and the build sheet.
- Do steps 3 to 5 again with the leveling screw (3) and leveling screw (5).
- Move the tool head
T0above the leveling screw (1). - With a 4 mm hex key and a feeler gauge, adjust the leveling screw (1) until there is light force on the feeler gauge.
- Do steps 7 and 8 again with the leveling screw (3) and leveling screw (5).
- Do steps 7 to 9 until the force on the feeler gauge is the same for leveling screws (1), (3), and (5).
- Tighten the jam nuts (2), (4), and (6).
- With a 13 mm socket and a torque wrench, apply a torque of 10 N·m to the jam nuts (2), (4), and (6).
- Do a probing sequence to make sure that the probe grid is less than 0.5 mm.
Test and Return to Service
- Make sure that you remove all the tools from the build chamber.
- Close the build chamber door.
- Home XYZ.