Replace Filament
| Model | [•] AON M2+ (CE) | [•] AON M2+ (R-NZ) | [•] AON M2+ | [•] AON-M2 2020 | [•] AON-M2 |
| Category | [ ] Installation | [•] Operation | [ ] Maintenance |
Summary
The guide that follows gives instructions on how to:
- Understand the difference in temperature requirements for different materials used.
- Understand the importance of heater block assembly selections.
- Unload the filament from the feed path(s).
- Prepare the roll(s) of filament.
- Install the roll(s) of filament on the AON3D machine.
- Load the filament into the feed path(s).
Tools
| Qty | Description | Specification |
|---|---|---|
| 1 | Wire Cutters | N/A |
| 1 | Brush, Wire | Brass, soft bristle |
Parts Information
| Qty | Part Number | Description |
|---|---|---|
| A/R | Filament, Roll of | N/A |
Reach out to our Customer Success team at help@aon3d.com to purchase rolls of filament.
Personal Protective Equipment
| Qty | Description | Minimum Specification |
|---|---|---|
| 1 | Safety Eyewear | ANSI/ISEA Z87.1 |
| A/R | Nitrile Gloves | ISO 2859-1 or ASTM D6319 |
| A/R | Gloves | Work |
Filament Temperature Ranges
There will be a small amount of material in the heater block assembly(ies) when the operator changes filaments. The old material must be purged from the heater block assembly(ies) before the new material can be used.
- To change between materials with small differences in extrusion temperatures, the previous material is purged from the heater block assembly(ies) with the use of the new material.
- To change between materials with great differences in extrusion temperatures, it is necessary to use one or two materials to step up or down to bridge the temperature difference. While this is possible, it is not recommended. AON3D recommends to use of a different hot end assembly if the temperature difference between the two materials is large.
Before materials can be safely changed, make sure that the temperature range of the new material overlaps, or is greater than, the temperature range of the old material.
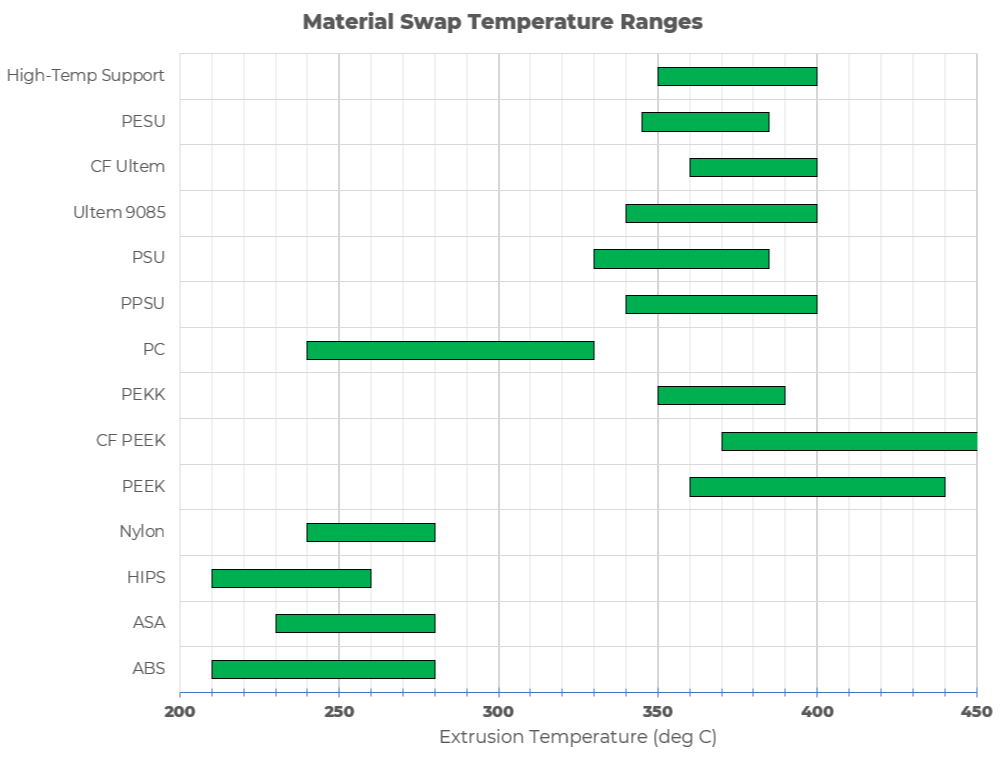
Heater Block Selection
To prevent nozzle clogs, AON3D recommends that one heater block assembly be used for one material temperature range.
-
Example: ABS material recommended nozzle temperatures range between 210°C to 280°C (410°F to 536°F) and Polycarbonate (PC) material is 250°C to 330°C (482°F to 626°F). The same heat block assembly(ies) can be be used for both ABS and PC, but the operator must make sure that the ABS has been completely purged before the PC material can be used.
-
Example: ABS materials recommend a nozzle temperature between 210°C to 280°C (410°F to 536°F) and PEEK materials recommends a nozzle temperature between 360°C to 440°C (680°F to 824°F). The same heater block assembly can be used for ABS and PEEK, but the change in nozzle temperatures are great, and can cause damages to the heater block assembly(ies) over time.
-
Example: ABS 210°C to 280°C (410°F to 536°F) and ASA 230°C to 280°C (446°F to 536°F) can safely use the same heater block assembly.
Reach out to our Customer Success team at help@aon3d.com for genuine AON3D replacement part(s) inquiries.
Unload Filament
All machine components are hot as all heaters are enabled. Persons are to wear the correct personal protective equipment to prevent injuries.
Do the steps that follow to remove the filament from the feed path(s):
- On the Graphical User Interface (GUI), select Control > Motion.
- Under the Jog Distance (mm) tab, select
100. - Select XY ↑ two times to put the X-axis gantry to the front of the build platform.
- Under the Jog Distance (mm) tab, select
- On the GUI, select Temp and enter the target temperature of the filament that will be removed for the selected toolhead.
- Make sure the selected toolhead is at the target temperature.
- Open the build chamber door.
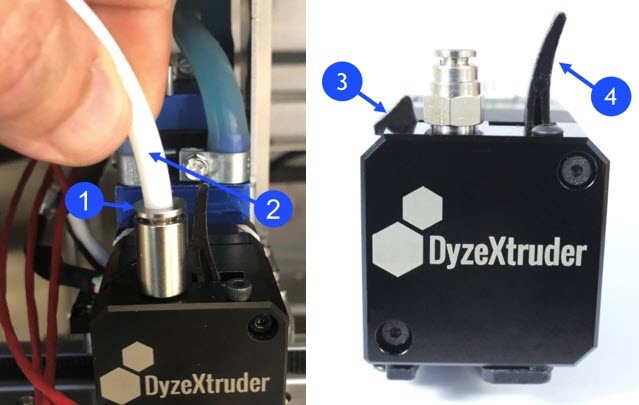
- Disconnect the PTFE tube (2) found in the extruder fitting (1).
- On the selected toolhead, compress the extruder tab (3) and lever (4) together to disengage the internal drive gears.
- Carefully pull the filament out of the selected extruder.
- Use the wire cutters to cut off the melted filament tip. This will help with the removal of the filament through the feed path.
- Close the build chamber door.
- Carefully pull out the filament from the feed path from the the rear of the machine.
- Attach the end of the filament to the spool to prevent tangles, if necessary.
Prepare and Load Filament
Refer to the Load Filament procedure.
All machine components are hot as all heaters are enabled. Persons are to wear the correct personal protective equipment to prevent injuries.
• Do not leave toolhead temperature power ON for more than 30 minutes. This can cause the filament to burn and clog the nozzle.
• Do not surpass the temperature above the maximum temperature for the selected filament. This can cause the filament to break down and/or burn and clog the nozzle.
• When a change is made to a material that needs a greater temperature than the previous material that was used, increase the selected toolhead target temperature to the minimum temperature needed for the new material.
• Unless it is outside the recommended temperature range for the new material that is installed, do not change the extrusion temperature.
• Carbon fiber, and other filled materials, can need more than 200 mm of filament to be fully purged from the heater block assembly(ies). Extrude an additional 100 mm material, if necessary. The additional 100 mm should be sufficient to purge the old material from the heater block assembly(ies). Purge additional material, if necessary.