Other Tab
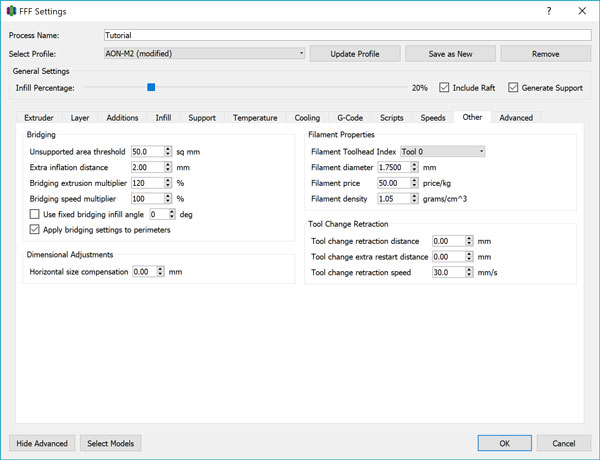
Bridging
In reference to the act of “bridging a gap”, bridging refers to a scenario where material must be deposited across an unsupported gap which generally would call for support structures to be placed.
We recommend the use of supports whenever possible, but there are some instances where this is not always possible. When supports are used, bridging settings are still applied to the area printed on to the support. The following settings allow you to fine tune bridging behavior for printing both with and without support.
Unsupported Area Threshold
This is the detection limit for what Simplify3D® will recognize as a bridging situation. Below this value in mm^2^, Simplify3D® will behave as if there is no gap at all since the size is so small. Above this value, special bridging behavior will be applied.
This value should be tuned on a case-by-case basis depending on the geometry.
Extra Inflation Distance
The extra inflation distance extends the boundaries of the gap recognized by Simplify3D. For true bridging, this value should be set to a minimum of 2mm. A value equal to one Extrusion Width is sufficient for printing on support.
Bridging Extrusion Multiplier
This value overrides the Extrusion Multiplier value in the Extruder tab only during bridging movements. The ideal value here depends on the material used and the size of the gap. When printing on supports, a value of 100% is generally sufficient. Higher values will increase model adhesion to support, while lower values will decrease adhesion.
Bridging Speed Multiplier
This value overrides the Default Printing Speed under the Speeds tab only during bridging movements. The ideal value here depends on the material used and the size of the gap. When printing on supports, it is better to print slowly, to help the model material adhere properly to the support. Use the Default Print Speed to calculate a value that will give you a print speed <20mm/s.
Use Fixed Bridging Angle
By default, Simplify3D® will attempt to bridge a gap using the shortest point-to-point extrusion distance. Depending on the orientation of the model on the build plate, you may want to override this behavior using this feature.
Apply Bridging to Perimeters
By default, the bridging overrides are only applied to the “infill” section of the toolpath. Enabling this option applies the overrides to the perimeter as well. This is advised when printing on supports.
Horizontal Size Compensation
All plastics shrink when cooled from the molten to solid state. The extent to which this happens varies by material, and the Horizontal Size Compensation offers a way to ensure your part tolerances remain within specifications.
Imagine a donut-shaped sponge for a moment if you will. When the sponge soaks up water, it will expand in such a way that the outer diameter (OD) will increase and inner diameter (ID) will decrease. If the sponge is dried out, the OD will decrease and ID will increase.
Similarly, a positive horizontal compensation value is similar to wetting the metaphorical donut sponge, and a negative compensation value is similar to drying it out.
Generally, internal hole features tend to come out smaller than intended so we recommend that the original model incorporate tolerances as appropriate.
Filament Properties
In the G-code preview tab, estimates are given for material usage and the corresponding material cost. You can adjust the values here to make those estimates more accurate.
Tool Change Retraction
Tool changes for the AON-M2 are handled by the firmware. The Tool Change Retraction Distance and Tool Change Extra Restart Distance should always be set to 0 to avoid issues.