Clean and Lubricate Z-Axis
| Model | [ ] AON M2+ (CE) | [ ] AON M2+ (R-NZ) | [ ] AON M2+ | [•] AON-M2 2020 | [•] AON-M2 |
| Category | [•] Preventive | [ ] Corrective | |||
| Frequency | [ ] Daily | [ ] Weekly | [•] Monthly | [ ] Yearly | [ ] As Needed |
For instructions on how to clean and lubricate the AON M2+ (CE), AON M2+ (R-NZ) and AON M2+ Z-axis linear components, refer to the Clean and Lubricate Z-Axis (M2+) procedure.
Summary
The procedure that follows gives instructions on how to clean and lubricate the Z-axis machine components found on the AON-M2 and AON-M2 2020 machines.
Estimated time: 60 minutes
Correctly lubricated Z-axis machine components will prevent:
- Friction between motion components.
- Contamination and/or debris on the Z-axis lead screws, rods, and/or lead nuts.
- Loud squeaks and vibration while Z-axis is in motion.
- Unsatisfactory print layers.
Tools
| Qty | Description | Specification |
|---|---|---|
| 1 | Wide Flexible Scrub Brush | N/A |
| 1 | Brass Brush | N/A |
| 1 | Applicator Brush | N/A |
| A/R | Degreaser | Spray Nine® |
| A/R | Rags | Lint-free |
| A/R | Isopropyl Alcohol | 99% |
Parts Information
| Qty | Part Number | Description |
|---|---|---|
| 1 | C-000745 | SuperLube Silicone Lubricating Grease with Syncolon® (PTFE) 400g/14.1oz |
| 1 | K-0999-015 | Z-Axis Lubricant Field Kit |
A Z-Axis Lubricant Field Kit (SKU K-0999-015) is available to purchase. This kit contains the AON3D-approved lubricant and brushes needed to maintain the lead screws. Reach out to our Customer Success team at help@aon3d.com to purchase the a Z-Axis Lubricant Field Kit.
Personal Protective Equipment
| Qty | Description | Minimum Specification |
|---|---|---|
| 1 | Safety Eyewear | ANSI/ISEA Z87.1 |
| A/R | Nitrile Gloves | ISO 2859-1 or ASTM D6319 |
| A/R | Face Mask | Respiratory |
Prepare the Machine
Make sure that there are no prints on the build surface. Remove print(s) before the procedure that follows is started. Failure to do so can cause a collision and cause damage to the machine component(s).
- Home XYZ.
- Push the E-stop button.
- Wait until the build chamber, build platform and hot ends are at room temperature.
Identify Linear Bushings
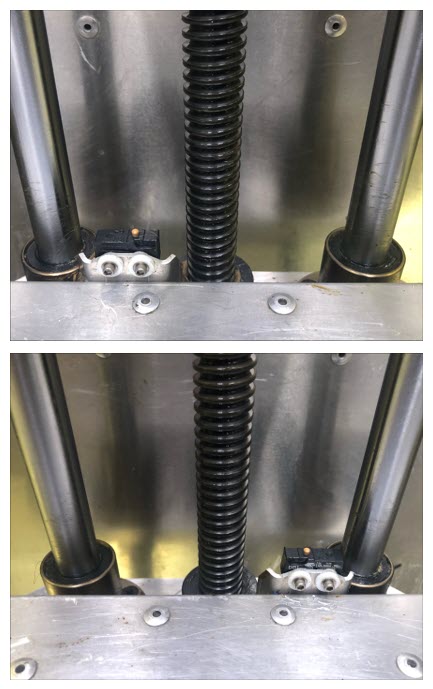
Machines shipped after November 2020 are equipped with greaseless linear bushings.
- Identify if the machine has greased or greaseless linear bushings installed.
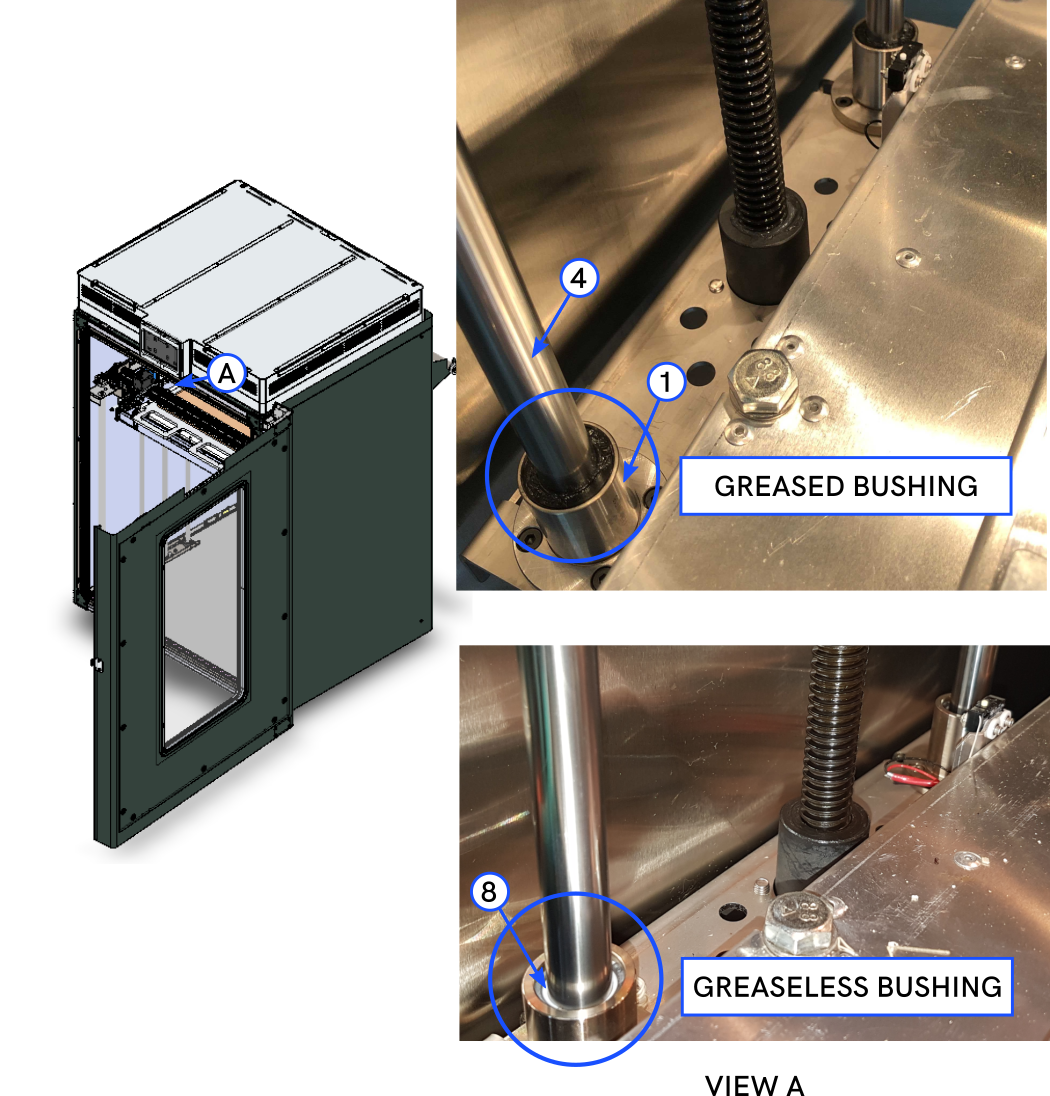
The greaseless linear bushings are identified by the white inner ring (8).
Clean Z-Axis Components
Clean the Bottom of the Z-Axis Linear Components
Wait until all machine components are at room temperature before you continue. Some machine components can be hot if the machine was recently used. Failure to do so can cause injuries.
For machines with greased Z-axis linear bushings, do the steps that follow:
- Open build chamber door.
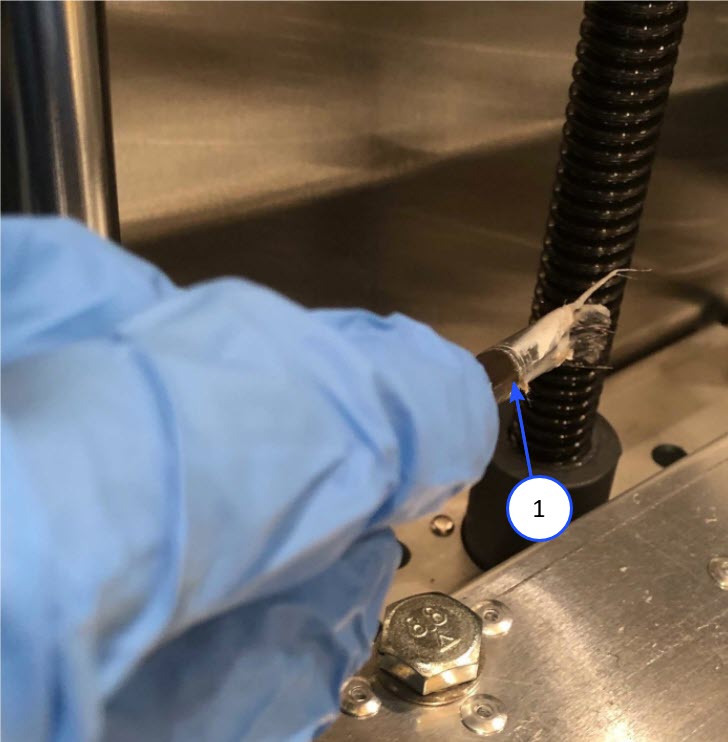
- Apply the Spray Nine® degreaser on the bottom side of the components that follow:
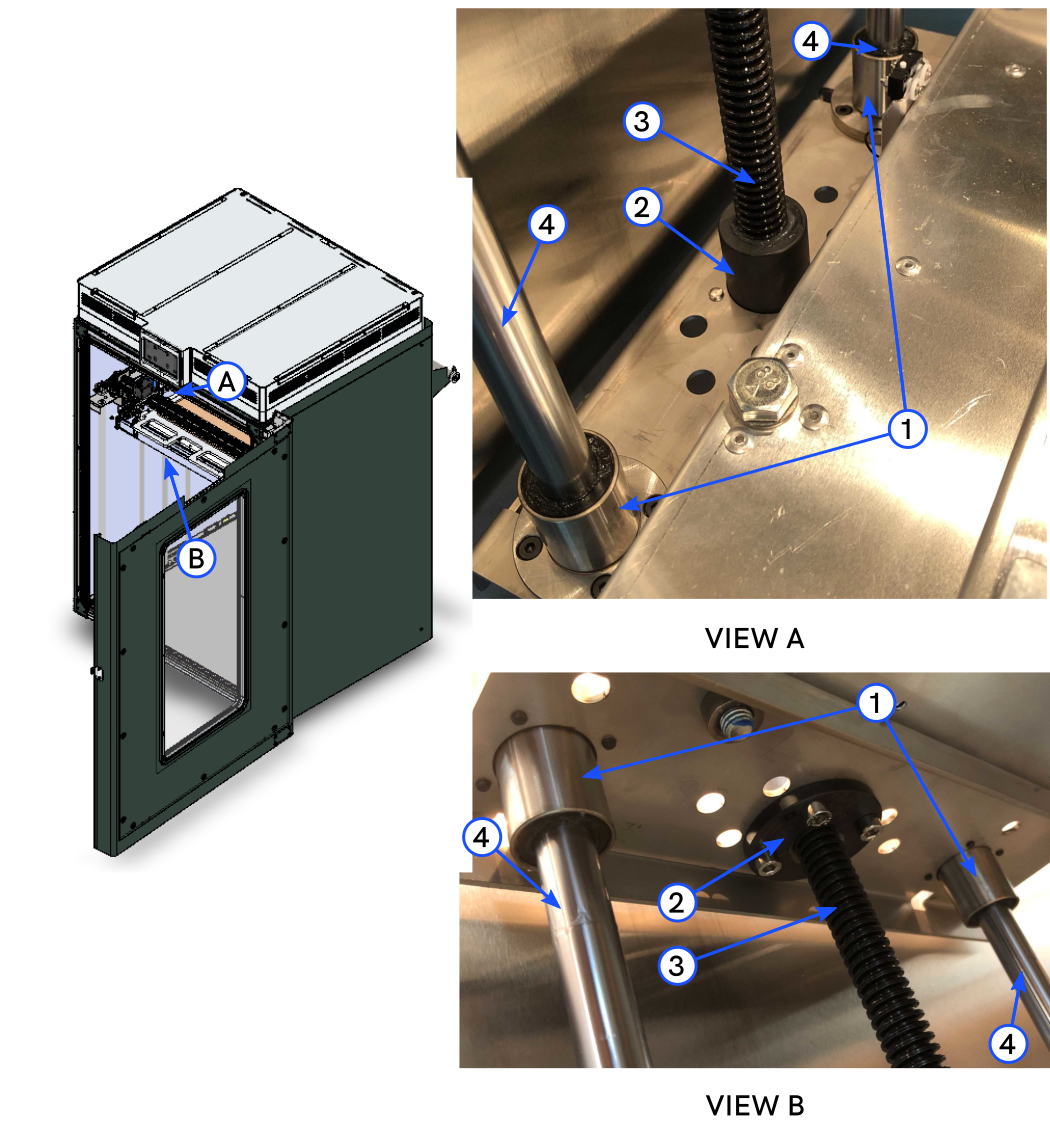
- Four greased linear bushings (1)
- Two lead nuts (2)
- Two lead screws (3)
- Four linear shafts (4).
- Let the Spray Nine® degreaser soak for 10 minutes.
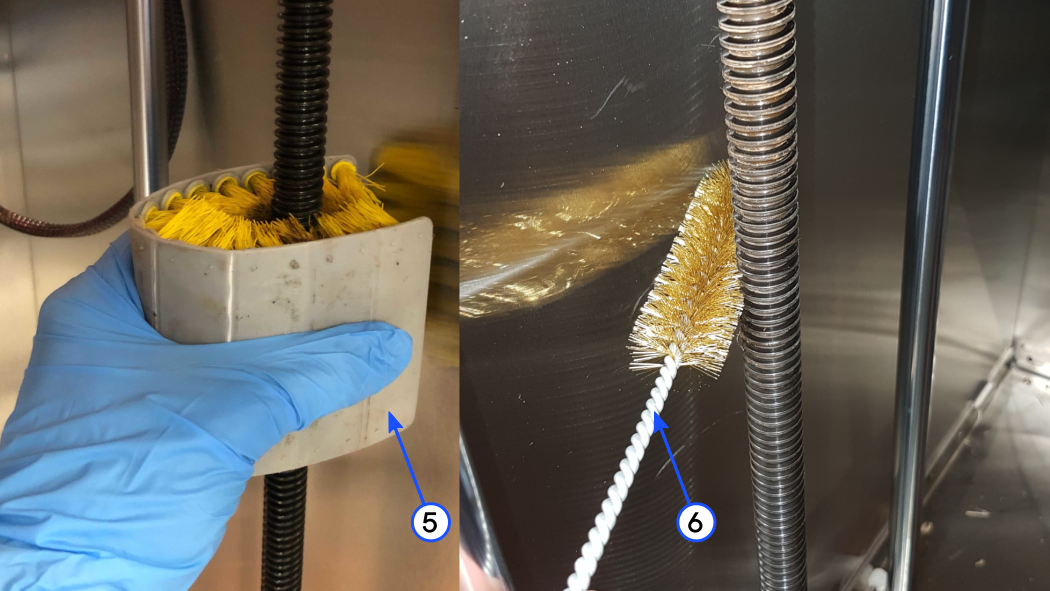
- Remove the grease and unwanted contamination with the tools that follow:
- Flexible scrub brush (5)
- Brass brush (6)
- Clean lint-free rag(s)
- Isopropyl alcohol.
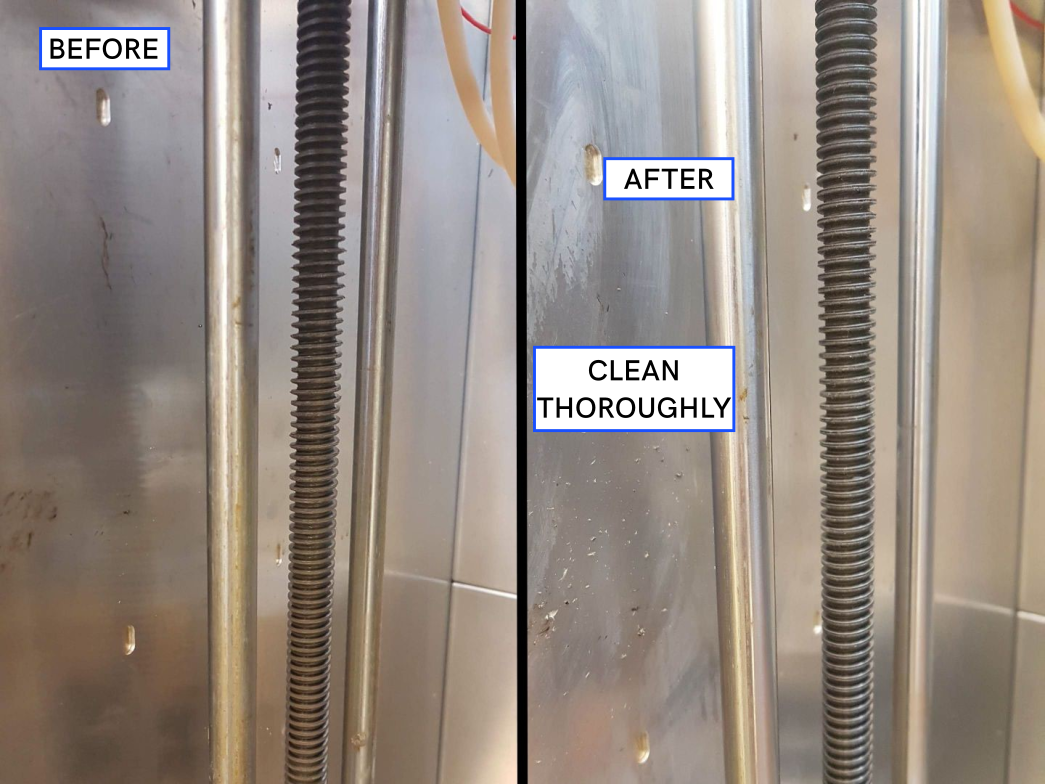
- Do steps 2 to 4 until all components are clean.
- Release the E-stop button.
- Home XYZ.
- Lower the Z-axis to the bottom of the build chamber.
- Raise the Z-axis by 150 mm.
- Push the E-stop button.
For machines with greaseless Z-axis linear bushings, do the steps that follow:
- Open build chamber door.
- Apply the Spray Nine® degreaser on the bottom side of the components that follow:
- Two lead nuts (2)
- Two lead screws (3).
- Let the Spray Nine® degreaser soak for 10 minutes.
- Remove the grease and unwanted contamination with the tools that follow:
- Flexible scrub brush (5)
- Brass brush (6)
- Clean lint-free rag(s)
- Isopropyl alcohol.
- Apply the isopropyl alcohol on the bottom side of the components that follow:
- Four greaseless linear bushings (1). Do not use degreaser.
- Use clean lint-free rag(s) to remove the contaminants from the four greaseless linear bushings (1).
- Do steps 2 to 5 until the two lead nuts (2) and the two lead screws (3) are clean.
- Release the E-stop button.
- Home XYZ.
- Lower the Z-axis to the bottom of the build chamber.
- Raise the Z-axis by 150 mm.
- Push the E-stop button.
Clean the Top of the Z-Axis Linear Components
For machines with greased Z-axis linear bushings, do the steps that follow:
- Apply the Spray Nine® degreaser on the top side of the components that follow:
- Four greased linear bushings (1)
- Two lead nuts (2)
- Two lead screws (3)
- Four linear shafts (4).
- Let the Spray Nine® degreaser soak for 10 minutes.
- Remove the grease and unwanted contamination with the tools that follow:
- Flexible scrub brush (5)
- Brass brush (6)
- Clean lint-free rag(s)
- Isopropyl alcohol.
- Do steps 1 to 3 until all components are clean.
For machines with greaseless Z-axis linear bushings, do the steps that follow:
- Apply the Spray Nine® degreaser along the full length of the components that follow:
- Two lead nuts (2)
- Two lead screws (3).
- Let the Spray Nine® degreaser soak for 10 minutes.
- Remove the grease and unwanted contamination with the tools that follow:
- Flexible scrub brush (5)
- Brass brush (6)
- Clean lint-free rag(s)
- Isopropyl alcohol.
- Apply the isopropyl alcohol on the full length of the components that follow:
- Four greaseless linear bushings (1). Do not use degreaser.
- Four linear shafts (4). Do not use degreaser.
- Use clean lint-free rag(s) to remove all the unwanted contamination from the components that follow:
- Four greaseless linear bushings (1)
- Four linear shafts (4).
- Do steps 1 to 5 until all components are clean.
Lubricate the Z-Axis Components
Only use SuperLube Silicone Lubricating Grease with Syncolon® (PTFE) grease on the Z-axis lead screws and lead nuts. The only lubricant approved by AON3D for the Z-axis greased motion components is SuperLube Silicone Lubricating Grease with Syncolon® (PTFE) grease. The use of non-approved lubricants can cause the Z-axis to bind, squeak, and/or vibrate. Non-approved lubricants can effect print quality.
Do not apply lubricants to greaseless Z-axis linear components. Greaseless Z-axis linear bushings must operate dry. If the machine has four greaseless linear bushings, do not apply lubricants to the four linear shafts (4).
Do not operate the machine when the lead screws, lead nuts, and/or greased linear bushings are not lubricated.
For machines with greased Z-axis linear bushings, do the steps that follow:
- Use the applicator brush to apply a thin layer of SuperLube Silicone Lubricating grease along the full length of the components that follow:
- Two lead screws (3)
- Four linear shafts (4).
- Release the E-stop button.
- Home XYZ.
- Lower the Z-axis to the bottom of the build chamber.
- Raise the Z-axis by 150 mm.
- Push the E-stop button.
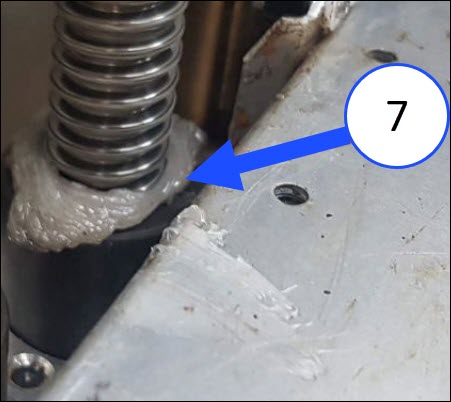
- If there is too much SuperLube Silicone Lubricating grease found at the top and/or at the bottom of the four greased linear bushings (1) and the two lead nuts (2), remove the SuperLube Silicone Lubricating grease with a clean lint-free rag. Do not use isopropyl alcohol to remove the grease.
- Inspect the greased components and make sure there is a thin layer of grease where necessary.
- Use the applicator brush to apply a thin layer of grease along the full length of the two lead screws (3) and four linear shafts (4), if necessary.
- Use the applicator brush to apply a thin layer of grease along the full length of the two lead screws (3) and four linear shafts (4), if necessary.
- Release the E-stop button.
- Home XYZ.
- Do steps 1 to 10, as necessary.
For machines with greaseless Z-axis linear bushings, do the steps that follow:
- Use the applicator brush to apply a thin layer of SuperLube Silicone Lubricating grease along the full length of the two lead screws (3) only.
- Release the E-stop button.
- Home XYZ.
- Lower the Z-axis to the bottom of the build chamber.
- Raise the Z-axis by 150 mm.
- Push the E-stop button.
- If there is too much grease found at the top and at the bottom of the the two lead nuts (2), remove the grease with a clean lint-free rag. Do not use the isopropyl alcohol to remove the grease.
- Inspect the greased components and make sure that there is a thin layer of SuperLube Silicone Lubricating grease where necessary.
- Use the applicator brush to apply a thin layer of SuperLube Silicone Lubricating grease along the full length of two lead screws (3), if necessary.
- Release the E-stop button.
- Home XYZ.
- Do steps 1 to 10, as necessary.
Test and Return to Service
- Make sure that you remove all the tools from the build chamber.
- Close build chamber door.
- Release the E-stop button.
- Home XYZ.
- Clean the build platform and build chamber, if necessary. Refer to the Clean Build Platform and Build Chamber procedure.